
404 pages are a great way to inform your web users that you have broke your server or that they are too stupid to type in the correct URL. 404 pages in general should be used to signify that the URL used links to no document. Additionally on your 404 page you should have some form of navigation to allow the user to navigate back to your site content. Another good thing to have on your 404 page is some form of logging. If you log the 404 page visits you can see what pages people are trying to view on your site and allow you to fix the cause of the problem. It could be a simple broken link, or misspelled URL allowing you to fix the link or rename the hard to spell URL to a simpler one.
[embedyt] http://www.youtube.com/watch?v=5POQvIg1JzA[/embedyt]
In our 404 page we’re going to add an HTML canvas that will allow the user to change how the 404 appears. Using JavaScript and an HTML canvas we can change the size, colour, shape, gradient, stroke and background for our 404 error message.
Creating The HTML page
To start the error page we first need an html page with a canvas element.
|
1 2 3 4 5 6 7 8 9 10 11 12 13 14 15 16 17 |
<DOCTYPE html> <head> <title>404 - Not Found</title> </head> <style> body { margin:0px; } #cv { position: absolute; background-color: #AAA } </style> <body> <canvas id="cv" width="1000" height="1000"></canvas> </body> </html> |
Now we have the base for our 404 page we can start adding the JavaScript to control the canvas.
|
1 2 3 4 |
<script language="JavaScript"> var c = document.getElementById("cv"); var ctx = c.getContext("2d"); </script> |
The above code should be placed before the </body> tag so it will be loaded after all the other HTML elements have loaded. This JavaScript creates 2 new variables, c for the canvas and ctx for the context of the canvas. The context is what we will be making our JavaScript changes to.
Adding our 404 Characters
As we are making a 404 page we now need to define two 4’s and a 0 that we can use to signify the position of each block that makes up the 404. Below I have 3 arrays, one for each character of the 404.
|
1 2 3 |
var four = [[2,0],[1,1],[0,2],[1,2],[2,2],[3,2],[2,3],[2,1]]; var zero = [[6,0],[5,1],[5,2],[6,3],[7,2],[7,1]]; var four2 =[[11,0],[10,1],[9,2],[10,2],[11,2],[12,2],[11,3],[11,1]]; |
I could have used just one array for both of the 4s but having two means less code.
Now we have our 404 defined we need a function to draw the 404 on the canvas. Our first function will call the draw function for each of the characters.
|
1 2 3 4 5 |
function drawFOF(xpos,ypos){ drawArray(ctx,four, xpos,ypos); drawArray(ctx,zero, xpos,ypos); drawArray(ctx,four2, xpos,ypos); } |
Our second function will draw a single character.
|
1 2 3 4 5 6 7 8 9 10 11 12 13 14 15 16 17 18 19 20 21 22 23 24 25 26 27 28 29 30 31 32 33 34 35 36 37 38 39 |
function drawArray(ctx,array, xpos,ypos){ var wid = window.innerWidth; var hei = window.innerHeight; ctx.save(); array.forEach(function(item,index){ // pos x (based on x pos of size control) var x = (xpos+((item[0] -7.5) * ((sizeCircle.posx / wid) * 40))); // posy (based on x pos of size control) var y = (ypos+((item[1] -2)* ((sizeCircle.posx / wid) * 40))); // width (based on y pos of size control) var w = ((sizeCircle.posx / wid ) * (40 * (sizeCircle.posy / hei ))); // height ( based on y pos of size control) var h = ((sizeCircle.posx / wid) * (40 * (sizeCircle.posy / hei ))); // shadow var sx = ((shadowCircle.posx / wid) * 20) -10; var sy = ((shadowCircle.posy / hei) * 20) -10; ctx.beginPath(); // manual shadow (canvas shadow is extremely slow) ctx.fillStyle=hslToRgb((shadowColourCircle.posx / wid),1-(shadowColourCircle.posy / hei)); ctx.fillRect(x+sx,y+sy,w,h); // do stroke ctx.strokeStyle=hslToRgb((strokeColourCircle.posx / wid),1-(strokeColourCircle.posy / hei)); ctx.lineWidth=(strokeCircle.posx / wid) * 10; ctx.rect(x,y,w,h); // Create gradient var grd=ctx.createLinearGradient(x,y,x,y+h); grd.addColorStop(0,hslToRgb((fillTopColourCircle.posx / wid),1-(fillTopColourCircle.posy / hei))); grd.addColorStop(1,hslToRgb((fillbottomColourCircle.posx / wid),1-(fillbottomColourCircle.posy / hei))); ctx.fillStyle=grd; ctx.fillRect(x,y,w,h); ctx.stroke(); }); ctx.restore(); } |
The drawArray function takes the canvas context to draw on, the array of points for the character, the horizontal position and the vertical position as arguments. It then loops through each point. Each point is then drawn to the context using ctx.fillRect for the shadow rectangle, ctx.stroke for the border and ctx.fillRect using the fillStyle grd for the gradient.
Adding Our Controls
The sizeCircle, shadowCircle, fillTopColourCircle etc are the objects we will be using to control the different aspects of the characters. Let’s add them now.
Add the following code to define the control objects:
|
1 2 3 4 5 6 7 8 9 |
var sizeCircle = {posx:500, posy:200, radius:10, text:"Size"}; var strokeCircle = {posx:250, posy:150, radius:10, text:"Stroke Width"}; var strokeColourCircle = {posx:10, posy:80, radius:10, text:"Stroke Colour"}; var fillTopColourCircle= {posx:500, posy:50, radius:10, text:"Top Colour"}; var fillbottomColourCircle= {posx:900, posy:100, radius:10, text:"Bottom Colour"}; var shadowColourCircle= {posx:100, posy:110, radius:10, text:"Shadow Colour"}; var shadowCircle= {posx:130, posy:160, radius:10, text:"Shadow"}; var windCircle= {posx:20, posy:100, radius:10, text:"Wind Direction"}; var backgroundCircle= {posx:20, posy:150, radius:10, text:"Background"}; |
This code defines each of the controls we will be using. The contain the x and y position, their radius (as they will be circles) and their text.
We now need to be able to draw them on the canvas. We will use a function to allow us to draw a single control. The code is below:
|
1 2 3 4 5 6 7 8 9 10 11 12 13 14 15 16 17 18 19 20 21 |
function drawSingleControl(ctx, object){ ctx.beginPath(); ctx.arc(object.posx,object.posy,object.radius,0,2*Math.PI); if(object.text == 'Stroke Colour' || object.text == 'Top Colour' || object.text == 'Bottom Colour' || object.text == 'Shadow Colour' ){ var hue = (object.posx / window.innerWidth); var sat = 1- (object.posy / window.innerHeight); ctx.fillStyle=hslToRgb(hue,sat); }else{ ctx.fillStyle='red'; } ctx.fill(); ctx.lineWidth = "2"; ctx.strokeStyle='black'; ctx.stroke(); ctx.fillStyle='black'; ctx.font="10px Arial"; ctx.fillText(object.text,object.posx+(object.radius * 1.2),object.posy+3); } |
This function takes the canvas context and an object as its arguments. The object is one of the controls we defined earlier. This function just draws the control to the canvas using the ctx.arc function and adds text to the right of the control. The ctx.arc function takes 5 arguments. The x and y position of the circle, the size of the circle, the start of the arc and the end of the arc. Using 0 and 1*Math.PI for the start and end of the arc would create a semi-circle.
Now we can draw a single control, let’s add a function to draw all controls so we don’t have to type out a function call each time we want to show a control. To do this we will put all the objects into an array like so:
|
1 2 3 4 5 6 7 8 9 10 11 |
var sphereControls = [ sizeCircle ,strokeCircle ,strokeColourCircle ,fillTopColourCircle ,fillbottomColourCircle ,shadowColourCircle ,shadowCircle ,windCircle ,backgroundCircle ]; |
Now we create a function to loop through that array calling the draw controls function we just made.
|
1 2 3 4 5 |
function drawControls(controls){ controls.forEach(function(item,index){ drawSingleControl(ctx,item); }); } |
Our code up to now doesn’t do much when you run it. This is because we haven’t told it to render and we’re still missing a function to convert our controls position to an RGB colour. So let’s get this done so we can see some changes to our HTML page.
Additional functions and Rendering
Let’s add the control position to colour function first. The function is converted from an hsltoRgb function I found online at http://stackoverflow.com/questions/2353211/hsl-to-rgb-color-conversion.
It has been converted from a 0-255 scaled RGB to a hex string. This allows use to convert control positions to colour values the browser/canvas will understand.
|
1 2 3 4 5 6 7 8 9 10 11 12 13 14 15 16 17 18 19 20 21 22 23 24 25 26 27 28 29 30 31 32 33 34 35 36 37 |
function hslToRgb(h,l){ s = 1; if(l < 0) l=0; if(l > 1) l = 1; var r, g, b; if(s == 0){ r = g = b = l; // achromatic }else{ var hue2rgb = function hue2rgb(p, q, t){ if(t < 0) t += 1; if(t > 1) t -= 1; if(t < 1/6) return p + (q - p) * 6 * t; if(t < 1/2) return q; if(t < 2/3) return p + (q - p) * (2/3 - t) * 6; return p; } var q = l < 0.5 ? l * (1 + s) : l + s - l * s; var p = 2 * l - q; r = hue2rgb(p, q, h + 1/3); g = hue2rgb(p, q, h); b = hue2rgb(p, q, h - 1/3); } ro = Math.round(r * 255).toString(16); go = Math.round(g * 255).toString(16); bo = Math.round(b * 255).toString(16); // add preceeding 0 for single digit values if(ro.length < 2) ro = '0'+ro; if(go.length < 2) go = '0'+go; if(bo.length < 2) bo = '0'+bo; return '#'+ro+go+bo; } |
Now we need to render everything. So let’s make a function.
|
1 2 3 4 5 6 7 |
function render(){ drawFOF((window.innerWidth/2),(window.innerHeight/2)); drawControls(sphereControls); requestAnimationFrame(render); } render(); |
Here will define our function that will render our 404 characters using screen width /2 and screen height /2 to position them in the middle, render our controls and requestAnimationFrame(render). The requestAnimationFrame function is used to tell the browser that the canvas is ready to draw itself and would like to be drawn when the browser is capable. The requestAnimationFrame function takes a function as an argument and this function must contain the requestAnimationFrame function to create a loop. It is possible to draw to the canvas using setInterval but this will create sync issues with refresh rates whereas requestAniamtionFrame will always try to refresh at a rate that syncs.
Now we can save our page and run it. It will show a 1000×1000 canvas with our 404 and controls inside. The display of controls might look misshapen depending on the screen resolution you are using. We will fix hat issue now by adding some code to resize the canvas to fill the browser and while we’re here empty the screen ready for the next render.
|
1 2 3 4 5 6 7 |
function clearScreen(){ c.width = window.innerWidth; c.height = window.innerHeight; ctx.clearRect(0, 0, c.width, c.height); ctx.width = window.innerWidth; ctx.height = window.innerHeight; } |
Above is the clearScreen function which sets the canvas to fill the browser window and then empties the canvas using the clearRect function. Add clearScreen() as the first item in the render function as shown below:
|
1 2 3 4 5 6 7 8 |
function render(){ clearScreen(); drawFOF((window.innerWidth/2),(window.innerHeight/2)); drawControls(sphereControls); requestAnimationFrame(render); } |
Part 1 Check
Your code should be similar to the following file html-p1
Events and Mouse Control
Now we have rendered our 404 and our controls its time to allow the user to move the controls. To do that we will need 4 variables to store mx, my, down and attached. mx is the mouse x position, my is the mouse y position, down is whether the mouse button is down and finally attached is the control object that is currently attached to the mouse.
|
1 2 3 4 5 |
var mdown = false; var attached = false; var mx =0; var my = 0; |
Add the variables near the top of the script with your other vars.
Now we have the variables we need to add event listeners for the mouse events.
|
1 2 3 4 5 6 7 8 9 10 11 12 13 14 15 |
if (document.addEventListener) { document.addEventListener("mousemove", getMouseXY); document.addEventListener("mousedown", function(){mdown = true}); document.addEventListener("mouseup", function(){ mdown = false; // MOUSE DOWN FLAG attached = false; // ATTACHED CONTROL FLAG }); } else if (document.attachEvent) { document.attachEvent("mousemove", getMouseXY); document.attachEvent("mousedown", function(){mdown = true}); document.attachEvent("mouseup", function(){ mdown = false; // MOUSE DOWN FLAG attached = false; // ATTACHED CONTROL FLAG }); } |
Here we have an if conditional that tries to add an event listener if that fails it tries to attach an event listener. This is to allow older browsers which don’t support the addEventListener to still have event listeners. The above listeners just set flags expect the mousemove listener which calls a separate function to get the x and y pos of the mouse. The getMouseXY function code is below:
|
1 2 3 4 5 6 7 8 9 10 11 12 13 14 15 16 17 18 19 |
var tempX = 10 var tempY = 10 var IE = document.all?true:false function getMouseXY(e) { if (IE) { tempX = event.clientX + document.body.scrollLeft tempY = event.clientY + document.body.scrollTop } else { tempX = e.pageX tempY = e.pageY } if (tempX < 0){tempX = 0} if (tempY < 0){tempY = 0} mx = tempX; my = tempY; return true } |
We can now react to events created by the mouse but we still need to react to clicks on the controls. To do that we will update our render function to monitor our variables we create earlier. Our render code should be changed to:
|
1 2 3 4 5 6 7 8 9 10 11 12 13 14 15 16 17 18 19 20 |
function render(){ clearScreen(); drawFOF((window.innerWidth/2),(window.innerHeight/2)); drawControls(sphereControls); if(attached == false){ if(mdown && (current = hoveredControl(mx, my))){ attached = current; current.posx = mx; current.posy = my; attached = current; } }else{ attached.posx = mx; attached.posy = my; } requestAnimationFrame(render); } |
We also need to add a function to see if the mouse position is over a control. We do that with the following code:
|
1 2 3 4 5 6 7 8 9 10 11 12 |
function hoveredControl(posx, posy){ var current = false; // no control sphereControls.forEach(function(item,index){ if(posx > (item.posx - item.radius) && posx < (item.posx + item.radius) && posy > (item.posy - item.radius) && posy < (item.posy + item.radius)){ current = item; } }); return current; } |
This function loops through each control and checks if the mouse x and mouse y falls inside a control’s position.
Each frame we are now checking to see if we have an attached control. If we do not we check to see if the mouse button is down and if the mouse pointer is over a control with the hoveredControl function. If the mouse button is down and the hoveredControl function returns a control then we are trying to move the control so we set the attached variable to the control object and update the control’s position to the mouse x/y. The next rendered frame will have an object in the attached var so will skip this block and only update the positions x/y.
Part 2 Check
You can now save your code and test it in a browser. You should be able to move the controls with the mouse and the 404 characters should change accordingly. If you are getting any errors or it is not responding verify your code matches this file html-p2
Some controls still do nothing such as wind direction and background.
The background
The background is made up of 3 different background types with a 4th blank background. The first background we will look at is the starfield background type.
Starfield
The starfield background is a background which tries to imitate flying through space with stars getting closer to the user. This is achieved by creating stars at the center of the screen and they move outward towards the edges getting bigger as they get closer to the edge.
Our first step is to create an array to store each star that is created. While we’re here we may as well add the arrays for the rain and for the bubble clouds.
|
1 2 3 |
var stars = []; var drops = []; var clouds = []; |
We will need a function to create a star which we will call each render frame. This would create a star each frame unless we limit the amount of stars per second. We will do that by using the Math.random function and only adding a star each 10% of the time.
|
1 2 3 4 5 6 7 8 9 10 11 |
function addStar(){ if(Math.random() * 100 > 90){ var w = window.innerWidth; var h = window.innerHeight; var vx = (Math.random() * 2) - 1; //( -1 to +1) var vy = (Math.random() * 2) - 1; var star = {posx:w/2, posy:h/2, xvel:vx, yvel:vy, size:0.2}; stars.push(star); } } |
The stars object has 5 properties; The x and y position, the x and y velocities and the size. The x and y position is the position the star is at on the canvas. The x and y velocities are the direction the star is moving and is create using (Math.random() * 2) -1 to create a value between -1 and 1. This is done for both x axis and y axis. The size is set to 0.2 and is then added to the star array.
In order to render the star a renderStar function will be made. It will loop through each item in the star array and then render it to the canvas. The code is below:
|
1 2 3 4 5 6 7 8 9 10 11 12 13 14 15 16 17 18 19 |
function renderStar(){ stars.forEach(function(item,index){ ctx.beginPath(); ctx.fillStyle='#ffffff'; ctx.arc(item.posx,item.posy,item.size,0,2*Math.PI); item.posx += item.xvel / 30; item.posy += item.yvel / 30; item.xvel *= 1.04; item.yvel *= 1.04; item.size *= 1.015; ctx.fill(); if(item.posx < 0 || item.posx > window.innerWidth || item.posy < 0 || item.posy > window.innerHeight){ stars.splice( index, 1 ); } }); } |
To make the star get bigger I increase the size each frame by 1.5% by multiplying the star size by 1.015 each frame. This creates the illusion of the stars getting bigger. I use the value 1.04 for the x and y velocities. Finally, we check to see if the star has gone off the screen and remove it from the array if it has.
So now we have our function to create and render our stars but they are never called in the render function. As we will have 4 backgrounds including the blank one we will use the backgroundCircle position to decide which background to show. Update your render function to look like this.
|
1 2 3 4 5 6 7 8 9 10 11 12 13 14 15 16 17 18 19 20 21 22 23 24 25 26 27 28 29 30 31 32 |
function render(){ clearScreen(); var bgv = Math.round((backgroundCircle.posx / window.innerWidth) * 3)+1; if(bgv == 1){ addStar(); renderStar(); }else if(bgv == 2){ addDrop(); renderDrop(); }else if(bgv == 3){ addCloud(); renderCloud(); } drawFOF((window.innerWidth/2),(window.innerHeight/2)); drawControls(sphereControls); if(attached == false){ if(mdown && (current = hoveredControl(mx, my))){ attached = current; current.posx = mx; current.posy = my; attached = current; } }else{ attached.posx = mx; attached.posy = my; } requestAnimationFrame(render); } |
You can save this and test it in a browser to show the starfield in action. Here’s an updated HTML file including everything we have done so far. html-p3
Rain Background
The rain background creates raindrops at the top of the screen which fall slowly at an angle based on the wind direction control. Since we already have the control we just need to add our add raindrop and render raindrop functions.
|
1 2 3 4 5 6 7 8 9 10 11 12 13 14 15 16 17 18 19 20 21 22 23 24 25 26 27 28 |
//RAIN DROPS function addDrop(){ var w = Math.random() * window.innerWidth; var h = 0; var vx = 0; var vy = 1; var drop = {posx:w, posy:h, xvel:vx, yvel:vy, size:2}; drops.push(drop); } function renderDrop(){ drops.forEach(function(item,index){ ctx.beginPath(); ctx.fillStyle='#6666aa'; ctx.arc(item.posx,item.posy,item.size,0,2*Math.PI); item.posx += ((windCircle.posx / innerWidth) -0.5) * 8; item.posy += ((windCircle.posy / innerHeight) + 1) *2; ctx.fill(); if(item.posx < 0 || item.posx > window.innerWidth || item.posy < 0 || item.posy > window.innerHeight){ drops.splice( index, 1 ); } }); } |
We use addDrop to add a new drop, except this time we set the y position to the top of the browser and set the y velocity to 1 so it starts falling downwards. The x velocity is set to 0 so no horizontal movement as this will be set in the renderDrop function.
The renderDrop function loops through each drop in the array and draws a blue circle. The raindrop is then updated using the windCircle control to move it left/right based on the x position of the control and down using the y position of the control. Finally, we check if the drop has gone off the screen and remove it from the array if it has.
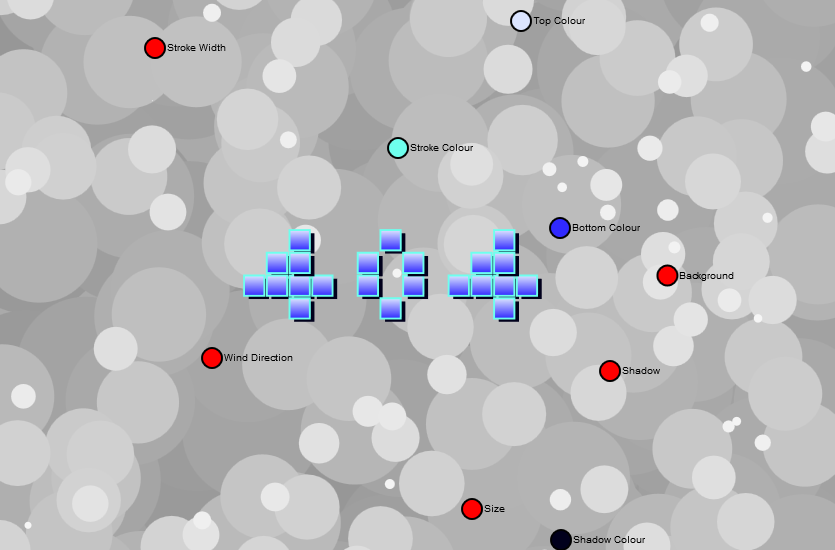
Bubble Clouds
Our last background is the bubble clouds. Our create cloud and render cloud functions will be pretty similar to our previous functions for the rain and starfield backgrounds.
|
1 2 3 4 5 6 7 8 9 10 11 12 13 14 15 16 17 18 19 20 21 22 23 24 25 26 27 28 29 30 31 32 33 34 35 36 37 38 39 40 41 42 |
// CLOUDS function addCloud(){ if(Math.random() * 100 > 75){ var w = Math.random() * window.innerWidth; var z = (Math.random() * 0.8) + 0.2; var h = 0 - (1-z) * 100; var s = 1; var cloud = {posx:w, posy:h, ratio:z, size:s}; clouds.push(cloud); //compare before render or flicker on first insert clouds.sort(compareClouds); } } function compareClouds(a,b) { if (a.ratio < b.ratio) return -1; if (a.ratio> b.ratio) return 1; return 0; } function renderCloud(){ clouds.forEach(function(item,index){ var hex = Math.round(((item.ratio * 125) + 125)).toString(16); size = (1-item.ratio) * 100 ctx.beginPath(); ctx.fillStyle='#'+hex+''+hex+''+hex; ctx.arc(item.posx,item.posy,size,0,2*Math.PI); item.posy += item.ratio; ctx.fill(); }); clouds.forEach(function(item,index){ if(item.posy > (window.innerHeight + (((1-item.ratio) * 100)*2))){ clouds.splice( index, 1 ); } }); } |
In the code above you can see we have and extra function call compareClouds. This function sorts our array of bubble clouds so that the bigger bubbles are drawn first so they appear to be at the back whereas the smaller ones are drawn on top appearing to be at the front.
You now have everything needed to have your own custom 404 error page using canvas and JavaScript. A copy of the complete code can be downloaded here Final Code.
For more information on HTML Canvas visit w3schools at http://www.w3schools.com/html/html5_canvas.asp