

Full LibGDX Game Tutorial – Menu Controls
This part of the tutorial will go over adding actions to buttons and creating our preferences. If you haven’t seen part 1 of this tutorial you can view it on Full LibGDX Game Tutorial – Project setup where it explains how to create this project as well as setting up the screens and menu.
So now we can run our game and we get our menu. Let’s start by adding the exit action so we can exit our game with the exit button. We will add a ChangeListener to out button so when the button changes our code is executed. Add the following code to your show method.
|
1 2 3 4 5 6 |
exit.addListener(new ChangeListener() { @Override public void changed(ChangeEvent event, Actor actor) { Gdx.app.exit(); } }); |
Anything inside the changed method will be executed when the button is clicked. Here we use “Gdx.app.exit();” to exit the application. Add the listener code again this time for the newGame button and instead of exiting the app we will tell it to change the screen using the reference to our parent class.
|
1 |
parent.changeScreen(Box2DTutorial.APPLICATION); |
And again for our preferences button
|
1 |
parent.changeScreen(Box2DTutorial.PREFERENCES); |
Congratulations, you have just created the menu screen. There’s one more thing we need to do to before we move on to our preferences screen and that is, dispose of our stage when we’re finished with it. In libgdx we need to call dispose on any objects that allow you to dispose of them. In our menu screen that is our stage and our skin. Our skin will be disposed of automatically later when we implement our asset manager so we’ll leave that for now and just dispose of our stage. This is done by adding “stage.dispose();” in the dispose method of our MenuScreen.
|
1 2 3 4 |
@Override public void dispose() { stage.dispose(); } |
Your MenuScreen Code should look like this now:
|
1 2 3 4 5 6 7 8 9 10 11 12 13 14 15 16 17 18 19 20 21 22 23 24 25 26 27 28 29 30 31 32 33 34 35 36 37 38 39 40 41 42 43 44 45 46 47 48 49 50 51 52 53 54 55 56 57 58 59 60 61 62 63 64 65 66 67 68 69 70 71 72 73 74 75 76 77 78 79 80 81 82 83 84 85 86 87 88 89 90 91 92 93 94 95 96 97 98 99 100 101 102 103 104 105 106 107 108 109 110 111 112 113 114 115 116 117 |
package blog.gamedevelopment.box2dtutorial.views; import blog.gamedevelopment.box2dtutorial.Box2DTutorial; import com.badlogic.gdx.Gdx; import com.badlogic.gdx.Screen; import com.badlogic.gdx.graphics.GL20; import com.badlogic.gdx.scenes.scene2d.Actor; import com.badlogic.gdx.scenes.scene2d.Stage; import com.badlogic.gdx.scenes.scene2d.ui.Skin; import com.badlogic.gdx.scenes.scene2d.ui.Table; import com.badlogic.gdx.scenes.scene2d.ui.TextButton; import com.badlogic.gdx.scenes.scene2d.utils.ChangeListener; import com.badlogic.gdx.utils.viewport.ScreenViewport; public class MenuScreen implements Screen{ private Box2DTutorial parent; private Stage stage; public MenuScreen(Box2DTutorial box2dTutorial){ parent = box2dTutorial; /// create stage and set it as input processor stage = new Stage(new ScreenViewport()); Gdx.input.setInputProcessor(stage); } @Override public void show() { // Create a table that fills the screen. Everything else will go inside this table. Table table = new Table(); table.setFillParent(true); table.setDebug(true); stage.addActor(table); // temporary until we have asset manager in Skin skin = new Skin(Gdx.files.internal("skin/glassy-ui.json")); //create buttons TextButton newGame = new TextButton("New Game", skin); TextButton preferences = new TextButton("Preferences", skin); TextButton exit = new TextButton("Exit", skin); //add buttons to table table.add(newGame).fillX().uniformX(); table.row().pad(10, 0, 10, 0); table.add(preferences).fillX().uniformX(); table.row(); table.add(exit).fillX().uniformX(); // create button listeners exit.addListener(new ChangeListener() { @Override public void changed(ChangeEvent event, Actor actor) { Gdx.app.exit(); } }); newGame.addListener(new ChangeListener() { @Override public void changed(ChangeEvent event, Actor actor) { parent.changeScreen(Box2DTutorial.APPLICATION); } }); preferences.addListener(new ChangeListener() { @Override public void changed(ChangeEvent event, Actor actor) { parent.changeScreen(Box2DTutorial.PREFERENCES); } }); } @Override public void render(float delta) { // clear the screen ready for next set of images to be drawn Gdx.gl.glClearColor(0f, 0f, 0f, 1); Gdx.gl.glClear(GL20.GL_COLOR_BUFFER_BIT); // tell our stage to do actions and draw itself stage.act(Math.min(Gdx.graphics.getDeltaTime(), 1 / 30f)); stage.draw(); } @Override public void resize(int width, int height) { // change the stage's viewport when teh screen size is changed stage.getViewport().update(width, height, true); } @Override public void pause() { // TODO Auto-generated method stub } @Override public void resume() { // TODO Auto-generated method stub } @Override public void hide() { // TODO Auto-generated method stub } @Override public void dispose() { // dispose of assets when not needed anymore stage.dispose(); } } |
Preferences
Next, we should work on our preferences screen, but in order to do that, we need to set up our AppPreferences class with all the possible preferences. We should control sound volume, music volume, sound on or off and music on or off. This is the bare minimum I use for games and can be expanded later to include options like screen size, texture quality etc. Create a new class called AppPreferences in the top level package shown earlier in our base structure and add the following:
|
1 2 3 4 5 |
private static final String PREF_MUSIC_VOLUME = "volume"; private static final String PREF_MUSIC_ENABLED = "music.enabled"; private static final String PREF_SOUND_ENABLED = "sound.enabled"; private static final String PREF_SOUND_VOL = "sound"; private static final String PREFS_NAME = "b2dtut"; |
These will store the values of the preferences which will get saved when we close our application. Now we’re going to add a protected method. A protected method is a method that will only be allowed to be run by the current class or any classes that extend it. This means that our Screen classes can’t run the getPrefs method but our AppPreferences class can, and we want it this way so our AppPreferences class is the only one to control how we change our preferences. Now let’s add the method:
|
1 2 3 |
protected Preferences getPrefs() { return Gdx.app.getPreferences(PREFS_NAME); } |
Next, let’s add a method to get and set the music volume. We will add a method called getMusicVolume (a getter) and setMusicVolume (a setter). As our getMusicVolume returns the volume we set it up with “public float getMusicVolume()“, our volume will be stored as a float value e.g 0.5 for half volume or 1.0 for full volume. Then we add “return getPrefs().getFloat(PREF_MUSIC_VOLUME, 0.5f);” This code tells the application to pull the PREF_MUSIC_VOLUME value from our saved preferences and if it isn’t set yet use the 0.5f value. As our setter will take a volume value and set it in our preferences we set it up with “public void setMusicVolume(float volume)”. The argument float volume is the value we will pass it when we change the volume. Next, we add “getPrefs().putFloat(PREF_MUSIC_VOLUME, volume);” to save the value of the volume to our preferences and finally “getPrefs().flush();” to make sure they are written to disk and saved. You should end up with this code:
|
1 2 3 4 5 6 7 8 |
public float getMusicVolume() { return getPrefs().getFloat(PREF_MUSIC_VOLUME, 0.5f); } public void setMusicVolume(float volume) { getPrefs().putFloat(PREF_MUSIC_VOLUME, volume); getPrefs().flush(); } |
We do that same for the other preferences except when we use yes / no values we use putBoolean and getBoolean instead of putFloat and getFloat. Once all this is complete you will have an AppPreferences class like this:
|
1 2 3 4 5 6 7 8 9 10 11 12 13 14 15 16 17 18 19 20 21 22 23 24 25 26 27 28 29 30 31 32 33 34 35 36 37 38 39 40 41 42 43 44 45 46 47 48 49 50 51 52 |
package blog.gamedevelopment.box2dtutorial; import com.badlogic.gdx.Gdx; import com.badlogic.gdx.Preferences; public class AppPreferences { private static final String PREF_MUSIC_VOLUME = "volume"; private static final String PREF_MUSIC_ENABLED = "music.enabled"; private static final String PREF_SOUND_ENABLED = "sound.enabled"; private static final String PREF_SOUND_VOL = "sound"; private static final String PREFS_NAME = "b2dtut"; protected Preferences getPrefs() { return Gdx.app.getPreferences(PREFS_NAME); } public boolean isSoundEffectsEnabled() { return getPrefs().getBoolean(PREF_SOUND_ENABLED, true); } public void setSoundEffectsEnabled(boolean soundEffectsEnabled) { getPrefs().putBoolean(PREF_SOUND_ENABLED, soundEffectsEnabled); getPrefs().flush(); } public boolean isMusicEnabled() { return getPrefs().getBoolean(PREF_MUSIC_ENABLED, true); } public void setMusicEnabled(boolean musicEnabled) { getPrefs().putBoolean(PREF_MUSIC_ENABLED, musicEnabled); getPrefs().flush(); } public float getMusicVolume() { return getPrefs().getFloat(PREF_MUSIC_VOLUME, 0.5f); } public void setMusicVolume(float volume) { getPrefs().putFloat(PREF_MUSIC_VOLUME, volume); getPrefs().flush(); } public float getSoundVolume() { return getPrefs().getFloat(PREF_SOUND_VOL, 0.5f); } public void setSoundVolume(float volume) { getPrefs().putFloat(PREF_SOUND_VOL, volume); getPrefs().flush(); } } |
Preferences Screen
Yay! now we can work on our preferences screen. We will make a screen similar to our menu screen in that we will use a stage and a table to layout all our preference components. This time instead of a single column with 3 cells for the buttons we will make 2 columns one for the label and one for the control and 4 rows for each control. Add the stage, table and skin the same way we added it to our preferences screen and then add the following code to add a new Slider for our volume control:
|
1 2 3 4 5 6 7 8 9 10 |
//volume final Slider volumeMusicSlider = new Slider( 0f, 1f, 0.1f,false, skin ); volumeMusicSlider.setValue( parent.getPreferences().getMusicVolume() ); volumeMusicSlider.addListener( new EventListener() { @Override public boolean handle(Event event) { parent.getPreferences().setMusicVolume( volumeMusicSlider.getValue() ); return false; } }); |
Add the required imports, as usual, making sure to use the LibGDX versions for the EventListener and Event as the default Java.util ones won’t work and will cause your application to crash or run in unexpected ways. Do this again, this time for the soundSlider.
Next, we add the checkbox versions for music on/off and sound on/off with this code:
|
1 2 3 4 5 6 7 8 9 10 11 |
//music final CheckBox musicCheckbox = new CheckBox(null, skin); musicCheckbox.setChecked( parent.getPreferences().isMusicEnabled() ); musicCheckbox.addListener( new EventListener() { @Override public boolean handle(Event event) { boolean enabled = musicCheckbox.isChecked(); parent.getPreferences().setMusicEnabled( enabled ); return false; } }); |
Again make sure you import the correct LibGDX versions of these classes. Now we need a way to go back to the main menu once we changed all our preferences. We will do that with a textButton like the ones we used in the main menu.
|
1 2 3 4 5 6 7 8 |
// return to main screen button final TextButton backButton = new TextButton("Back", skin, "small"); // the extra argument here "small" is used to set the button to the smaller version instead of the big default version backButton.addListener(new ChangeListener() { @Override public void changed(ChangeEvent event, Actor actor) { parent.changeScreen(Box2DTutorial.MENU); } }); |
We now have all the control elements we need to add to our preferences screen. We still need to add labels so our users know which slider is for which preference. We will create 5 fields to store our labels in. These fields are defined in the top of our class after the “implements screen {” section like so:
|
1 2 3 4 5 6 7 8 9 10 |
public class PreferencesScreen implements Screen{ private Box2DTutorial parent; private Stage stage; // our new fields private Label titleLabel; private Label volumeMusicLabel; private Label volumeSoundLabel; private Label musicOnOffLabel; private Label soundOnOffLabel; |
These fields store our labels and will allow us to access them later, which we will need to do. Next, we add the code to create the labels and then add all our newly created controls to our table to be displayed.
|
1 2 3 4 5 6 7 8 9 10 11 12 13 14 15 16 17 18 19 20 21 |
titleLabel = new Label( "Preferences", skin ); volumeMusicLabel = new Label( null, skin ); volumeSoundLabel = new Label( null, skin ); musicOnOffLabel = new Label( null, skin ); soundOnOffLabel = new Label( null, skin ); table.add(titleLabel); table.row(); table.add(volumeMusicLabel); table.add(volumeMusicSlider); table.row(); table.add(musicOnOffLabel); table.add(musicCheckbox); table.row(); table.add(volumeSoundLabel); table.add(soundMusicSlider); table.row(); table.add(soundOnOffLabel); table.add(soundEffectsCheckbox); table.row(); table.add(backButton); |
You can now test out your application and see what issues you run into….Done!? Let’s see, we were unable to exit the application with the exit button after we viewed the preferences screen. This is because we only set the stage as the input processor when we create the screen. This is not what we want. We want it to be the controller every time we show the screen. So to fix this issue we just move the “Gdx.input.setInputProcessor(stage);” from the constructor to the show method.
Another issue we’re having is when we exit the preferences screen and go back into our preferences screen and change the volume sliders we’re still seeing the old preference sliders behind.
Again, this is due to when we are creating our objects. We are currently creating the stage when we create the screen and then each time we show the screen we add a table to the stage so looking at our preferences screen 3 times will add 3 tables to our stage. We could move the stage creation into our show method and that would fix our issue as it would be a new stage each time we show our screen. This, however, means creating the stage every time, instead we can just empty the current stage with “stage.clear()” which will allow us to keep our stage.
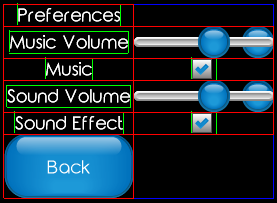
So now everything works as we want it to. Let’s update the layout a bit so it’s a bit better looking.Our title is centred, but only on the left side of the screen. We want it to be centred across both columns. to do that we add “.colspan(2)” when we add it to our table. We do the same for our button since that should be in the middle too. Next, we want to make the labels on the left not be centred so that they visually make a line making it more aesthetic to the user. This is done by adding “.leftg()” when addin the labels to our table. Finally, let’s get rid off the debug visuals by commenting out the “table.setDebug(true);”
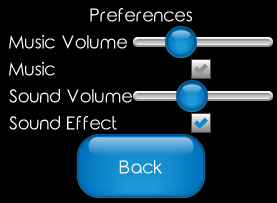
It’s better but not quite there yet. We should add padding to all the rows so they are not all squashed together. We do that by adding .pad(t,l,b,r) to our .row() and replacing the t,l,b,r with the amount of padding for the top, left, bottom, right respectively. I have used 10,0,0,10 for all rows and this is what it looks like now.

Later we will add some nice textures to the background for both our main menu screen and our preferences screen but in order to do that properly we will need the asset manager and I think we need to move into creating the game as we’ve done enough setting up to start working on the game logic.
Part 3 of our Full LibGDX Game tutorial will go into game logic and adding Box2D.
| ← Project Setup | — Contents — | Box2D → |
Where is the source code. For some reason I can’t get “parent.getPreferences” to work inside my PreferencesScreen methods for volume and music.
Unfortunately, there is no source until part 7. I don’t think there were any changes to the preferences between this part and part 7 so you could get the source for part 7 from https://stormyvids.is-sweet.co.uk/download.php?id=$1$d.vzNqFE$wFMn0A8t2qxDym8zktJC91 and check against that.
can you send another link, the link is broken. Thanks!
You can find everything here
https://github.com/dfour/box2dtut/tree/part17
The code (just in case) is :
private AppPreferences preferences;
@Override
public void create () {
…
preferences = new AppPreferences();
…
}
public AppPreferences getPreferences(){
return this.preferences;
}
After checking the source code, I found that getPreferences is missing from box2dtutorial class.
add this in box2dtutorial class
private AppPreferences preferences;
add this to create method: preferences = new AppPreferences();
add the below method
public AppPreferences getPreferences() {
return this.preferences;
}
then you’ll be able to “parent.getPreferences”
Thanks for the tutorials 🙂 Really Appreciate it
thanks a lot!
Thank You
Same here.
hello,
I do not really understand what dispose is for… ?
would you please explain it for me..?
The dispose method is used to manage memory. If any class you use in libgdx has a dispose method you should use it when you are no longer using that class. In this case it is the stage that is disposed. When the stage is dispose it will remove any files it has from memory and instruct native drivers to free all resources related to this class. In short it helps reduce memory usage and helps prevent memory leaks.
hello, I am just wondering the saving data like preference does not work on my Android phone but, it works on my laptop… do you have any idea ?
Make sure you are using the flush() command each time something is changed as android needs this flush command to write the changes to the save file. Also, check the PREFS_NAME and find the file on disk to see what items if any are changing.
hello, the saving data, preference , does not work on my android phone, but it works on desktop… Do you have any idea? the code is totally same as yours
hello it does not really work on my android phone, but it works on my laptop…
The flush () function does not help, the fact is that you can not pull Libgdx every time you need that or other setting. Libgdx each time creates a new object whose editor field is null, so flush() function does nothing. As an option*: describe the class variable
—
private final Preferences prefsObj = Gdx.app.getPreferences(PREFS_NAME);
—
and use it instead of getPrefs().
* This is an idea, so there may be syntax errors 🙂
A few insides of Libgdx:
@Override
public Preferences getPreferences (String name) {
return new AndroidPreferences(getSharedPreferences(name, Context.MODE_PRIVATE));
}
===========
@Override
public void flush () {
if (editor != null) {
if (Build.VERSION.SDK_INT >= Build.VERSION_CODES.GINGERBREAD) {
editor.apply();
} else {
editor.commit();
}
editor = null;
}
}
==========
private void edit () {
if (editor == null) {
editor = sharedPrefs.edit();
}
}
==========
public AndroidPreferences (SharedPreferences preferences) {
this.sharedPrefs = preferences;
}
Hii. thanks for the great tutorial. but there is problem in my project. i cannot figure out the issue. when i open new screen and came back to previous any event is not work. as example if i click on preferences screen and click on back button menu screen will open. but any button is not work.
This is due to the input controller being changed from the main screen controller to the second screen controller. This can be fixed by resetting the controller as the input controller when we go back to the main screen. This issue is pointed out and fixed in a future tutorial part.
[…] The Skin class is something like an image wrapper which helps you create the texture for the button while the Table class is something used for organisation. The most useful and simplest resource I found to get me started off was from gamedevelopment.blog: https://www.gamedevelopment.blog/full-libgdx-game-tutorial-menu-control/ […]
Where is the source code? After checking the source code, I found that getPreferences are missing from box2dtutorial class.
volumeMusicSlider.setValue( parent.getPreferences().getMusicVolume() );
volumeMucisSlider.addListener( new EventListener() {
Should be “MusicSlider” not MucisSlider.
Thanks for the great tutorial 🙂
Thanks for pointing that out, will fix it. Also a Mucis slider sounds disgusting.
That’s alright to this post end, except the size of these display content.All stuff show very tiny on my phone while I publish a test. In other word, this code isn’t effect:
table.setFillParent( true );
Is there any trouble in code here? thank you!
Wibrst:
Did you solve your problem with everything being very small on your phone? I’m running into the same issue!
My preferences table is *tiny*! Like, barely able to see it well enough to do anything! And certainly too small to actually be able to interact with it?
Hello, i added the line
table.setFillParent(true);
and it worked for me, size changed to normal.
You need to change the screenViewPort to StretchViewPort then set size like 500,500.
Try this in preference screen:
stage=new Stage(new StretchViewport(500,500));
and see the results.
Hi
I understand that screen dispose method is not called automatically, so the stage will not be disposed. How do you call the screens dispose method?
Thanks
No, full source for each page or this tutorial sucks.
I’m struggling for 3 days to run preferences screen and it fails after first exit. Nothing woks and I have to force close the app.
bad tutorial, not recommended
It’s not bad but it’s incomplete