
Full LibGDX Game Tutorial – Box2D
Welcome to part 3 of our Full LibGDX Game Tutorial. This part will focus on the Box2D basic, creating a world, stepping it through time and adding different types of bodies to it. If you haven’t seen the earlier parts of this tutorial I advise you to start at Full LibGDX Game Tutorial – Project setup as this tutorial continues from these earlier parts. For those of you who have come from part 2, you can continue on.
We’ve already made our MainScreen which will be the screen that displays our game. In addition to that, we need a model which will control all the logic in our game. So let’s create a new class called B2DModel and in this model, we will add a world, which, Box2D uses to keep all the physical objects in the game.
|
1 2 3 4 5 6 7 8 9 10 |
import com.badlogic.gdx.Gdx; import com.badlogic.gdx.physics.box2d.World; public class B2dModel { public World world; public B2dModel(){ world = new World(new Vector2(0,-10f), true); } } |
Since this is the logic part of our game we need a logic method which will run the logic part of the model. We will also add a world step that tells the Box2D world to move forward in time.
|
1 2 3 4 |
// our game logic here public void logicStep(float delta){ world.step(delta , 3, 3); } |
If we start our application now nothing will happen when we select “new game” as we need to tell the MainScreen to use our model. In our MainScreen add the following to the constructor:
|
1 2 3 |
model = new B2dModel(); cam = new OrthographicCamera(32,24); debugRenderer = new Box2DDebugRenderer(true,true,true,true,true,true); |
And add this to the render method:
|
1 2 3 4 |
model.logicStep(delta); Gdx.gl.glClearColor(0f, 0f, 0f, 1); Gdx.gl.glClear(GL20.GL_COLOR_BUFFER_BIT); debugRenderer.render(model.world, cam.combined); |
What we have just done is created a new model when the MainScreen is created, we then we create a camera which controls how much of the box world we see(32 units wide and 24 units tall). In Box2D all objects are based on a unit, which is 1 meter. When you create a physical object that is 1 wide and 1 tall you are making a 1m by 1m object. This helps keep the physics correct with the real world. Our screen will show a 32 meter high, 24 meter wide area of our map and this is good enough for now. We have also created a debugRenderer which is used to redner objects in a Box2D world without the need to add textures which we will use until our asset manager is added.
We also added a call to our model’s logicStep method. This will be used to move our game logic forward. Later we can use an if statement to disable running this logic to essentially pause our game. We then clear the screen and use the debugRenderer to render our world.
Now our MainScreen is ready we need to tell the model to create something in the Box2D world. This is done by creating a body. A body is a physical object in a Box2D world, it stores all the physics information such as it’s size, shape, position, speed, restitution etc. There are 3 types of bodies you can use in Box2D. They are DynamicBody, StaticBody and KinematicBody. A DynamicBody is affected by gravity and other bodies, a StaticBody is a body that isn’t affected by gravity or other bodies and doesn’t move and a KinematicBody is a body that isn’t affected by gravity or other bodies but can move.
So dynamic bodies will be used for players and enemies, static bodies used for the floors and walls and kinematic bodies for things like wheels or moving platforms. We will create one of each and add them to our world.
Dynamic Body
Create a new private method in our model class call createObject with the following code:
|
1 2 3 4 5 6 7 8 9 10 11 12 13 14 15 16 17 18 19 20 21 22 23 24 25 26 27 |
private void createObject(){ //create a new body definition (type and location) BodyDef bodyDef = new BodyDef(); bodyDef.type = BodyDef.BodyType.DynamicBody; bodyDef.position.set(0,0); // add it to the world bodyd = world.createBody(bodyDef); // set the shape (here we use a box 50 meters wide, 1 meter tall ) PolygonShape shape = new PolygonShape(); shape.setAsBox(1,1); // set the properties of the object ( shape, weight, restitution(bouncyness) FixtureDef fixtureDef = new FixtureDef(); fixtureDef.shape = shape; fixtureDef.density = 1f; // create the physical object in our body) // without this our body would just be data in the world bodyd.createFixture(shape, 0.0f); // we no longer use the shape object here so dispose of it. shape.dispose(); } |
This private method can only be called in our model our screens or orchestrator class have no access to this method because it is private. It creates a BodyDef which is like the data for the physical object, it will hold information such as, type of body, location, speed, rotation etc. Next we add it to the world so the world knows about the object and can update it. We then create a FixtureDef which is the data for a physical body part. We could create a body with multiple parts like an ice cream has a cone and the ice cream part, we would want the cone to have a low density because it’s light whereas the ice cream should be denser as it is heavier. We then use the bodies createFixture method to add that fixture to the body. We finally dispose of the shape as it is no longer needed and we want our memory back.
Now we can work on our static body
The static body is almost identical to our dynamic body except we don’t need to define a density and we can just use the shape in our body’s createFixture method.
|
1 2 3 4 5 6 7 8 9 10 11 12 13 14 15 16 |
private void createFloor() { // create a new body definition (type and location) BodyDef bodyDef = new BodyDef(); bodyDef.type = BodyDef.BodyType.StaticBody; bodyDef.position.set(0, -10); // add it to the world bodys = world.createBody(bodyDef); // set the shape (here we use a box 50 meters wide, 1 meter tall ) PolygonShape shape = new PolygonShape(); shape.setAsBox(50, 1); // create the physical object in our body) // without this our body would just be data in the world bodys.createFixture(shape, 0.0f); // we no longer use the shape object here so dispose of it. shape.dispose(); } |
Finally, we can make our Kinematic Body
|
1 2 3 4 5 6 7 8 9 10 11 12 13 14 15 16 17 18 19 20 21 22 23 24 25 26 27 28 29 |
private void createMovingObject(){ //create a new body definition (type and location) BodyDef bodyDef = new BodyDef(); bodyDef.type = BodyDef.BodyType.KinematicBody; bodyDef.position.set(0,-12); // add it to the world bodyk = world.createBody(bodyDef); // set the shape (here we use a box 50 meters wide, 1 meter tall ) PolygonShape shape = new PolygonShape(); shape.setAsBox(1,1); // set the properties of the object ( shape, weight, restitution(bouncyness) FixtureDef fixtureDef = new FixtureDef(); fixtureDef.shape = shape; fixtureDef.density = 1f; // create the physical object in our body) // without this our body would just be data in the world bodyk.createFixture(shape, 0.0f); // we no longer use the shape object here so dispose of it. shape.dispose(); bodyk.setLinearVelocity(0, 0.75f); } |
This is exactly the same as our dynamic code except we have set the linear velocity. Now all we need to do before we test our code is to call these private methods in our model class.
Your B2DModel code should look like this:
|
1 2 3 4 5 6 7 8 9 10 11 12 13 14 15 16 17 18 19 20 21 22 23 24 25 26 27 28 29 30 31 32 33 34 35 36 37 38 39 40 41 42 43 44 45 46 47 48 49 50 51 52 53 54 55 56 57 58 59 60 61 62 63 64 65 66 67 68 69 70 71 72 73 74 75 76 77 78 79 80 81 82 83 84 85 86 87 88 89 90 91 92 93 94 95 96 97 98 99 100 101 102 103 104 105 106 107 108 109 110 111 112 113 114 115 |
package blog.gamedevelopment.box2dtutorial; import com.badlogic.gdx.Gdx; import com.badlogic.gdx.graphics.GL20; import com.badlogic.gdx.graphics.OrthographicCamera; import com.badlogic.gdx.math.Vector2; import com.badlogic.gdx.physics.box2d.Body; import com.badlogic.gdx.physics.box2d.BodyDef; import com.badlogic.gdx.physics.box2d.Box2DDebugRenderer; import com.badlogic.gdx.physics.box2d.Fixture; import com.badlogic.gdx.physics.box2d.FixtureDef; import com.badlogic.gdx.physics.box2d.PolygonShape; import com.badlogic.gdx.physics.box2d.World; public class B2dModel { public World world; private Box2DDebugRenderer debugRenderer; private OrthographicCamera camera; private Body bodyd; private Body bodys; private Body bodyk; public B2dModel(){ world = new World(new Vector2(0,-10f), true); createFloor(); createObject(); createMovingObject(); } private void createFloor() { // create a new body definition (type and location) BodyDef bodyDef = new BodyDef(); bodyDef.type = BodyDef.BodyType.StaticBody; bodyDef.position.set(0, -10); // add it to the world bodyd = world.createBody(bodyDef); // set the shape (here we use a box 50 meters wide, 1 meter tall ) PolygonShape shape = new PolygonShape(); shape.setAsBox(50, 1); // create the physical object in our body) // without this our body would just be data in the world bodyd.createFixture(shape, 0.0f); // we no longer use the shape object here so dispose of it. shape.dispose(); } private void createObject(){ //create a new body definition (type and location) BodyDef bodyDef = new BodyDef(); bodyDef.type = BodyDef.BodyType.DynamicBody; bodyDef.position.set(0,0); // add it to the world bodys = world.createBody(bodyDef); // set the shape (here we use a box 50 meters wide, 1 meter tall ) PolygonShape shape = new PolygonShape(); shape.setAsBox(1,1); // set the properties of the object ( shape, weight, restitution(bouncyness) FixtureDef fixtureDef = new FixtureDef(); fixtureDef.shape = shape; fixtureDef.density = 1f; // create the physical object in our body) // without this our body would just be data in the world bodys.createFixture(shape, 0.0f); // we no longer use the shape object here so dispose of it. shape.dispose(); } private void createMovingObject(){ //create a new body definition (type and location) BodyDef bodyDef = new BodyDef(); bodyDef.type = BodyDef.BodyType.KinematicBody; bodyDef.position.set(0,-12); // add it to the world bodyk = world.createBody(bodyDef); // set the shape (here we use a box 50 meters wide, 1 meter tall ) PolygonShape shape = new PolygonShape(); shape.setAsBox(1,1); // set the properties of the object ( shape, weight, restitution(bouncyness) FixtureDef fixtureDef = new FixtureDef(); fixtureDef.shape = shape; fixtureDef.density = 1f; // create the physical object in our body) // without this our body would just be data in the world bodyk.createFixture(shape, 0.0f); // we no longer use the shape object here so dispose of it. shape.dispose(); bodyk.setLinearVelocity(0, 0.75f); } // our game logic here public void logicStep(float delta){ world.step(delta , 3, 3); } } |
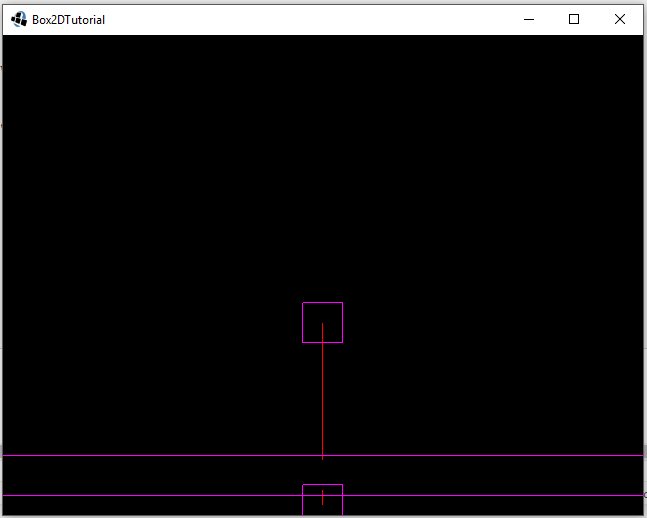
When you run your application your main screen should output somethign similar to this.
We now have the first part of our game setup. We have create the project, created the 5 screens we will eventually use, added a menu system, created the model for our logic, added box2D components and added Box2D bodies.
Part 4 of our Full LibGDX game tutorial will go over moving the creating of bodies into its own class so we can keep the specifics of bodies in its own section.
| ← Preferences And Menu | — Contents — | Box2D Body Factory → |
When setting the fixture on each of the three bodies, I was a little confused regarding the purpose of the FixtureElement until I looked at the JavaDoc for Box2D, and I believe there may be an oversight in your example.
For anyone going through the tutorial, there are two different methods to set a fixture on a body, you can either pass a shape and a density, or you can pass a FixtureElement. In the example, the fixtures for all three objects are set by passing the shape and the density. I think the intent was to add the fixture using the shape/density method when adding the floor, and then for the other two objects set the fixture by passing the FixtureElement.