
Full Unity 2D Game Tutorial 2019 – Main Menu
In this part of the tutorial we will be crating the main menu and adding some buttons to allows us to play a game, go to the options menu and to exit the game.
Full Unity 2D Game Tutorial 2019 – Scene
We have our game scene but its just called SampleScene. Let’s fix that by right clicking on the scene in the project window and renaming it to GameScene. While were here right click and add a new scene and name it MainMenu.
Now save your GameScene and select the background and AudioManager objects in the hierarchy view and right click > copy. Open the new Main Menu scene and paste the objects. We now have music and a background in our main menu. We can now focus on making the UI.
Full Unity 2D Game Tutorial 2019 – Menu UI
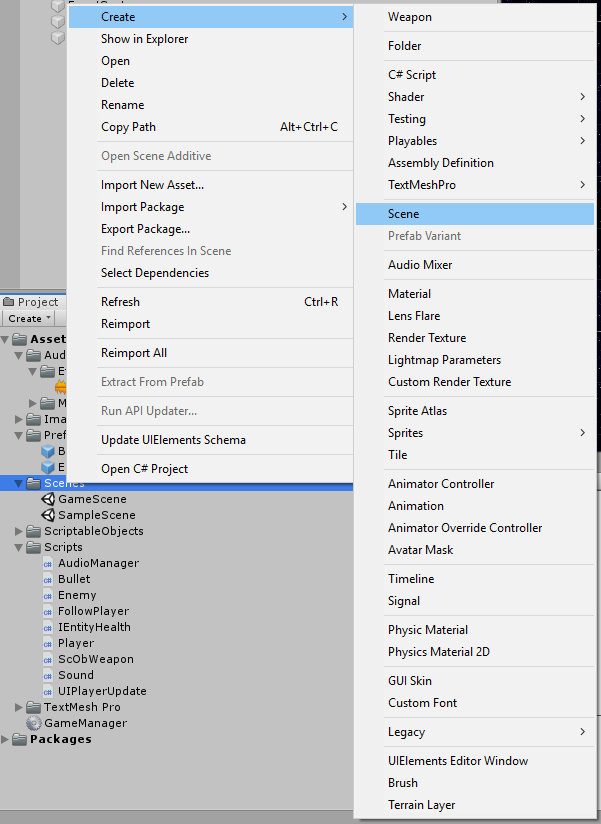
The first thing we are going to do is to add a button. This will not only create the button but also the Canvas and Event System. Rename it to StartButton.

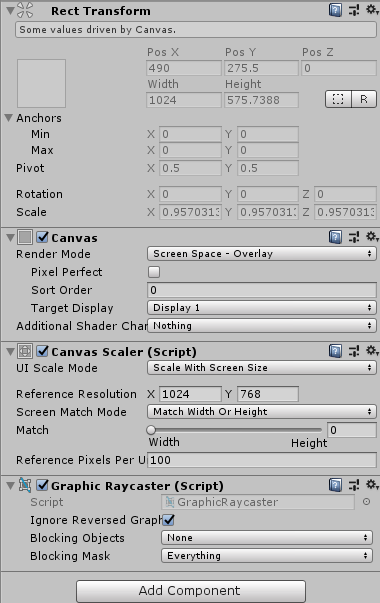
Now we have a canvas let’s set it up so it work’s on multiple display sizes. First set the UI Scale Mode to Scale With Screen Size. then set the size to 1024 x 768. This is a small 16:9 aspect ratio and should allow us to work on a multitude of displays without too many issues.
 The Canvas is done for now so lets setup the main menu. We have our button but its just there floating around inside the canvas. We need more order, so add an empty game object to the canvas and name it Main Menu. This will be the object that holds all our main menu UI. The reason we do this is so we can swap between menus by deactivating the main menu and showing the options menu and vice versa. Move the StartButton inside the Main Menu object.
 Our menu is now nice and ordered. Now we can play with the style.
Full Unity 2D Game Tutorial 2019 – Menu Style
The MainMenu object at the moment is just a small square area inside the canvas. Use the Anchor Presets to fill the entire canvas with the MainMenu by Shift+Alt clicking the bottom right icon. This will fill the canvas with our menu. On the MainMenu object add a new component called Vertical Layout Group. This will layout our objects for us and keep things displaying neatly in a vertical line. We set the Child Alignment to Upper Center so all our buttons will be laid out in the middle of our screen starting from the top.
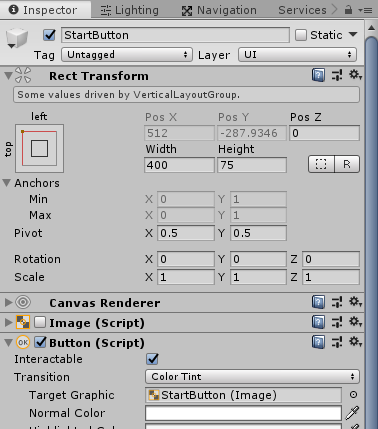
The size of our canvas and main menu have been set but our button hasn’t. Lets set its size to 400 x 75. The original text element isn’t as good as the TextMeshPro text so delete the current text and replace it with a TextMeshPro text. Set the text to Start and change the size to say 64. That should be big enough. The TextMeshPro text doesn’t automatically fill the start button size, it actually is larger than the button by default so use the Anchor presets again to fit the button with the same Shift+Alt clicking the bottom right icon we did before.

We should now have a big ugly white box in the center of our screen. Let’s fix that by adjusting the button colours. The image below shows how I have set mine. Pure black for normal, a tint of blue for highlighted and a dark grey for pressed all set with 80 alpha.

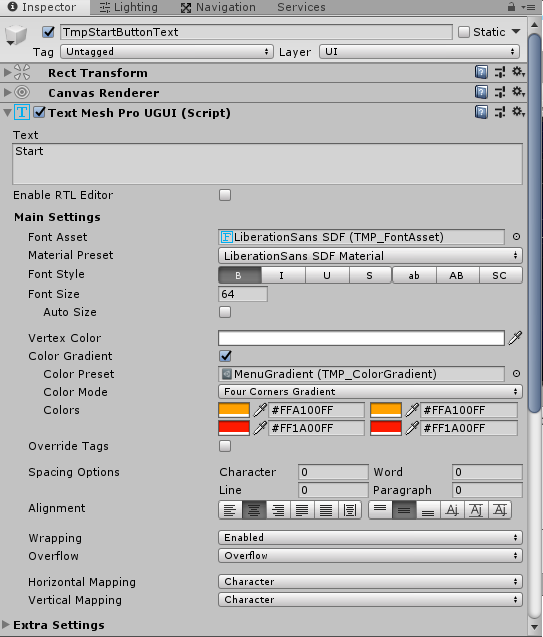
Full Unity 2D Game Tutorial 2019 – TextMeshPro Text Style
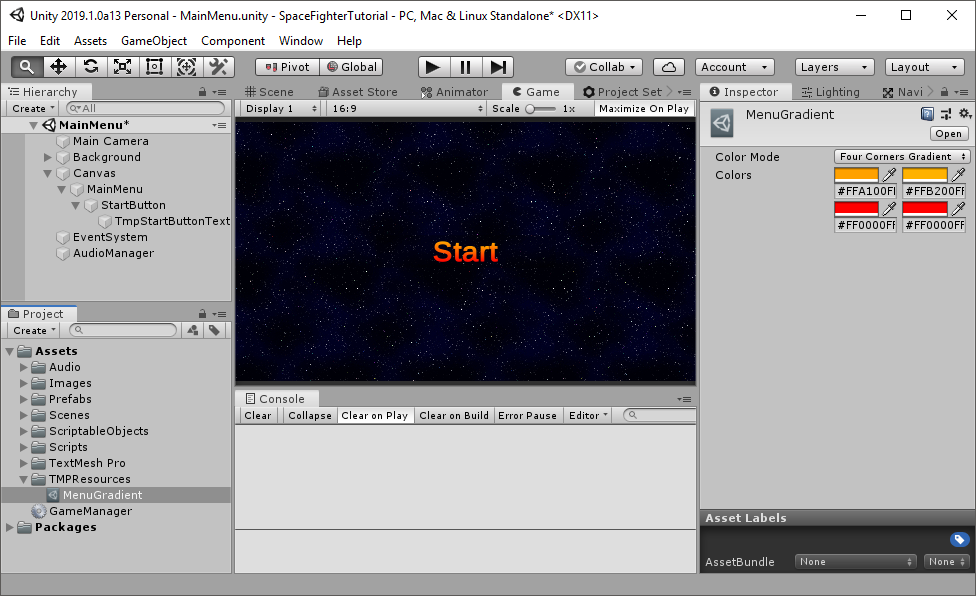
The button looks better but the text is still rather boring. We’re going to fix that by using a colour gradient for TextMeshPro. Create a folder called TMPResources and right click Create > TextMeshPro > Color Gradient and name it MenuGradient. Adjust the colours to something you like. I went with a fire orange > red like the image below.
 To apply this gradient to your text you will have to check the Color Gradient box and drop the gradient you made into the colour preset box.
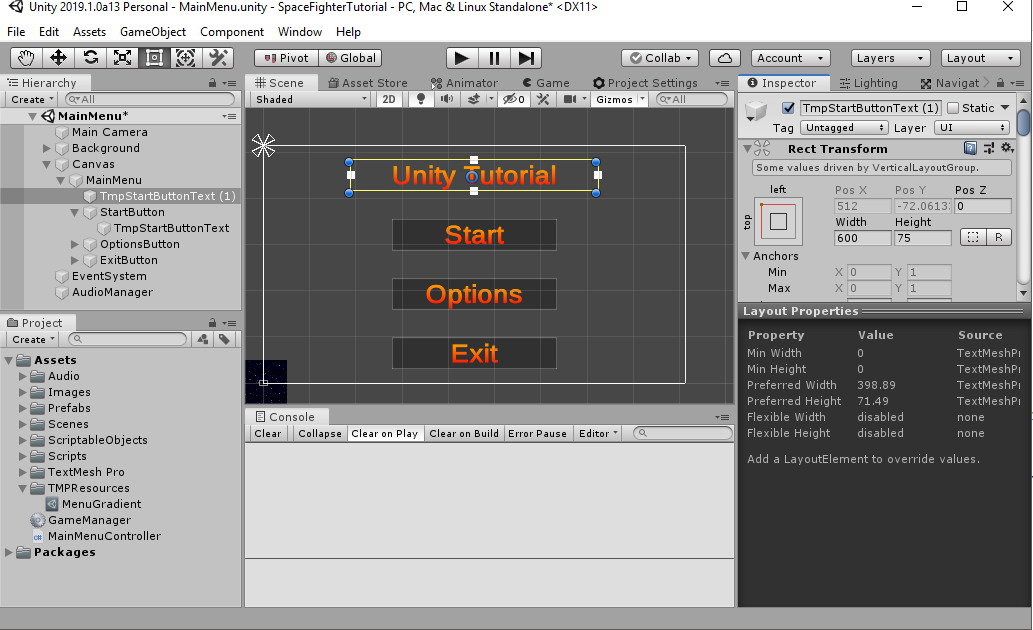
 We have finished creating the style for the button, so now we duplicate it and make another 2. Select the StartButton in the hierarchy window and using the ctrl+d shortcut to duplicate it. Do this twice to create a total of 3 buttons. Rename all your buttons and button texts so we have a start button and options button and an exit button. You should end up with something like this:

Full Unity 2D Game Tutorial 2019 – Responding to Button Events
Add a new component to the MainMenu object and create a new c# script called MainMenuController. This will house all the code for our buttons. Then in that script add this code:
|
1 2 3 4 5 6 7 8 9 10 11 12 13 14 15 16 17 18 19 |
using System.Collections; using System.Collections.Generic; using UnityEngine; using UnityEngine.SceneManagement; public class MainMenuController : MonoBehaviour { public void playGame() { SceneManager.LoadScene("GameScene"); } public void options() { } public void exitGame() { Application.Quit(); } } |
Code Notes:
using UnityEngine.SceneManagement has been added as we will be switching scenes to the game scene.
Application.Quit() will quite the game when not run in the Unity editor.
We have added 3 methods. One for each of our buttons. The options method will be blank until we add an options menu and start adding Preferences. How do we link this buttons to these methods we created? Each button has an On Click section in the Inspector. Here we first click the + icon to add a new action. Then we drag and drop the MainMenu object into the bottom box. This say that this object has the methods we want to run when this button is clicked. We then click the No Function drop down menu and scroll to our MainMenuController script and select the appropriate method. Repeat these steps for the other 2 buttons and we have our menu up and working.

All the buttons should now call their respective methods and allow us to play the game. We won’t be able to test the exit button because unity wont exit the game when run in the unity editor, however it will close when we create a build. You’ll just have to trust me on that.
There’s on Last thing I want to do before we move on to the Options menu and that is to create a title. We already have a nice Text object inside our buttons so we will just copy one of those. Duplicate one of the buttons Text objects and drag it out of the button and into the menu. Set the Rect Transform width to 600 and the height to 75 and give it a nice title by setting the text. You should end up with something like this:
Full Unity 2D Game Tutorial 2019 – Options Menu
I have chosen to do both the Main Menu and the Options in the same scene as not to duplicate scene data like the audio manager, canvas background etc. We will implement a toggle system that toggles the Main menu of and the option menu on. First we will duplicate the whole MainMenu and call it OptionsMenu. This will contain the title, all its buttons and the Main Menu Controller. We don’t need the Main Menu Controller on our OptionsMenu so delete that one so we only have the one on the MainMenu Controller.
We will now update out MeinMenu code to allow use to swap between the main menu and the potions menu.
|
1 2 3 4 5 6 7 8 9 10 11 12 13 14 15 16 17 18 19 20 21 22 23 24 25 26 27 28 29 |
using System.Collections; using System.Collections.Generic; using UnityEngine; using UnityEngine.SceneManagement; public class MainMenuController : MonoBehaviour { public GameObject mainMenu; public GameObject optionsMenu; public void playGame() { SceneManager.LoadScene("gameScene"); } public void options() { mainMenu.SetActive(false); optionsMenu.SetActive(true); } public void back() { mainMenu.SetActive(true); optionsMenu.SetActive(false); } public void exitGame() { Application.Quit(); } } |
Code Notes:
SetActive(true/false) this is used to enable or disable a game object. it will enable or disable all of its children too.
Added a back method so we can go back from the options menu to the main menu.
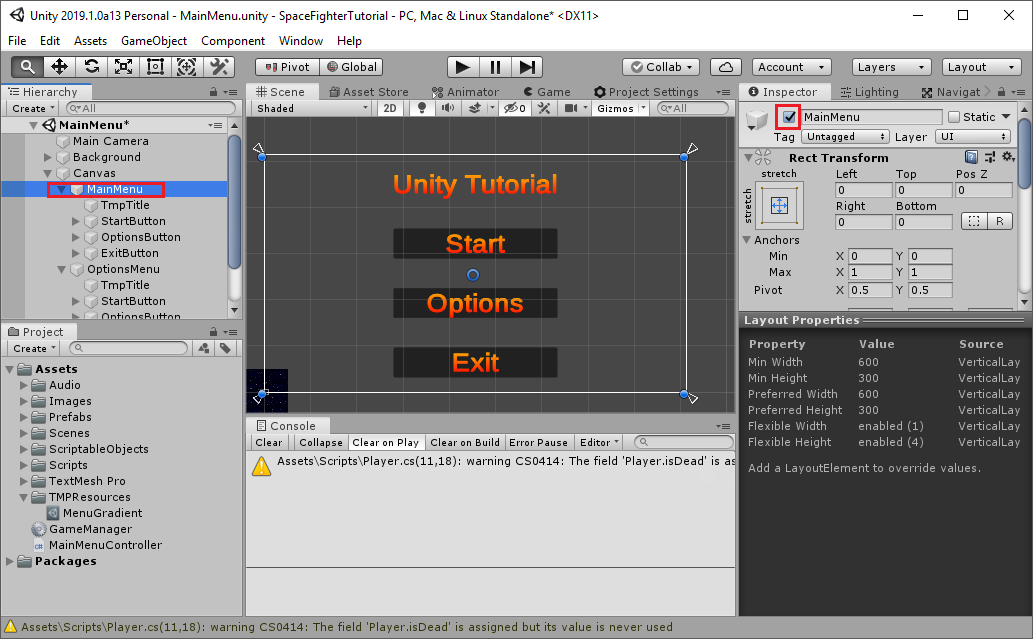
We are currently showing both the main menu and the options menu at the same time. This will make it difficult for us to see what were adding or removing from the options menu. So for now lets just disable the Main Menu by unchecking the check box shown in the image below:
We should now only be able to see the options menu. First, we will remove the Start and Options button in the options menu as we will not be using these. We will however keep the title and Exit button. We will Change the names of the object and text so it is a Back button. Then we will replace the On Click function to the back method we created to the back method we created in our MainMenu script.

Full Unity 2D Game Tutorial 2019 – Options Menu Sliders
We will now implement a slider which we will use to control the volume of our music. As usual create an empty ojbect to hold our slider and call it MusicVolumeSlider. Then add a slider component. Create > UI > Slider.
 Set the MusicVolumeSlider width to 400 and height to 50. This should give use a nice visible size and select the Slider and use the Anchor presets to fill it parent (shift+alt+click bottom right). Its still ugly and has an odd shaped handle. We will not be using the handle so we can just disable this with the checkbox(same as we did for the main menu) with the Handle Slide Area disabled we can make some adjustments to make it look better.
Adjust the slider value field to 0.5. This should set our sliders bar half way through the slider so we can see the background and fill colours.
 Next we set the background colour. I set mine to #FF0000 with an alpha of 123. This gives us a semi transparent background with a hint of red. The next part is to adjust the Fill Area Rect transform. Set the Left, Top, PosZ,Right and bottom to zero. This makes the fill area match its parent exactly. so it will fill properly with no border or spacing.

Next we adjust the Fill. Set the Left, Top, PosZ,Right and bottom to zero and select a colour you want for the bar that fills up the slider. We need one more thing for the slider, a descriptive text so users know what this slider is for. We will duplicate the Title TextMeshPro text and place it inside our MusicVolumeSlider object. Change the size down to something like 20 and move it into position above the slider. You should end up with something like this.

Right now our options for volume doesn’t do anything. We will implement the preferences in the next section of the tutorial. Our Main menu script now expects the Main menu and option menu. So add these and disable the option menu and enable the Main menu. You should now have something that works similar to this gif.

That’s it for this part of the tutorial. In the next part we will go over adding some functionality to our options menu including duplicating the music volume to create an effects volume control. As usual the source is available here on Github.
I came here for this part of your tutorial and ended up working through the previous steps as well to improve the game I’m busy making. Thank you for the well-written tutorial!
It’s also great that you mention how your decisions are good for optimisation or things you’ll need in the future.
I think your “Next Part” link is broken in the “Game Manager” page, it skips the “Audio Manager” page. A list of all the parts at the top of each page would also be nice 🙂
Thanks ! i was like did i miss something ? what is that Audio thing ? didn’t think to look the previous page for it
i do get a error but dont no how to fix it
One there can help?
UnassignedReferenceException: The variable MainMenu of MainMenuController has not been assigned.
You probably need to assign the MainMenu variable of the MainMenuController script in the inspector.
For future readers having the same problem :
To assign the right objects to the variables in the script, go to the Unity window and select MainMenu. In the inspector you can see the MainMenuController component.
If you have copied the script from the tutorial, you should see the two variables appear, with “None (GameObject)” to the right.
Drag and drop MainMenu to its variable, and OptionsMenu to the other one, and it should work.
This should be added to the tutorial imo.
ok so the next link in the game manager takes you to directly to this part skipping one tutorial part on audios.
i cant code
help pls