
Full Unity 2D Game Tutorial 2019 – Background and Camera
In this section of the tutorial we will go into adding images and making them tile as well as adding some code to the camera to make it follow the player around. We will use the following image for our background.

Full Unity 2D Game Tutorial 2019 – Background and Image Tiling
In order to have a background image you must first add an image to your project. You can simply drop and already exiting image from your computer into the Unity project window and the Image will be added.
The image will be in the top level of your assets folder so to keep things clean create an Images folder and move the image into it. Now before we start using this image we need to set up some options in the Inspector. Firstly the Mesh Type. The Mesh Type is used to decide how the image is rendered. We will set ours to Full Rect. This is required in order to tile the image. Don’t forget to click the apply button to save the settings

Next we want to add it to our scene. We will first create an empty object with a right click in the hierarchy window > create empty and name it BackgroundObject. Its a good idea to keep items you add at position 0,0,0, this will mean if you ever create a prefab out of it it will not appear in a weird position later on. Now we can create the Background sprite. Select the BackgroundObject and add a sprite. With the sprite selected go to the inspector and add our background image for the sprite and set Draw Mode to Tiled.
Our sprite is now tiled. We just can’t see it yet because its tiled at 1 by 1. Increase the size width and height to something like 100 and you will be able to see our newly tiled background.
 Yay our background is displaying but our player has disappeared 🙁
Full Unity 2D Game Tutorial 2019 – Sorting layers
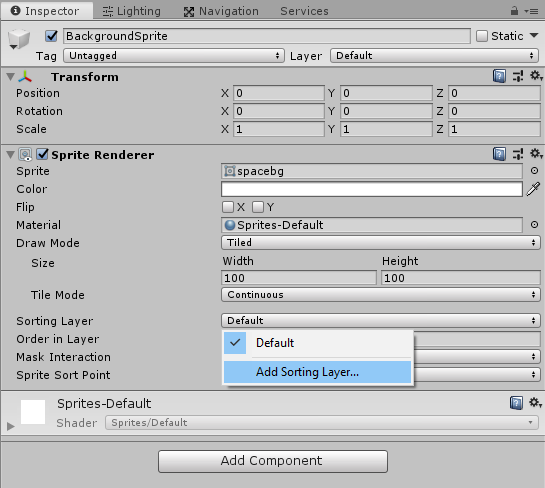
In Unity there is an option for rendered items called Sorting layer. This is used to define what order an image should be rendered. When drawing the background we should draw it first. If we drew it last it would overwrite all our other images. Again in the inspector for our sprite go to the Sorting layer drop down menu and select Add Sorting Layer… Here we will define some sorting layers that we will use in our project.
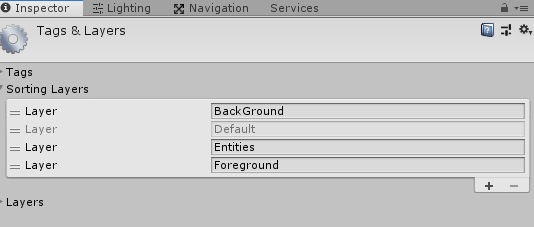
The layers are drawn from top to bottom so background is drawn first then the default layer and so on. Additionally we have entities and foreground. Our player sprite can now be set to the Entities layer so it is always draw above the default and background layers. This applies to other rendered items like particle effects which we will go into later.
Full Unity 2D Game Tutorial 2019 – Follow Player
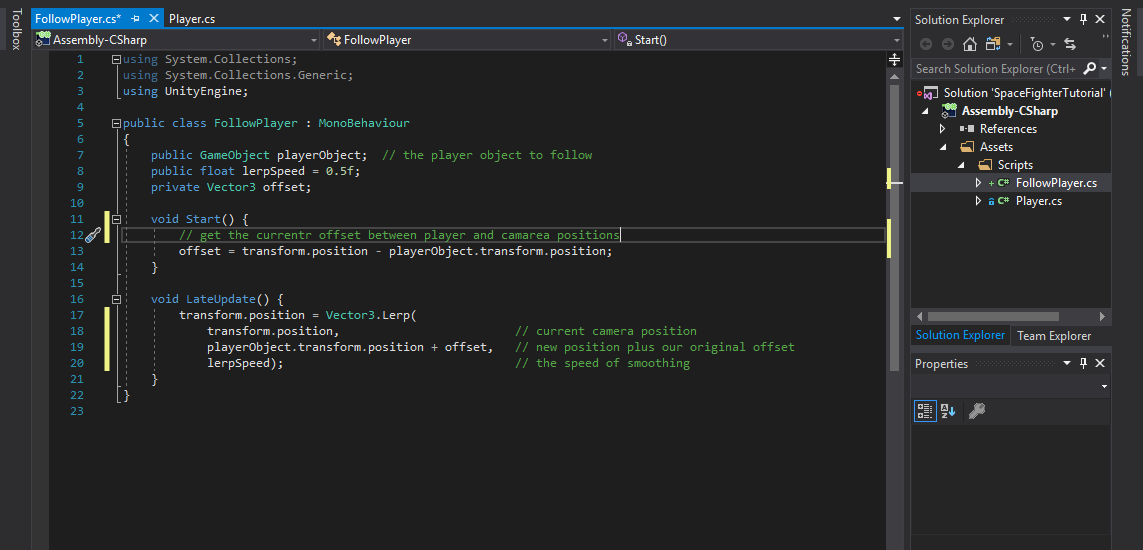
We have crated a tile background but we never get to see much of it as our camera never moves. We want our camera to follow the player and we will do that with a small script. First let’s create the script called FollowPlayer and open it in Visual Studio.
|
1 2 3 4 5 6 7 8 9 10 11 12 13 14 15 16 17 18 |
public class FollowPlayer : MonoBehaviour { public GameObject playerObject; // the player object to follow public float lerpSpeed = 0.5f; private Vector3 offset; void Start() { // get the currentr offset between player and camarea positions offset = transform.position - playerObject.transform.position; } void LateUpdate() { transform.position = Vector3.Lerp( transform.position, // current camera position playerObject.transform.position + offset, // new position plus our original offset lerpSpeed); // the speed of smoothing } } |
Notes on code:
The camera’s position is not the centre of the view, it is in 3D space above the player. This offset needs to be saved and used later
The Lerp function smoothes transitions from one point to another using the lerpSpeed value.
With this script created (and moved into our scripts folder 😉 ) add it to our camera by selecting the camera in the hierarchy view and dragging the FollowPlayer script into the Inspector window.
Now if we play our game…oh no another error! (yes, I like making you fail it’s how we learn). Whats the issue?
|
1 |
UnassignedReferenceException: The variable playerObject of FollowPlayer has not been assigned. |
Ah! we added public GameObject playerObject in our code but we never set it in our inspector. Our code didn’t know about our player object. To fix this we simple drag the PlayerObject from the hierarchy window into the Player Object field in the inspector.
Full Unity 2D Game Tutorial 2019 – Minor Adjustments
I have made some minor adjustments to the RigidBody2D for the player to get more smooth and fluid movement. The settings are:
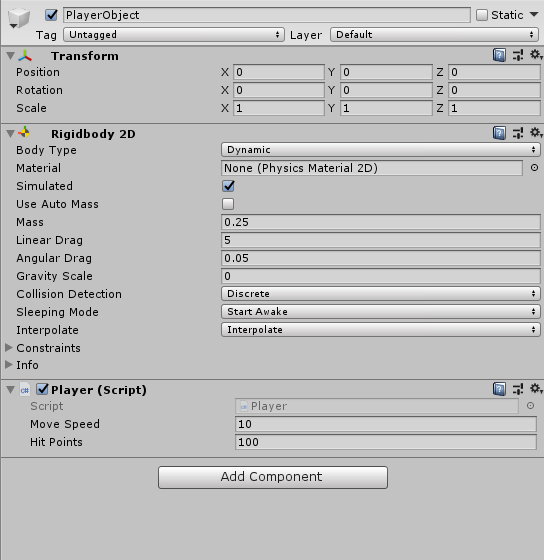 I think these settings allow the player to move more freely and feel more enjoyable. However feel free to play about with them, after all this is your game.
That’s it for this tutorial section. The Github source for the completed project can be found here on Github