

Full LibGDX Game Tutorial – Box2D Body Factory
Welcome to part 4 of our Full LibGDX Game Tutorial. This part will focus on the Box2D and creating a Body Factory to create our bodies for us instead of typing code in every time for each object. If you haven’t seen the earlier parts of this tutorial I advise you to start at Full LibGDX Game Tutorial – Project setup as this tutorial continues from these earlier parts. For those of you who have come from part 3, you can continue on.
A factory in programming is like a factory in real life. You input some goods and some produce comes out. In programming, this means we give our factory some details and it will create a new object for us. In our case, we want to give the factory some details like the shape and size of our body and get a body back which we can use.
Create a new class called BodyFactory and add a constructor that takes a Box2D World like below:
|
1 2 3 4 5 6 7 8 9 10 11 12 |
package blog.developmentbox2dtutorial; import com.badlogic.gdx.physics.box2d.World; public class BodyFactory { private World world; private BodyFactory(World world){ this.world = world; } } |
Notice how we have used “private BodyFactory(World world)” instead of using public like usual. That is because we’re going to make this a singleton class. That means only 1 BodyFactory object will ever be created as we will never need more than 1 and instead of creating a new body factory everytime we want to make a body and using up more ram, we will just use the one already created.
To finish turning this into a singleton class we need a public static method that returns the BodyFactory object if one exists or creates one if none exist. The code for that is:
|
1 2 3 4 5 6 |
public static BodyFactory getInstance(World world){ if(thisInstance == null){ thisInstance = new BodyFactory(world); } return thisInstance; } |
So now we have a singleton BodyFactory ready, we just need to add some methods that will allow us to create bodies as needed. Bodies are made up of one or more fixtures and those fixtures have properties that define what the material is like, so rubber is pretty heavy, very bouncy and doesn’t slide well, whereas glass is lighter, not very bouncy and slides quite a bit. Sometimes we will want a glass like fixture and sometimes we will want a bouncy ball like fixture. In order to do that we will have to add some way of choosing a fixture type.
We’re going to do it by defining some fixture definitions in our BodyFactory and then when we create new bodies we can just say we want a bouncy ball type body. So our method for creating a fixture will be:
|
1 2 3 4 5 6 7 8 9 10 11 12 13 14 15 16 17 18 19 20 21 22 23 24 25 26 27 28 29 30 31 |
static public FixtureDef makeFixture(int material, Shape shape){ FixtureDef fixtureDef = new FixtureDef(); fixtureDef.shape = shape; switch(material){ case 0: fixtureDef.density = 1f; fixtureDef.friction = 0.3f; fixtureDef.restitution = 0.1f; break; case 1: fixtureDef.density = 0.5f; fixtureDef.friction = 0.7f; fixtureDef.restitution = 0.3f; break; case 2: fixtureDef.density = 1f; fixtureDef.friction = 0f; fixtureDef.restitution = 1f; break; case 3: fixtureDef.density = 1f; fixtureDef.friction = 0.9f; fixtureDef.restitution = 0.01f; default: fixtureDef.density = 7f; fixtureDef.friction = 0.5f; fixtureDef.restitution = 0.3f; } return fixtureDef; } |
The code above allows us to send the BodyFactory an integer(whole number. e.g 1 or 98 etc) for the material and a shape and it will return a FixtureDef for us. The integer value will allow us to choose between the 0,1,2, and 3 types. This isn’t very readable to us so we can improve this by changing the integers into constants and have STEEL = 0, WOOD = 1, RUBBER = 2 etc. In order to do that we need to define these constants in our bodyFactory.
|
1 2 3 4 |
public static final int STEEL = 0; public static final int WOOD = 1; public static final int RUBBER = 2; public static final int STONE = 3; |
Now we have them defined in our BodyFactory when we want a new body that’s like STEEL we can ask the bodyFactory for a square body that’s made from STEEL. We also added a default value so if somehow we ask for a type that doesn’t exist it will not crash the application.
Creating our Box2D bodies
Now we have our fixture method we want to move onto making bodies. Let’s create the circle body type first. The code is :
|
1 2 3 4 5 6 7 8 9 10 11 12 13 14 15 16 |
public Body makeCirclePolyBody(float posx, float posy, float radius, int material, BodyType bodyType, boolean fixedRotation){ // create a definition BodyDef boxBodyDef = new BodyDef(); boxBodyDef.type = bodyType; boxBodyDef.position.x = posx; boxBodyDef.position.y = posy; boxBodyDef.fixedRotation = fixedRotation; //create the body to attach said definition Body boxBody = world.createBody(boxBodyDef); CircleShape circleShape = new CircleShape(); circleShape.setRadius(radius /2); boxBody.createFixture(makeFixture(material,circleShape)); circleShape.dispose(); return boxBody; } |
The makeCirclePolyBody method takes a few arguments. The arguments are:
- float posx
- The x position the body will be in our world
- float posy
- the y position our body will be in the world
- float radius
- the size of our circle’s radius. The circle will be twice this value wide.
- int material
- The material type we just defined earlier(Steel, Wood, Rubber, Stone)
- BodyType bodyType
- The type of body (DynamicBody, StaticBody or KinematicBody)
- boolean fixedRotation
- This will be true if we want our body to never rotate.
With all of these arguments, we can make a body in our body factory. Now whenever we need a new body in our application we can use this code:
|
1 |
Body ourNewBodyObject = bodyFactory.makeCirclePolyBody(x, y, 2, BodyFactory.RUBBER, BodyType.DynamicBody,false); |
Let’s test it out with what we have so far. Update our B2DModel constructor to match the following code:
|
1 2 3 4 5 6 7 8 9 10 11 12 13 14 15 16 17 18 19 |
public B2dModel(){ world = new World(new Vector2(0,-10f), true); createFloor(); createObject(); createMovingObject(); // get our body factory singleton and store it in bodyFactory BodyFactory bodyFactory = BodyFactory.getInstance(world); // add a new rubber ball at position 1, 1 bodyFactory.makeCirclePolyBody(1, 1, 2, BodyFactory.RUBBER, BodyType.DynamicBody,false); // add a new steel ball at position 4, 1 bodyFactory.makeCirclePolyBody(4, 1, 2, BodyFactory.STEEL, BodyType.DynamicBody,false); // add a new stone at position -4,1 bodyFactory.makeCirclePolyBody(-4, 1, 2, BodyFactory.STONE, BodyType.DynamicBody,false); } |

Great, we can now easily create Circle bodies whenever we want easily. We can make this even easier since 90% of the time we will be using false for fixed rotation. To do that we can define another method without the fixed rotation argument and have that method call our current method adding false to the fixed rotation. This gives us one less argument to type in. So the code would be:
|
1 2 3 |
public Body makeCirclePolyBody(float posx, float posy, float radius, int material, BodyType bodyType){ return makeCirclePolyBody( posx, posy, radius, material, bodyType, false); } |
This technique of using the same name for a method with different types or a different amount of arguments is called method overloading. This allows us to use the same name for a method and pass in different arguments depending on what we want to pass in. More detail on method overloading can be found here.
Now if we omit the false from our bodyFactory calls we will still get the same body we usually would get. For example, this code will still give us a rubber ball.
|
1 |
bodyFactory.makeCirclePolyBody(1, 1, 2, BodyFactory.RUBBER, BodyType.DynamicBody); |
We can go a step further and have DynamicBody the default with this method:
|
1 2 3 |
public Body makeCirclePolyBody(float posx, float posy, float radius, int material){ return makeCirclePolyBody( posx, posy, radius, material, BodyType.DynamicBody, false); } |
Rectangle Shaped Bodies
So now we have an easy way to make circles with a few arguments and still able to define different body types if needed. We should do the same for rectangle shaped bodies. The following code should do the trick:
|
1 2 3 4 5 6 7 8 9 10 11 12 13 14 15 16 17 18 19 20 21 |
public Body makeBoxPolyBody(float posx, float posy, float width, float height,int material, BodyType bodyType){ return makeBoxPolyBody(posx, posy, width, height, material, bodyType, false); } public Body makeBoxPolyBody(float posx, float posy, float width, float height,int material, BodyType bodyType, boolean fixedRotation){ // create a definition BodyDef boxBodyDef = new BodyDef(); boxBodyDef.type = bodyType; boxBodyDef.position.x = posx; boxBodyDef.position.y = posy; boxBodyDef.fixedRotation = fixedRotation; //create the body to attach said definition Body boxBody = world.createBody(boxBodyDef); PolygonShape poly = new PolygonShape(); poly.setAsBox(width/2, height/2); boxBody.createFixture(makeFixture(material,poly)); poly.dispose(); return boxBody; } |
We can now make circle and rectangle shaped bodies. Later we will add some more methods to this factory to allow us to make sensors, which are bodies that can tell us when they are interacting with another body. We will also add methods for adding additional fixtures to bodies.
Polygon Shaped Bodies
There are two more shape types we will add to this factory and the first shape is the polygon shape. Sometimes we don’t want a rectangle or a circle shape and we want a more complex shape and for that, we have the polygon shape. There is one drawback to using this and that is it only works for convex polygons(shapes with no indents). Using concave polygons(shaped with indents) will not function properly when interacting with other bodies. Sometimes they will partially go through other bodies and that is not what we want. To counteract this we would split the concave object into convex parts like the example below.

The makePolygonShapeBody method will take an array of Vector2s(An array is a variable that contains many other variables). Our array will contains many Vector2s which are a pair of values used to indicate a position. For example, let’s say we want to make a pentagon.
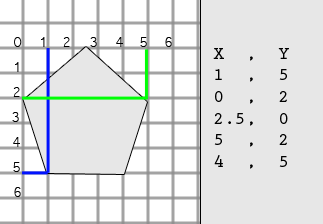
Our first Vector2 would be the blue line (1,5). The first value being how far left the point is, the second being how far down the point is. We continue this for all points and we have all 5 points, we then put them all in a single array and pass that to our method which will create a body using these points to make a shape.
Our code will be this:
|
1 2 3 4 5 6 7 8 9 10 11 12 13 14 |
public Body makePolygonShapeBody(Vector2[] vertices, float posx, float posy, int material, BodyType bodyType){ BodyDef boxBodyDef = new BodyDef(); boxBodyDef.type = bodyType; boxBodyDef.position.x = posx; boxBodyDef.position.y = posy; Body boxBody = world.createBody(boxBodyDef); PolygonShape polygon = new PolygonShape(); polygon.set(vertices); boxBody.createFixture(makeFixture(material,polygon)); polygon.dispose(); return boxBody; } |
Now we can make circles, rectangles and convex polygons.
Cone Shaped Bodies
The final method we will add for now is the cone shape. This is useful for using as a sensor to act as an enemy’s field of view, which is why it’s been added to BodyFactory. The code for our cone body is:
|
1 2 3 4 5 6 7 8 9 10 11 12 13 14 15 16 17 18 19 |
public void makeConeSensor(Body body, float size){ FixtureDef fixtureDef = new FixtureDef(); //fixtureDef.isSensor = true; // will add in future PolygonShape polygon = new PolygonShape(); float radius = size; Vector2[] vertices = new Vector2[5]; vertices[0] = new Vector2(0,0); for (int i = 2; i < 6; i++) { float angle = (float) (i / 6.0 * 145 * DEGTORAD); // convert degrees to radians vertices[i-1] = new Vector2( radius * ((float)Math.cos(angle)), radius * ((float)Math.sin(angle))); } polygon.set(vertices); fixtureDef.shape = polygon; body.createFixture(fixtureDef); polygon.dispose(); } |
The code above will create a cone shaped body using cos and sin to plot a few points of a circle and an initial point of 0,0 to specify the focal point of the cone. Additionally, we need to add the constant DEGTORAD which is a float used to convert degrees into radians. So add “private final float DEGTORAD = 0.0174533f;” as a field with the other fields we currently have. This cone sensor will later be used as a field of view for our enemies.
We now have a fully functional BodyFactory that can create circles, rectangles, convex polygons and cone-shaped bodies. The BodyFactory is also a singleton so we can load it and create bodies in whatever part of our code we like which should make creating enemies and obstacles in the game later on a lot easier.
For now, feel free to experiment with adding different body shapes in the constructor of our Box2DModel.
In the next part of our tutorial, part 5, we will be adding a contact listener which will allow us to react to objects that hit each other as well as making sensors.
| ← Box2D | — Contents — | Box2D Contact Listener → |
Am I correct that we are overloading makeCirclePolyBody? If so, would the tutorial be improved by adding a paragraph to explain why this is allowed and how it works? I only figured it out by going to the code for Part 8 and seeing three methods with the same name, and then barely remembering something about overloading.
https://docs.oracle.com/javase/tutorial/java/javaOO/methods.html
I can certainly add a note and a link for method overloading.
Function
public static BodyFactory getInstance(World world){ }
* I can not use ‘static ‘ : it show an error. I don’t know why? Sorry I am just a newbie
I assume this is due to using the word “Function”. Java does not use this word for methods in classes. If this isn’t the error can you post what error message you are receiving.
Function
public static BodyFactory getInstance(World world){ }
* I can not use ‘static ‘ : it show an error. I don’t know why? Sorry I am just a newbie
OK, I found what I was wrong;
I forget to declare a static variable like this : private static BodyFactory thisInstance;
Hello,
thanks for this Tutorial so far!
Hey John Day – I’ve been trodding along this tutorial for 2 days now and I’m really impressed with your work. I think it has potential to be even greater than it is. I’ve created a repo detailing my commits/progress for this extremely detailed walk through.
https://github.com/wilkon/Box2d-Tutorial
I added a bit of my own touch to how you’ve structured the project.
I’ve also created this repo based on your initial 2 lessons.
https://github.com/wilkon/LibGDX-template
also a very minor difference here – within the screen switches
If you’re not okay with this, I can take it down or even grant you full ownership of it to use in tangent with this walkthrough. It is YOU who did this after all.
Thank You for taking such a great effort in creating this work of art.