

Full Unity 2D Game Tutorial 2019 – Preferences
In this section of the tutorial we will be adding the preferences code to allow us to update the music and effects volume. These preferences can be applied to any item you want to store like volume, username, fullscreen/windowed screensize, key/controller configurations etc. For more information check out the unity documentation for PlayerPrefs.
Full Unity 2D Game Tutorial 2019 – Preferences UI
In the last part of this tutorial we got up to adding a volume slider for the music. Now that we already have a slider we can just duplicate the music one and rename it to EffectsVolumeSlider and change the text to Effects Volume. You should have something like this:

Our sliders have an On Value Changed event just like the buttons On Click event. We will use this to trigger a method in one of our scripts. But first we have to make that script. So here’s the code:
|
1 2 3 4 5 6 7 8 9 10 11 12 13 14 15 16 17 18 19 20 21 |
using System.Collections; using System.Collections.Generic; using UnityEngine; using UnityEngine.UI; public class OptionsMenu : MonoBehaviour { public Slider musicVolumeSlider; public Slider effectsVolumeSlider; void Start() { musicVolumeSlider.value = PlayerPrefs.GetFloat("MusicVolume", 0.75f); effectsVolumeSlider.value = PlayerPrefs.GetFloat("EffectsVolume", 0.75f); } public void updateMusicVolume() { PlayerPrefs.SetFloat("MusicVolume", musicVolumeSlider.value); } public void updateEffectsVolume() { PlayerPrefs.SetFloat("EffectsVolume", effectsVolumeSlider.value); } } |
Code Notes:
PlayerPrefs can be used to to get or set a float, int or string from the preferences (stored in your registry on windows)
Using UnityEngine.UI because we access slider’s values.
This code is pretty self explanatory so we will move onto setting the sliders to run these methods when changed.
Full Unity 2D Game Tutorial 2019 – Preferences Slider On Value Changed
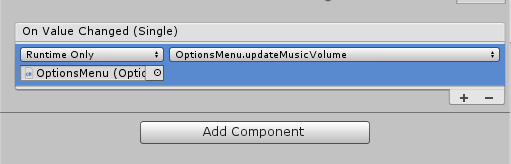
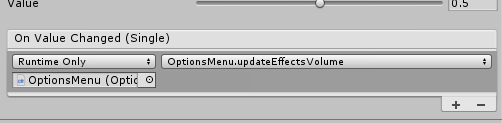
Firstly lets add the OptionsMenu script to our OptionsMenu object. This will allows us to link the sliders to the references we have in our code. Link the sliders and rename them now if you haven’t already so we know which slider is which.

Assign the Options menu to the slider Events and select the updateMusicVolume method for the Music volume event and the updateEffectsVolume method for the Effects volume.
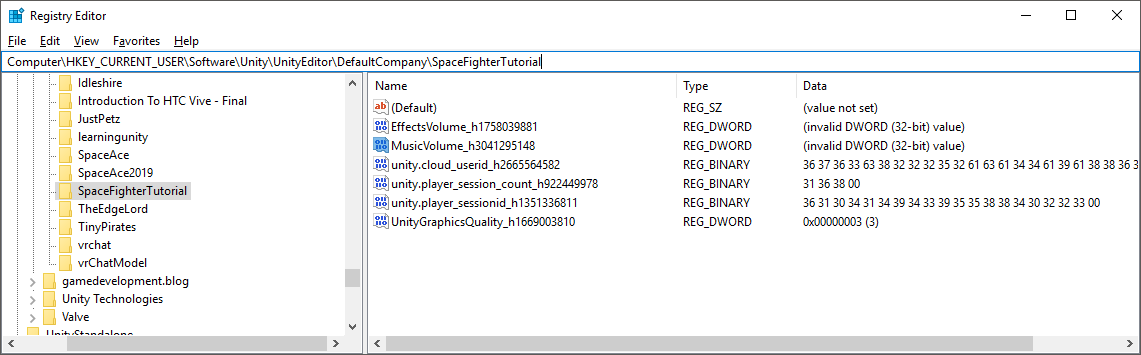
If you play the game now in unity you should be able to adjust the effects and volume sliders(this wont change the volumes yet) and then quit and play the game again. The values should match the values you set them at from the previous play. This means they have been saved in your preferences. You can further double check the values in windows by opening Regedit (winkey+r > regedit [enter]) and going to Computer\HKEY_CURRENT_USER\Software\Unity\UnityEditor\DefaultCompany\projectname. Here we can see in my registry we have both the music and effects volume saved.
We now need to update the AudioManager to tell it that the volumes have changes and all the music and effect’s volumes should be changed.
Full Unity 2D Game Tutorial 2019 – Update Audio Manager
There is two ways of doing this. We could add a new event to the OnValueChanged and add the Audio manager and select the method for updating the volume. This would mean we have to set the Audio Manager to the slider in Unity. The problem with this is we already have the AudioManager set as a singleton so why don’t we use this.
|
1 2 3 4 5 6 7 8 9 |
public void updateMusicVolume() { PlayerPrefs.SetFloat("MusicVolume", musicVolumeSlider.value); AudioManager.instance.musicVolumeChanged(); } public void updateEffectsVolume() { PlayerPrefs.SetFloat("EffectsVolume", effectsVolumeSlider.value); AudioManager.instance.effectVolumeChanged(); } |
Code Notes:
We used the singleton pattern to access the audio manager and update the volumes.
Now, when you play the game you should be able to adjust the volume and hear the volume change for the music and effects.
Full Unity 2D Game Tutorial 2019 – Bonus Content
In some of my games I require a username for things like a leader board or an online game where names should be unique. People may skip the option to set their user name in the options panel so I usually have a list of first and last names that can be used to generate a random name. The first name list is usually something like an emotion or an adverb and the second is an animal. This allows me to come up with some fun name for people like angry duck or dangerous fly. We are going to implement this in our game.
First we need an input box that will allow the user to change their name if they don’t like the randomly generated one.

Remove the Placeholder text object as we will not need it because we will automatically populate it with code. We set the text in the TmpInputUname object and not the text object because TextMeshPro takes care of updating the text field for us. Play around with the colours and size until you get something you like. You should be familiar with all this now if you’ve been folllowing this tutorial from the beginning.
Now lets update our code:
|
1 2 3 4 5 6 7 8 9 10 11 12 13 14 15 16 17 18 19 20 21 22 23 24 25 26 27 28 29 30 31 32 33 34 35 36 37 38 39 40 41 42 43 44 45 46 47 48 49 50 51 52 53 54 55 56 |
using System.Collections; using System.Collections.Generic; using UnityEngine; using TMPro; using UnityEngine.UI; public class OptionsMenu : MonoBehaviour { public TMP_InputField username; public Slider musicVolumeSlider; public Slider effectsVolumeSlider; string uname; // Start is called before the first frame update void Start() { musicVolumeSlider.value = PlayerPrefs.GetFloat("MusicVolume", 0.5f); effectsVolumeSlider.value = PlayerPrefs.GetFloat("EffectsVolume", 0.5f); uname = PlayerPrefs.GetString("username"); // get the username (no default) Debug.Log("uname is :" + uname); if (uname == null || uname == "") { // is the name null or empty PlayerPrefs.SetString("username", createUname()); // it is so create a new name uname = PlayerPrefs.GetString("username"); // set the new name } username.text = uname; // update the textfield } public void updateUname() { PlayerPrefs.SetString("username", username.text); } public void updateMusicVolume() { PlayerPrefs.SetFloat("MusicVolume", musicVolumeSlider.value); AudioManager.instance.musicVolumeChanged(); } public void updateEffectsVolume() { PlayerPrefs.SetFloat("EffectsVolume", effectsVolumeSlider.value); AudioManager.instance.effectVolumeChanged(); } private string createUname() { // get the text asset TextAsset fnamesAsset = Resources.Load("fname") as TextAsset; string[] fnames = fnamesAsset.text.Split('\n'); // split it into lines Debug.Log(fnames[0]); // show us teh first name in the list (debug) TextAsset lnamesAsset = Resources.Load("lname") as TextAsset; string[] lnames = lnamesAsset.text.Split('\n'); Debug.Log(lnames[0]); //create a random name from one of the first name + "-" + one of the last names string uname = fnames[Random.Range(0, fnames.Length - 1)].Trim(); uname += "-" + lnames[Random.Range(0, lnames.Length - 1)].Trim(); Debug.Log(uname); // show us the new generated name return uname; // return the name } } |
Code Notes:
We check if the username is null or blank and create a new one if it is
The username is saved once it is created.
The createUname loads text assets(which we will add next) and then generate a random name from the 2 lists.
As you may have seen we use a couple of TextAssets. A TextAsset is a plain old text file stored inside our unity assets folder which we can load and get data from. Our code relies on these files being here so we will need to create a Rsources folder and put these two files inside. The first file here is the fname.txt file:
|
1 2 3 4 5 6 7 8 9 10 11 12 13 14 15 16 17 18 19 20 21 22 23 24 25 26 27 28 29 30 31 32 33 34 35 36 37 38 39 40 41 42 43 44 45 46 47 48 49 50 51 52 53 54 55 56 57 58 59 60 61 62 63 64 65 66 67 68 69 70 71 72 73 74 75 76 77 78 79 80 81 82 83 84 85 86 87 88 89 90 91 92 93 94 95 96 97 98 99 100 101 102 103 104 105 106 107 108 109 110 111 112 113 114 115 116 117 118 119 120 121 122 123 124 125 126 127 128 129 130 131 132 133 134 135 136 137 138 139 140 141 142 143 144 145 146 147 148 149 150 151 152 153 154 155 156 157 158 159 160 161 162 163 164 165 166 167 168 169 170 171 172 173 174 175 176 177 178 179 180 181 |
Adorable Affectionate Afraid Aggressive Agitated Alive Angry Annoyed Appreciated Ashamed Authoritative Awful Belligerent Bitter Blue Blunt Bold Bored Brilliant Bullying Callous Cautious Cheerful Clever Combative Comical Compassionate Contemptuous Content Contrary Cool Cordial Covetous Cranky Cross Curious Dainty Defeated Defiant Dejected Delighted Devoted Disagreeable Disciplined Discontent Disgusted Distasteful Doubtful Dreaded Dutiful Dynamic Elated Enraged Envious Evil Excited Exhausted Exhilarated Exuberant Fearful Fearless Feisty Fierce Flattered Forgiving Forlorn Frustrated Furious Generous Gentle Grateful Greedy Happy Harsh Hated Haughty Heroic Honest Honored Hopeful Hostile Ignored Imaginative Impartial Impatient Inconsiderate Indifferent Innocent Inquisitive Insensitive Insightful Inspired Intolerated Intuitive Irritate Isolated Jealous Joyful Kind Kindred Lazy Lively Loathing Lonely Lovely Lucky Mad Mean Mollified Nasty Natural Naughty Nervous Obnoxious Outraged Outstanding Overjoyed Pained Paniced Patient Perky Perturbed Powerful Querulous Raging Rapturous Relaxed Reliable Relieved Reluctant Repentant Repulsive Resented Resigned Resistant Restrained Reverent Revulsion Ridiculed Rough Rude Sad Satisfied Scornful Severe Shamed Sickly Silly Skillful Sorrowful Spite Stubborn Sure Surprised Sweet Tame Tempted Tender Tense Terse Tired Trepid Uncertain Understood Unhappy Valiant Victorious Vindictive Violent Vociferous Wary Weary Weird Wicked Wise Woeful Wonderful Worried Worthy Youthful Zealous |
The second is the lname.txt file:
|
1 2 3 4 5 6 7 8 9 10 11 12 13 14 15 16 17 18 19 20 21 22 23 24 25 26 27 28 29 30 31 32 33 34 35 36 37 38 39 40 41 42 43 44 45 46 47 48 49 50 51 52 |
alligator ant bear bee bird camel cat cheetah chicken chimp cow crocodile deer dog dolphin duck eagle elephant fish fly fox frog giraffe goat goldfish hamster hippo horse kangaroo kitten lion lobster monkey octopus owl panda pig puppy rabbit rat scorpion seal shark sheep snail snake spider squirrel tiger turtle wolf zebra |
Place these 2 text files in your Resources folder and press play. You will be granted a random name when you first start. This name will be saved in your preferences. Hehe! I got Fearless-cow. By using these 2 lists we are able to generate over 9000 name combinations (A wild Vegeta appears, It’s over 9000!!!!!!)

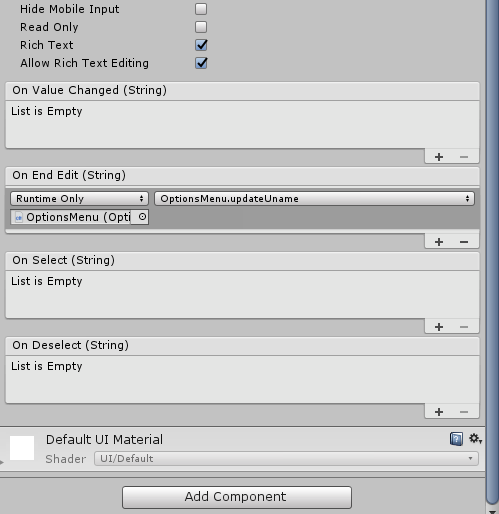
So now we have a random name but we still can’t change it because we haven’t used the text field to update out preferences when its changed. To do that we simple update the TmpInputUname event On End Edit event to call our OptionsMenu script and call the updateUname method. This will save our uname to the preferences.
Now as a finishing touch let’s let the player know that this box is for their username. We will copy the Text from one of the volume sliders and paste it into our TmpInputUname. Use our Anchor preset to attach it to the top left corner and move it up a bit manually. You should end up with something like this:

That’s it for this section of the tutorial. As usual the finished source code for this section of the tutorial is available on Github here.
the section to add the input field is missing
Also the updateUname function does nothing (it sets the user name to the already existing user name..). it has to be the same like in void Start:
PlayerPrefs.SetString(“username”, createUname());
uname = PlayerPrefs.GetString(“username”);
username.text = uname;