
Ashley and Box2D Tutorial
In this tutorial, we will create a simple game base using Ashley and Box2D. Ashley is an Entity System that allows us to create entities from a set of components such as an image, a position etc. More information on Ashley can be found on the Ashley wiki and information on Entity Systems can be found on www.gamedev.net. Box2D is a physics engine allowing us to create realistic physics in our game such as falling objects, explosions and collisions.
Ashley and Box2D – Project setup
The first step is to create a project using the gdxsetup.jar which can be downloaded from github.com/libgdx/libgdx/wiki/Project-Setup-Gradle. Run the jar file and set the project details making sure to include the Box2D and Ashley extensions. The settings I used are shown below:

Note: I have only created a desktop application as this is a tutorial and won’t ever be run on android, ios or gwt. If you add the android platform you will have to place your images in the android assets folder instead of the desktop assets folder.
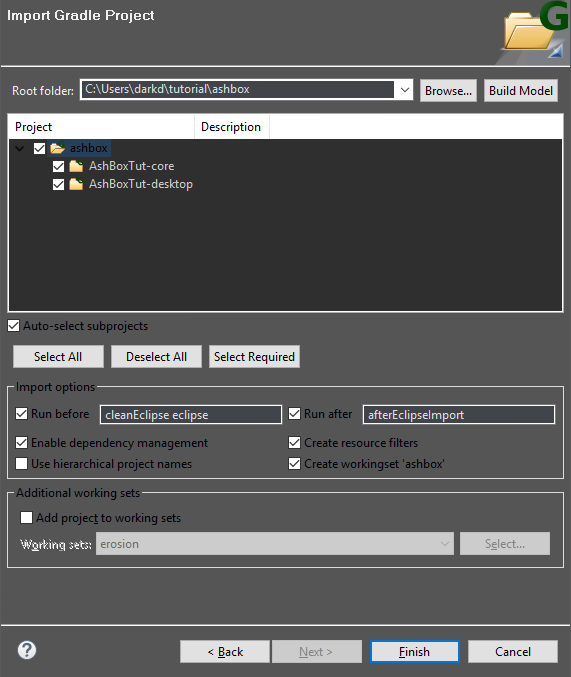
Now we need to import the project into Eclipse. Go to File > Import then select Gradle > Gradle Project. Find the project root (In my case it was C:/Users/darkd/tutorial/ashbox) and select Build model. Select all the projects and click import.
Ashley and Box2D – Set up base structure
Now that we have our project setup ready we can start on the code. The first thing we want to do is change the ashbox class to remove the example code and replace it with our own.
|
1 2 3 4 5 6 7 8 9 10 11 12 |
package blog.development.ashboxtut; import com.badlogic.gdx.Game; public class ashbox extends Game { @Override public void create() { this.setScreen(new GameScreen()); } } |
Right we now have our game setup to change to the GameScreen as soon as it loads. Now we need to add the GameScreen.
|
1 2 3 4 5 6 7 8 9 10 11 12 13 14 15 16 17 18 19 20 21 22 23 24 25 26 27 28 29 30 31 32 33 34 35 36 37 38 39 40 41 42 |
package blog.development.ashboxtut; import com.badlogic.gdx.Gdx; import com.badlogic.gdx.Screen; public class GameScreen implements Screen{ @Override public void show() { } @Override public void render(float delta) { Gdx.gl.glClearColor(0.5f, 0.5f, 0.5f, 1); Gdx.gl.glClear(GL20.GL_COLOR_BUFFER_BIT); } @Override public void resize(int width, int height) { } @Override public void pause() { } @Override public void resume() { } @Override public void hide() { } @Override public void dispose() { } } |
For now, that’s all we need in our GameScreen. We will come back to this once we have all our Components, Systems, Logic and Listeners in place.
Ashley and Box2D – Creating Components
Components in the Ashley ECS are like containers for a single set of specific data. In this example, we will be using a component called TransformComponent. This component will be solely used to store data relating to the position, rotation and scale of an entity. This component can be added to any Entity that has a position, rotation and scale such as our player or an enemy.
Here are all of our components:
|
1 2 3 4 5 6 7 8 9 |
package blog.gamedevelopment.ashboxtut.entity.components; import com.badlogic.ashley.core.Component; import com.badlogic.gdx.physics.box2d.Body; public class B2dBodyComponent implements Component{ public Body body; } |
|
1 2 3 4 5 6 7 8 9 10 11 |
package blog.gamedevelopment.ashboxtut.entity.components; import com.badlogic.ashley.core.Component; import com.badlogic.ashley.core.Entity; /* * Stores collision data such as entity that this entity has collided with */ public class CollisionComponent implements Component { public Entity collisionEntity;; } |
|
1 2 3 4 5 6 7 |
package blog.gamedevelopment.ashboxtut.entity.components; import com.badlogic.ashley.core.Component; public class PlayerComponent implements Component{ // nothing here yet but can add health etc } |
|
1 2 3 4 5 6 7 8 9 10 11 12 13 14 15 16 17 18 19 20 21 22 23 24 |
package blog.gamedevelopment.ashboxtut.entity.components; import com.badlogic.ashley.core.Component; public class StateComponent implements Component { public static final int STATE_NORMAL = 0; public static final int STATE_JUMPING = 1; public static final int STATE_FALLING = 2; public static final int STATE_MOVING = 3; public static final int STATE_HIT = 4; private int state = 0; public float time = 0.0f; public boolean isLooping = false; public void set(int newState){ state = newState; time = 0.0f; } public int get(){ return state; } } |
|
1 2 3 4 5 6 7 8 9 10 11 12 |
package blog.gamedevelopment.ashboxtut.entity.components; import com.badlogic.ashley.core.Component; import com.badlogic.gdx.math.Vector2; import com.badlogic.gdx.math.Vector3; public class TransformComponent implements Component { public final Vector3 position = new Vector3(); public final Vector2 scale = new Vector2(1.0f, 1.0f); public float rotation = 0.0f; public boolean isHidden = false; } |
That’s all the components needed for this part of the tutorial. Later we will extend this to render with textures instead of the default debug renderer for box2d.
Ashley and Box2D – Creating Systems
Ashley systems are the logic of our game and each system will focus on a specific area of logic such as rendering images, moving bodies, changing states etc. In this tutorial we will be using 4 systems; Collision, Physics, PhysicsDebug and PlayerControl.
Let’s start with the PlayerControlSystem:
|
1 2 3 4 5 6 7 8 9 10 11 12 13 14 15 16 17 18 19 20 21 22 23 24 25 26 27 28 29 30 31 32 33 34 35 36 37 38 39 40 41 42 43 44 45 46 47 48 49 50 51 52 53 54 55 56 57 58 59 60 61 62 63 64 65 66 67 68 69 70 71 72 |
package blog.gamedevelopment.ashboxtut.entity.systems; import blog.gamedevelopment.ashboxtut.controller.KeyboardController; import blog.gamedevelopment.ashboxtut.entity.components.B2dBodyComponent; import blog.gamedevelopment.ashboxtut.entity.components.PlayerComponent; import blog.gamedevelopment.ashboxtut.entity.components.StateComponent; import com.badlogic.ashley.core.ComponentMapper; import com.badlogic.ashley.core.Entity; import com.badlogic.ashley.core.Family; import com.badlogic.ashley.systems.IteratingSystem; import com.badlogic.gdx.math.MathUtils; public class PlayerControlSystem extends IteratingSystem{ ComponentMapper<PlayerComponent> pm; // gets player component of entity ComponentMapper<B2dBodyComponent> bodm; // gets body component ComponentMapper<StateComponent> sm; // gets state component KeyboardController controller; // our input controller @SuppressWarnings("unchecked") public PlayerControlSystem(KeyboardController keyCon) { // Set this system to process all entities with the PlayerComponent super(Family.all(PlayerComponent.class).get()); controller = keyCon; // assogn our reference to the controller // create our component mappers pm = ComponentMapper.getFor(PlayerComponent.class); bodm = ComponentMapper.getFor(B2dBodyComponent.class); sm = ComponentMapper.getFor(StateComponent.class); } @Override protected void processEntity(Entity entity, float deltaTime) { //get the entity body B2dBodyComponent b2body = bodm.get(entity); // get the entity state StateComponent state = sm.get(entity); // if body is going down set state falling if(b2body.body.getLinearVelocity().y > 0){ state.set(StateComponent.STATE_FALLING); } // if body stationary on y axis if(b2body.body.getLinearVelocity().y == 0){ // only change to normal if previous state was falling(no mid air jump) if(state.get() == StateComponent.STATE_FALLING){ state.set(StateComponent.STATE_NORMAL); } // set state moving if not falling and moving on x axis if(b2body.body.getLinearVelocity().x != 0){ state.set(StateComponent.STATE_MOVING); } } // apply forces depending on controller input if(controller.left){ b2body.body.setLinearVelocity(MathUtils.lerp(b2body.body.getLinearVelocity().x, -5f, 0.2f),b2body.body.getLinearVelocity().y); } if(controller.right){ b2body.body.setLinearVelocity(MathUtils.lerp(b2body.body.getLinearVelocity().x, 5f, 0.2f),b2body.body.getLinearVelocity().y); } if(!controller.left && ! controller.right){ b2body.body.setLinearVelocity(MathUtils.lerp(b2body.body.getLinearVelocity().x, 0, 0.1f),b2body.body.getLinearVelocity().y); } if(controller.up && (state.get() == StateComponent.STATE_NORMAL || state.get() == StateComponent.STATE_MOVING)){ //b2body.body.applyForceToCenter(0, 3000,true); b2body.body.applyLinearImpulse(0, 75f, b2body.body.getWorldCenter().x,b2body.body.getWorldCenter().y, true); state.set(StateComponent.STATE_JUMPING); } } } |
The PlayerControlSystem uses the Body and State components to determine if the player is able to move and then uses inputs to control the character movement by applying forces to the body. At the moment the Player Component is solely used to identify the player entity however it can be updated later to include player exclusive data.
Now let’s move on to the PhysicsSystem that updates our Box2d world then updates our local components.
|
1 2 3 4 5 6 7 8 9 10 11 12 13 14 15 16 17 18 19 20 21 22 23 24 25 26 27 28 29 30 31 32 33 34 35 36 37 38 39 40 41 42 43 44 45 46 47 48 49 50 51 52 53 54 55 56 57 58 59 60 61 62 63 64 65 66 |
package blog.gamedevelopment.ashboxtut.entity.systems; import blog.gamedevelopment.ashboxtut.entity.components.B2dBodyComponent; import blog.gamedevelopment.ashboxtut.entity.components.TransformComponent; import com.badlogic.ashley.core.ComponentMapper; import com.badlogic.ashley.core.Entity; import com.badlogic.ashley.core.Family; import com.badlogic.ashley.systems.IteratingSystem; import com.badlogic.gdx.math.MathUtils; import com.badlogic.gdx.math.Vector2; import com.badlogic.gdx.physics.box2d.World; import com.badlogic.gdx.utils.Array; public class PhysicsSystem extends IteratingSystem { // create variables to stabilize speed private static final float MAX_STEP_TIME = 1/45f; private static float accumulator = 0f; // variable for our box2d world and bodies private World world; private Array<Entity> bodiesQueue; // component mappers private ComponentMapper<B2dBodyComponent> bm = ComponentMapper.getFor(B2dBodyComponent.class); private ComponentMapper<TransformComponent> tm = ComponentMapper.getFor(TransformComponent.class); @SuppressWarnings("unchecked") public PhysicsSystem(World world) { // System for all Entities that have B2dBodyComponent and TransformComponent super(Family.all(B2dBodyComponent.class, TransformComponent.class).get()); this.world = world; this.bodiesQueue = new Array<Entity>(); } @Override public void update(float deltaTime) { super.update(deltaTime); float frameTime = Math.min(deltaTime, 0.25f); accumulator += frameTime; if(accumulator >= MAX_STEP_TIME) { world.step(MAX_STEP_TIME, 6, 2); accumulator -= MAX_STEP_TIME; //Loop through all Entities and update our components for (Entity entity : bodiesQueue) { // get components TransformComponent tfm = tm.get(entity); B2dBodyComponent bodyComp = bm.get(entity); // get position from body Vector2 position = bodyComp.body.getPosition(); // update our transform to match body position tfm.position.x = position.x; tfm.position.y = position.y; tfm.rotation = bodyComp.body.getAngle() * MathUtils.radiansToDegrees; } } // empty queue bodiesQueue.clear(); } @Override protected void processEntity(Entity entity, float deltaTime) { // add Items to queue bodiesQueue.add(entity); } } |
Next, we have the PhysicsDebugSystem which takes the Box2D world and renders it:
|
1 2 3 4 5 6 7 8 9 10 11 12 13 14 15 16 17 18 19 20 21 22 23 24 25 26 27 28 29 30 31 32 33 34 35 |
package blog.gamedevelopment.ashboxtut.entity.systems; import com.badlogic.ashley.core.Entity; import com.badlogic.ashley.core.Family; import com.badlogic.ashley.systems.IteratingSystem; import com.badlogic.gdx.graphics.OrthographicCamera; import com.badlogic.gdx.physics.box2d.Box2DDebugRenderer; import com.badlogic.gdx.physics.box2d.World; public class PhysicsDebugSystem extends IteratingSystem { private Box2DDebugRenderer debugRenderer; private World world; private OrthographicCamera camera; public PhysicsDebugSystem(World world, OrthographicCamera camera){ super(Family.all().get()); debugRenderer = new Box2DDebugRenderer(); this.world = world; this.camera = camera; } @Override public void update(float deltaTime) { super.update(deltaTime); debugRenderer.render(world, camera.combined); } @Override protected void processEntity(Entity entity, float deltaTime) { } } |
Finally, we Have our CollisionSystem
|
1 2 3 4 5 6 7 8 9 10 11 12 13 14 15 16 17 18 19 20 21 22 23 24 25 26 27 28 29 30 31 32 33 34 35 36 37 38 39 40 41 42 43 44 45 46 47 48 49 50 51 52 53 54 |
package blog.gamedevelopment.ashboxtut.entity.systems; import blog.gamedevelopment.ashboxtut.entity.components.CollisionComponent; import blog.gamedevelopment.ashboxtut.entity.components.PlayerComponent; import blog.gamedevelopment.ashboxtut.entity.components.TypeComponent; import com.badlogic.ashley.core.ComponentMapper; import com.badlogic.ashley.core.Entity; import com.badlogic.ashley.core.Family; import com.badlogic.ashley.systems.IteratingSystem; public class CollisionSystem extends IteratingSystem { ComponentMapper<CollisionComponent> cm; ComponentMapper<PlayerComponent> pm; @SuppressWarnings("unchecked") public CollisionSystem() { // only need to worry about player collisions super(Family.all(CollisionComponent.class,PlayerComponent.class).get()); cm = ComponentMapper.getFor(CollisionComponent.class); pm = ComponentMapper.getFor(PlayerComponent.class); } @Override protected void processEntity(Entity entity, float deltaTime) { // get player collision component CollisionComponent cc = cm.get(entity); Entity collidedEntity = cc.collisionEntity; if(collidedEntity != null){ TypeComponent type = collidedEntity.getComponent(TypeComponent.class); if(type != null){ switch(type.type){ case TypeComponent.ENEMY: //do player hit enemy thing System.out.println("player hit enemy"); break; case TypeComponent.SCENERY: //do player hit scenery thing System.out.println("player hit scenery"); break; case TypeComponent.OTHER: //do player hit other thing System.out.println("player hit other"); break; //technically this isn't needed } cc.collisionEntity = null; // collision handled reset component } } } } |
We now have all the systems in place. Next, we will create the Input Controller.
Ashley and Box2D – Creating the Controller
The Input controller is a standard implementation of an input processor with some flags for our PlayerControlSystem to access.
|
1 2 3 4 5 6 7 8 9 10 11 12 13 14 15 16 17 18 19 20 21 22 23 24 25 26 27 28 29 30 31 32 33 34 35 36 37 38 39 40 41 42 43 44 45 46 47 48 49 50 51 52 53 54 55 56 57 58 59 60 61 62 63 64 65 66 67 68 69 70 71 72 73 74 75 76 77 78 79 80 81 82 83 84 85 86 87 88 89 90 91 92 93 94 95 96 97 98 99 100 101 102 103 104 105 106 107 108 109 110 111 |
package blog.gamedevelopment.ashboxtut.controller; import com.badlogic.gdx.Input.Keys; import com.badlogic.gdx.InputProcessor; import com.badlogic.gdx.math.Vector2; public class KeyboardController implements InputProcessor { public boolean left,right,up,down; public boolean isMouse1Down, isMouse2Down,isMouse3Down; public boolean isDragged; public Vector2 mouseLocation = new Vector2(0,0); @Override public boolean keyDown(int keycode) { boolean keyProcessed = false; switch (keycode) // switch code base on the variable keycode { case Keys.LEFT: // if keycode is the same as Keys.LEFT a.k.a 21 left = true; // do this keyProcessed = true; // we have reacted to a keypress break; case Keys.RIGHT: // if keycode is the same as Keys.LEFT a.k.a 22 right = true; // do this keyProcessed = true; // we have reacted to a keypress break; case Keys.UP: // if keycode is the same as Keys.LEFT a.k.a 19 up = true; // do this keyProcessed = true; // we have reacted to a keypress break; case Keys.DOWN: // if keycode is the same as Keys.LEFT a.k.a 20 down = true; // do this keyProcessed = true; // we have reacted to a keypress } return keyProcessed; // return our peyProcessed flag } @Override public boolean keyUp(int keycode) { boolean keyProcessed = false; switch (keycode) // switch code base on the variable keycode { case Keys.LEFT: // if keycode is the same as Keys.LEFT a.k.a 21 left = false; // do this keyProcessed = true; // we have reacted to a keypress break; case Keys.RIGHT: // if keycode is the same as Keys.LEFT a.k.a 22 right = false; // do this keyProcessed = true; // we have reacted to a keypress break; case Keys.UP: // if keycode is the same as Keys.LEFT a.k.a 19 up = false; // do this keyProcessed = true; // we have reacted to a keypress break; case Keys.DOWN: // if keycode is the same as Keys.LEFT a.k.a 20 down = false; // do this keyProcessed = true; // we have reacted to a keypress } return keyProcessed; // return our peyProcessed flag } @Override public boolean keyTyped(char character) { return false; } @Override public boolean touchDown(int screenX, int screenY, int pointer, int button) { if(button == 0){ isMouse1Down = true; }else if(button == 1){ isMouse2Down = true; }else if(button == 2){ isMouse3Down = true; } mouseLocation.x = screenX; mouseLocation.y = screenY; return false; } @Override public boolean touchUp(int screenX, int screenY, int pointer, int button) { isDragged = false; //System.out.println(button); if(button == 0){ isMouse1Down = false; }else if(button == 1){ isMouse2Down = false; }else if(button == 2){ isMouse3Down = false; } mouseLocation.x = screenX; mouseLocation.y = screenY; return false; } @Override public boolean touchDragged(int screenX, int screenY, int pointer) { isDragged = true; mouseLocation.x = screenX; mouseLocation.y = screenY; return false; } @Override public boolean mouseMoved(int screenX, int screenY) { mouseLocation.x = screenX; mouseLocation.y = screenY; return false; } @Override public boolean scrolled(int amount) { return false; } } |
Ashley and Box2D – Contact Listener
The Contact Listener is an implementation of the Box2D Contact Listener with methods to allow us to update the CollisionComponent of the entities that collide.
|
1 2 3 4 5 6 7 8 9 10 11 12 13 14 15 16 17 18 19 20 21 22 23 24 25 26 27 28 29 30 31 32 33 34 35 36 37 38 39 40 41 42 43 44 45 46 47 48 49 50 51 52 53 54 55 56 57 58 59 60 61 |
package blog.development.ashboxtut; import blog.gamedevelopment.ashboxtut.entity.components.CollisionComponent; import com.badlogic.ashley.core.Entity; import com.badlogic.gdx.physics.box2d.Contact; import com.badlogic.gdx.physics.box2d.ContactImpulse; import com.badlogic.gdx.physics.box2d.ContactListener; import com.badlogic.gdx.physics.box2d.Fixture; import com.badlogic.gdx.physics.box2d.Manifold; public class B2dContactListener implements ContactListener { @Override public void beginContact(Contact contact) { System.out.println("Contact"); // get fixtures Fixture fa = contact.getFixtureA(); Fixture fb = contact.getFixtureB(); System.out.println(fa.getBody().getType()+" has hit "+ fb.getBody().getType()); // check if either fixture has an Entity object stored in the body's userData if(fa.getBody().getUserData() instanceof Entity){ Entity ent = (Entity) fa.getBody().getUserData(); entityCollision(ent,fb); return; }else if(fb.getBody().getUserData() instanceof Entity){ Entity ent = (Entity) fb.getBody().getUserData(); entityCollision(ent,fa); return; } } private void entityCollision(Entity ent, Fixture fb) { // check the collided Entity is also an Entity if(fb.getBody().getUserData() instanceof Entity){ Entity colEnt = (Entity) fb.getBody().getUserData(); // get the components for this entity CollisionComponent col = ent.getComponent(CollisionComponent.class); CollisionComponent colb = colEnt.getComponent(CollisionComponent.class); // set the CollisionEntity of the component if(col != null){ col.collisionEntity = colEnt; }else if(colb != null){ colb.collisionEntity = ent; } } } @Override public void endContact(Contact contact) { System.out.println("Contact end"); } @Override public void preSolve(Contact contact, Manifold oldManifold) { } @Override public void postSolve(Contact contact, ContactImpulse impulse) { } } |
Ashley and Box2D – Implementing the Engine
Now we can finally implement the engine supplied by Ashley in our GameScreen.
|
1 2 3 4 5 6 7 8 9 10 11 12 13 14 15 16 17 18 19 20 21 22 23 24 25 26 27 28 29 30 31 32 33 34 35 36 37 38 39 40 41 42 43 44 45 46 47 48 49 50 51 52 53 54 55 56 57 58 59 60 61 62 63 64 65 66 67 68 69 70 71 72 73 74 75 76 77 78 79 80 81 82 83 84 85 86 87 88 89 90 91 92 93 94 95 96 97 98 99 100 101 102 103 104 105 106 107 108 109 110 111 112 113 114 115 116 117 118 119 120 121 122 123 124 125 126 127 128 129 130 131 132 133 134 135 136 137 138 139 140 141 142 143 144 145 146 147 148 149 150 151 152 153 154 155 156 157 158 159 160 161 162 163 164 165 166 167 168 169 170 171 172 173 174 175 176 177 178 179 180 181 182 183 184 185 186 187 188 189 190 191 192 193 194 195 196 197 198 199 200 201 202 203 204 205 206 207 208 209 210 211 212 213 214 215 216 217 218 219 220 221 222 223 224 225 226 227 228 229 230 231 232 233 234 235 236 237 238 239 |
package blog.development.ashboxtut; import blog.gamedevelopment.ashboxtut.controller.KeyboardController; import blog.gamedevelopment.ashboxtut.entity.components.B2dBodyComponent; import blog.gamedevelopment.ashboxtut.entity.components.CollisionComponent; import blog.gamedevelopment.ashboxtut.entity.components.PlayerComponent; import blog.gamedevelopment.ashboxtut.entity.components.StateComponent; import blog.gamedevelopment.ashboxtut.entity.components.TransformComponent; import blog.gamedevelopment.ashboxtut.entity.components.TypeComponent; import blog.gamedevelopment.ashboxtut.entity.systems.CollisionSystem; import blog.gamedevelopment.ashboxtut.entity.systems.PhysicsDebugSystem; import blog.gamedevelopment.ashboxtut.entity.systems.PhysicsSystem; import blog.gamedevelopment.ashboxtut.entity.systems.PlayerControlSystem; import com.badlogic.ashley.core.Entity; import com.badlogic.ashley.core.PooledEngine; import com.badlogic.gdx.Gdx; import com.badlogic.gdx.Screen; import com.badlogic.gdx.graphics.Color; import com.badlogic.gdx.graphics.GL20; import com.badlogic.gdx.graphics.OrthographicCamera; import com.badlogic.gdx.graphics.Pixmap; import com.badlogic.gdx.graphics.Texture; import com.badlogic.gdx.graphics.Pixmap.Format; import com.badlogic.gdx.graphics.g2d.SpriteBatch; import com.badlogic.gdx.graphics.g2d.TextureRegion; import com.badlogic.gdx.math.Vector2; import com.badlogic.gdx.physics.box2d.Body; import com.badlogic.gdx.physics.box2d.BodyDef; import com.badlogic.gdx.physics.box2d.CircleShape; import com.badlogic.gdx.physics.box2d.FixtureDef; import com.badlogic.gdx.physics.box2d.PolygonShape; import com.badlogic.gdx.physics.box2d.World; import com.badlogic.gdx.physics.box2d.BodyDef.BodyType; public class GameScreen implements Screen{ private KeyboardController controller; private World world; private SpriteBatch sb; private OrthographicCamera cam; private PooledEngine engine; @Override public void show() { //create required objects controller = new KeyboardController(); world = new World(new Vector2(0,-10f), true); world.setContactListener(new B2dContactListener()); // get screen width and box2d to pixel width float PixelsPerMeter = 32.0f; float WorldWidth = Gdx.graphics.getWidth()/PixelsPerMeter;//37.5f; float WorldHeight = Gdx.graphics.getHeight()/PixelsPerMeter;//.0f; // setup camera and spritebatch cam = new OrthographicCamera(WorldWidth, WorldHeight); cam.position.set(WorldWidth / 2f, WorldHeight / 2f, 0); cam.update(); sb = new SpriteBatch(); sb.setProjectionMatrix(cam.combined); // create a pooled engine supplied by Ashley engine = new PooledEngine(); // add our systems engine.addSystem(new PhysicsSystem(world)); engine.addSystem(new PhysicsDebugSystem(world,cam)); engine.addSystem(new CollisionSystem()); engine.addSystem(new PlayerControlSystem(controller)); // create some entities createPlayer(); createPlatform(2,2); createPlatform(3,4); createPlatform(5,2); createPlatform(6,4); createFloor(); // set the input controller Gdx.input.setInputProcessor(controller); } //create a platform private void createPlatform(float x, float y){ Entity entity = engine.createEntity(); B2dBodyComponent b2dbody = engine.createComponent(B2dBodyComponent.class); b2dbody.body = createBox(x,y,3,0.2f,false); TypeComponent type = engine.createComponent(TypeComponent.class); type.type = TypeComponent.SCENERY; b2dbody.body.setUserData(entity); entity.add(b2dbody); entity.add(type); engine.addEntity(entity); } // create a floor entity private void createFloor(){ Entity entity = engine.createEntity(); B2dBodyComponent b2dbody = engine.createComponent(B2dBodyComponent.class); b2dbody.body = createBox(0,0,100,0.2f,false); TypeComponent type = engine.createComponent(TypeComponent.class); type.type = TypeComponent.SCENERY; b2dbody.body.setUserData(entity); entity.add(b2dbody); entity.add(type); engine.addEntity(entity); } // create the player entity private void createPlayer(){ //create an empty entity Entity entity = engine.createEntity(); //create a Box2dBody, transform, player, collision, type and state component B2dBodyComponent b2dbody = engine.createComponent(B2dBodyComponent.class); TransformComponent position = engine.createComponent(TransformComponent.class); PlayerComponent player = engine.createComponent(PlayerComponent.class); CollisionComponent colComp = engine.createComponent(CollisionComponent.class); TypeComponent type = engine.createComponent(TypeComponent.class); StateComponent stateCom = engine.createComponent(StateComponent.class); // set the components data b2dbody.body = createOval(10,1,1,true); // set object position (x,y,z) z used to define draw order 0 first drawn position.position.set(10,10,0); type.type = TypeComponent.PLAYER; stateCom.set(StateComponent.STATE_NORMAL); b2dbody.body.setUserData(entity); // add components to entity entity.add(b2dbody); entity.add(position); entity.add(player); entity.add(colComp); entity.add(type); entity.add(stateCom); //add entity to engine engine.addEntity(entity); } // create a rectangular body private Body createBox(float x, float y, float w, float h, boolean dynamic){ // create a definition BodyDef boxBodyDef = new BodyDef(); if(dynamic){ boxBodyDef.type = BodyType.DynamicBody; }else{ boxBodyDef.type = BodyType.StaticBody; } boxBodyDef.position.x = x; boxBodyDef.position.y = y; boxBodyDef.fixedRotation = true; //create the body to attach said definition Body boxBody = world.createBody(boxBodyDef); PolygonShape poly = new PolygonShape(); poly.setAsBox(w/2, h/2); FixtureDef fixtureDef = new FixtureDef(); fixtureDef.shape = poly; fixtureDef.density = 10f; fixtureDef.friction = 0.5f; fixtureDef.restitution = 0f; boxBody.createFixture(fixtureDef); poly.dispose(); return boxBody; } // create a Circular body private Body createOval(float x, float y, float w, boolean dynamic){ // create a definition BodyDef boxBodyDef = new BodyDef(); if(dynamic){ boxBodyDef.type = BodyType.DynamicBody; }else{ boxBodyDef.type = BodyType.StaticBody; } boxBodyDef.position.x = x; boxBodyDef.position.y = y; boxBodyDef.fixedRotation = true; //create the body to attach said definition Body boxBody = world.createBody(boxBodyDef); CircleShape circleShape = new CircleShape(); circleShape.setRadius(w /2); FixtureDef fixtureDef = new FixtureDef(); fixtureDef.shape = circleShape; fixtureDef.density = 10f; fixtureDef.friction = 0.5f; fixtureDef.restitution = 0f; boxBody.createFixture(fixtureDef); circleShape.dispose(); return boxBody; } @Override public void render(float delta) { Gdx.gl.glClearColor(0.5f, 0.5f, 0.5f, 1); Gdx.gl.glClear(GL20.GL_COLOR_BUFFER_BIT); engine.update(delta); } @Override public void resize(int width, int height) { } @Override public void pause() { } @Override public void resume() { } @Override public void hide() { } @Override public void dispose() { } } |
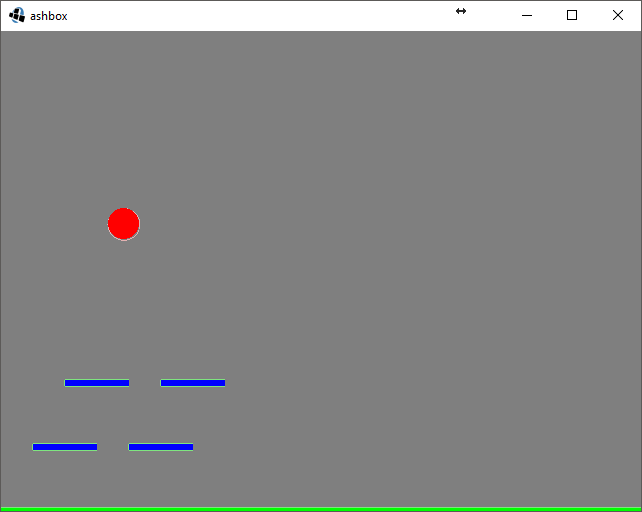
Now, everything is in place and can be tested by running the game. You should be able to use the left and right keys to move left and right and the up key to jump. The console should output a string saying what type of entity it has collided with. For now there is only the Scenery however we can add an enemy to the game later and it will display enemy when hit as long as the enemy entity contains the TypeComponent as is set to ENEMY.
Ashley and Box2D – Adding a Rendering System
In order to start Rendering with real textures instead of the Box2D debug renderer we’re going to have to add a component to store our textures. So lets start by making a TextureComponent.
|
1 2 3 4 5 6 7 8 |
package blog.gamedevelopment.ashboxtut.entity.components; import com.badlogic.ashley.core.Component; import com.badlogic.gdx.graphics.g2d.TextureRegion; public class TextureComponent implements Component { public TextureRegion region = null; } |
Usually, when creating games with lots of images you will pack the images into an atlas which is loaded by an asset manager and its simpler to get a TextureRegion then it is to get a Texture and a SpriteBatch will accept both a Texture and TextureRegion for most of it’s draw methods.
Now we have our component for the texture let’s make the system for rendering the textures.
|
1 2 3 4 5 6 7 8 9 10 11 12 13 14 15 16 17 18 19 20 21 22 23 24 25 26 27 28 29 30 31 32 33 34 35 36 37 38 39 40 41 42 43 44 45 46 47 48 49 50 51 52 53 54 55 56 57 58 59 60 61 62 63 64 65 66 67 68 69 70 71 72 73 74 75 76 77 78 79 80 81 82 83 84 85 86 87 88 89 90 91 92 |
package blog.gamedevelopment.ashboxtut.entity.systems; import blog.gamedevelopment.ashboxtut.entity.components.TextureComponent; import blog.gamedevelopment.ashboxtut.entity.components.TransformComponent; import com.badlogic.ashley.core.ComponentMapper; import com.badlogic.ashley.core.Entity; import com.badlogic.ashley.core.Family; import com.badlogic.ashley.systems.SortedIteratingSystem; import com.badlogic.gdx.Gdx; import com.badlogic.gdx.graphics.OrthographicCamera; import com.badlogic.gdx.graphics.g2d.SpriteBatch; import com.badlogic.gdx.utils.Array; import java.util.Comparator; public class RenderingSystem extends SortedIteratingSystem { static final float PIXELS_PER_METER = 32.0f; public static final float PIXELS_TO_METRES = 1.0f / PIXELS_PER_METER; static final float WORLD_WIDTH = Gdx.graphics.getWidth()/PIXELS_PER_METER; static final float WORLD_HEIGHT = Gdx.graphics.getHeight()/PIXELS_PER_METER; private SpriteBatch sb; private Array<Entity> entities; private Comparator<Entity> comparator; private OrthographicCamera cam; private ComponentMapper<TextureComponent> cmTex; private ComponentMapper<TransformComponent> cmTrans; @SuppressWarnings("unchecked") public RenderingSystem(SpriteBatch batch) { super(Family.all(TransformComponent.class, TextureComponent.class).get(), new ZComparator()); // set up reuired objects this.sb = batch; cmTex = ComponentMapper.getFor(TextureComponent.class); cmTrans = ComponentMapper.getFor(TransformComponent.class); entities = new Array<Entity>(); cam = new OrthographicCamera(WORLD_WIDTH, WORLD_HEIGHT); cam.position.set(WORLD_WIDTH / 2f, WORLD_HEIGHT / 2f, 0); } @Override public void update(float deltaTime) { super.update(deltaTime); entities.sort(comparator); cam.update(); sb.setProjectionMatrix(cam.combined); sb.enableBlending(); sb.begin(); for (Entity entity : entities) { TextureComponent texture = cmTex.get(entity); TransformComponent transform = cmTrans.get(entity); if (texture.region == null || transform.isHidden) { continue; } float width = texture.region.getRegionWidth(); float height = texture.region.getRegionHeight(); float originX = width/2f; float originY = height/2f; sb.draw(texture.region, transform.position.x - originX, transform.position.y - originY, originX, originY, width, height, (transform.scale.x * PIXELS_TO_METRES), (transform.scale.y * PIXELS_TO_METRES), transform.rotation); } sb.end(); entities.clear(); } @Override public void processEntity(Entity entity, float deltaTime) { entities.add(entity); } public OrthographicCamera getCamera() { return cam; } } |
This System loops through all Entities with a TextureComponent and a TransformComponent but it additionally has a Comparator use to sort the images. This Comparator sorts the Images out by the Z index of the Vector3 in the TransformComponent. This allows us to set what order entities will be drawn in. So our player can be drawn on top of scenery and our foreground can be drawn on top of that. The ZComparator code is:
|
1 2 3 4 5 6 7 8 9 10 11 12 13 14 15 16 17 18 19 20 21 22 23 24 25 26 27 28 29 30 |
package blog.gamedevelopment.ashboxtut.entity.systems; import blog.gamedevelopment.ashboxtut.entity.components.TransformComponent; import com.badlogic.ashley.core.ComponentMapper; import com.badlogic.ashley.core.Entity; import java.util.Comparator; public class ZComparator implements Comparator<Entity> { private ComponentMapper<TransformComponent> cmTrans; public ZComparator(){ cmTrans = ComponentMapper.getFor(TransformComponent.class); } @Override public int compare(Entity entityA, Entity entityB) { float az = cmTrans.get(entityA).position.z; float bz = cmTrans.get(entityB).position.z; int res = 0; if(az > bz){ res = 1; }else if(az < bz){ res = -1; } return res; } } |
We have the system in place, it’s now time to update our GameScreen to implement our render system. Update the show method to match this code:
|
1 2 3 4 5 6 7 8 9 10 11 12 13 14 15 16 17 18 19 20 21 22 23 24 25 26 27 28 29 30 31 32 33 34 |
public void show() { //create required objects controller = new KeyboardController(); world = new World(new Vector2(0,-10f), true); world.setContactListener(new B2dContactListener()); sb = new SpriteBatch(); RenderingSystem renderingSystem = new RenderingSystem(sb); cam = renderingSystem.getCamera(); sb.setProjectionMatrix(cam.combined); // create a pooled engine supplied by Ashley engine = new PooledEngine(); // add our systems engine.addSystem(renderingSystem); engine.addSystem(new PhysicsSystem(world)); engine.addSystem(new PhysicsDebugSystem(world,cam)); engine.addSystem(new CollisionSystem()); engine.addSystem(new PlayerControlSystem(controller)); // create some entities createPlayer(); createPlatform(2,2); createPlatform(3,4); createPlatform(5,2); createPlatform(6,4); createFloor(); // set the input controller Gdx.input.setInputProcessor(controller); } |
Now the Engine knows about the RenderSystem but our created Entities don’t so let’s update those now. In the createPlatform method add this code:
|
1 2 3 4 5 6 |
TextureComponent textComp = engine.createComponent(TextureComponent.class); textComp.region = this.createTexture(Color.BLUE, false,2 * 32,(int)(0.2f * 32)); entity.add(textComp); TransformComponent position = engine.createComponent(TransformComponent.class); position.position.set(x,y,1); entity.add(position); |
In the createPlayer method add:
|
1 2 3 |
TextureComponent textComp = engine.createComponent(TextureComponent.class); textComp.region = this.createTexture(Color.RED, true,32,32); entity.add(textComp); |
In the createFloor method add:
|
1 2 3 4 5 6 |
TextureComponent textComp = engine.createComponent(TextureComponent.class); textComp.region = this.createTexture(Color.GREEN, false, 100 * 32, (int)(0.2f * 32) ); entity.add(textComp); TransformComponent position = engine.createComponent(TransformComponent.class); position.position.set(0,0,0); entity.add(position); |
And finally, the code to create the TextureRegion:
|
1 2 3 4 5 6 7 8 9 10 11 12 13 |
private TextureRegion createTexture(Color color, boolean circle, int w, int h){ Pixmap pmap = new Pixmap(w,h,Format.RGBA8888); pmap.setColor(color); if(circle){ pmap.fillCircle(15,15,15); }else{ pmap.fill(); } TextureRegion texr = new TextureRegion(new Texture(pmap)); pmap.dispose(); return texr; } |
Ashley and Box2D – Benefits
Using Ashley and Box2D together can help organise your code by keeping all the entities, components and logic systems separate. This can be achieved in normal OOP coding but becomes more difficult as you get more and more systems and entities.
With Ashley and Box2D you don’t use inheritance so entities that would like to inherit from multiple superclasses can’t be done in normal OOP programming but with Ashley and Box2D being component based you can just add the components from multiple systems.
Allowing modding becomes easier as you can create entities with groups of components which can easily be stored as a JSON string
Ashley is simple to learn compared to other ECS systems.
Ashley and Box2D – Drawbacks
Ashley isn’t the fastest ECS system available and can slow down your game especially on smaller devices when using lots of entities even with pooling.
Adding Ashley and Box2D to your game increases it’s size and isn’t needed for small or simple games.
A zipped version of the project can be found on stormyvids
This article is great. Congratulations, and thank you.