
Full LibGDX Game Tutorial – Scene2D
Welcome to part 9 of our Full LibGDX Game Tutorial. This part will focus on the using updating out loading screen to use scene2D. If you haven’t seen the earlier parts of this tutorial I advise you to start at Full LibGDX Game Tutorial – Project setup as this tutorial continues from these earlier parts. For those of you who have come from part 8, you can continue on.
We have already gone over a few items from scene2D before when we created our preference screen. Those were the stage, tables and text buttons. This time we will be creating our own scene2d actor to replace the current loading bar parts. An Actor is an object that exists on your stage, it can be used to display images, react to clicks or other events and have its own logic. The tables and text buttons from our previous tutorial parts were actors.
Let’ s start by making a new class and calling it LoadingBarPart and having it extend the Actor class.
|
1 2 3 |
class LoadingBarPart extends Actor{ } |
Our LoadingBarPart will contain a texture (the dash) and an animation (flameAnimation) which we will then draw. In order for our LoadingBarPart to have these, we will need to add them to our constructor.
|
1 2 3 4 5 6 7 8 |
public LoadingBarPart(AtlasRegion ar, Animation an) { super(); image = ar; flameAnimation = an; this.setWidth(30); this.setHeight(25); this.setVisible(false); } |
Here we added the AtlasRegion which is our texture and an Animation which is the flame animation to our constructor. We then set the width and height as the stage will control the displaying of our actor and without these, our stage will not know how to layout our actor correctly. Finally, we set the actor to be invisible so the loading bar is not displayed full at the start.
So now we have an actor with the texture and animation but it still doesn’t know how to draw itself so we need to override the draw method. Sometimes you might want to override a method from a parent class but you don’t know what methods are available, for this, there is a handy menu option in eclipse that lets you specify which methods you want to override and that is in the source menu.
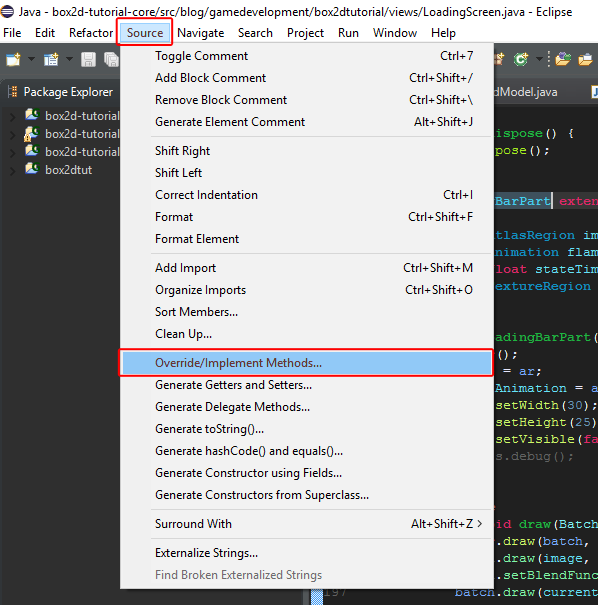
Just highlight the class name either by double clicking or clicking and dragging then use the menu source > Override/Implement Methods… option to select the methods you want to override. We will override the draw and act methods.
So now you have your methods update the draw method to this:
|
1 2 3 4 5 6 7 8 |
@Override public void draw(Batch batch, float parentAlpha) { super.draw(batch, parentAlpha); batch.draw(image, getX(),getY(), 30, 30); batch.setBlendFunction(GL20.GL_SRC_ALPHA, GL20.GL_ONE); batch.draw(currentFrame, getX()-5,getY(), 40, 40); batch.setBlendFunction(GL20.GL_SRC_ALPHA, GL20.GL_ONE_MINUS_SRC_ALPHA); } |
Here we have implemented a super call with “super();” This tells the parent class(Actor) to run the draw method from the parent class as usual. This means that any actions inside the Actor’s draw method will be run before the actions we have added in our draw method. This is here incase there are any actions that effect how the actor is drawn. Next, we tell our batch to draw the dash image in the x and y location of the actor sized at 30px x 30px. Next, we set the blend function to make the flame animation which is drawn next to be blended with the currently drawn image. Now we draw the animation using the current frame variable (which we will add in our act method after this). Finally, we reset the blend function of the sprite batch.
Now update the act method to match this:
|
1 2 3 4 5 6 |
@Override public void act(float delta) { super.act(delta); stateTime += delta; // Accumulate elapsed animation time currentFrame = flameAnimation.getKeyFrame(stateTime, true); } |
Again we call the Super method to make sure the actor’s act method is called before we start making changes. We then update the stateTime with the delta so our animation knows when the next frames should be changed and use the state time with our animation to get the actual currentFrame Texture. This is our actor complete and we can start on updating our loading screen.
Scene2D Loading Screen
In our loading screen we will move all the code for getting texture into its own method so our code is more organised. In you loading screen create a new method called loadAssets and add move the current loading asset code into this new method. You will end up with something like this below:
|
1 2 3 4 5 6 7 8 9 10 11 |
private void loadAssets() { // load loading images and wait until finished parent.assMan.queueAddLoadingImages(); parent.assMan.manager.finishLoading(); // get images used to display loading progress atlas = parent.assMan.manager.get("images/loading.atlas"); title = atlas.findRegion("staying-alight-logo"); dash = atlas.findRegion("loading-dash"); flameAnimation = new Animation(0.07f, atlas.findRegions("flames/flames"), PlayMode.LOOP); } |
This code should be self-explanatory now as we have gone over this in earlier parts of this tutorial. Now we can load all our assets in one method but it isn’t being called yet so we will add it to our constructor like so:
|
1 2 3 4 5 6 7 8 9 |
public LoadingScreen(Box2DTutorial box2dTutorial){ parent = box2dTutorial; stage = new Stage(new ScreenViewport()); loadAssets(); // initiate queueing of images but don't start loading parent.assMan.queueAddImages(); System.out.println("Loading images...."); } |
We have loaded our images now and can focus on displaying them. We will be using a table with an inner table. This is called nesting which is when you place an item inside another item. You can nest a lot of things in programming such as if statements and objects etc. We will be nesting out table with an inner table called loadingTable. Update your show method to the following:
|
1 2 3 4 5 6 7 8 9 10 11 12 13 14 15 16 17 18 19 20 21 22 23 24 25 26 27 28 |
@Override public void show() { titleImage = new Image(title); table = new Table(); table.setFillParent(true); table.setDebug(false); loadingTable = new Table(); loadingTable.add(new LoadingBarPart(dash,flameAnimation)); loadingTable.add(new LoadingBarPart(dash,flameAnimation)); loadingTable.add(new LoadingBarPart(dash,flameAnimation)); loadingTable.add(new LoadingBarPart(dash,flameAnimation)); loadingTable.add(new LoadingBarPart(dash,flameAnimation)); loadingTable.add(new LoadingBarPart(dash,flameAnimation)); loadingTable.add(new LoadingBarPart(dash,flameAnimation)); loadingTable.add(new LoadingBarPart(dash,flameAnimation)); loadingTable.add(new LoadingBarPart(dash,flameAnimation)); loadingTable.add(new LoadingBarPart(dash,flameAnimation)); table.add(titleImage).align(Align.center).pad(10, 0, 0, 0).colspan(10); table.row(); // move to next row table.add(loadingTable).width(400); stage.addActor(table); } |
Here we create an image actor called titleImage(yes, Image is a type of scene2d actor) and then we create our main table called table(another scene2d actor). We set it up the same as we did in previous lessons. Next, we added a new table called loadingTable. This will be the table which holds the 10 loading bar parts. Finally, after that, we add the title image and loadingTable to our main table and our main table to the stage so now everything is added to the stage or something within the stage.
The last thing we need to do is to update our render code so that the loading bar parts are set to visible when we have loaded a certain amount of progress. So let’s update our render code now:
|
1 2 3 4 5 6 7 8 9 10 11 12 13 14 15 16 17 18 19 20 21 22 23 24 25 26 27 28 29 30 31 32 33 34 35 36 37 38 39 40 41 42 43 44 45 |
@Override public void render(float delta) { Gdx.gl.glClearColor(0,0,0,1); Gdx.gl.glBlendFunc(GL20.GL_SRC_ALPHA, GL20.GL_ONE_MINUS_SRC_ALPHA); Gdx.gl.glClear(GL20.GL_COLOR_BUFFER_BIT); if (parent.assMan.manager.update()) { // Load some, will return true if done loading currentLoadingStage+= 1; if(currentLoadingStage <= 5){ loadingTable.getCells().get((currentLoadingStage-1)*2).getActor().setVisible(true); // new loadingTable.getCells().get((currentLoadingStage-1)*2+1).getActor().setVisible(true); } switch(currentLoadingStage){ case FONT: System.out.println("Loading fonts...."); parent.assMan.queueAddFonts(); break; case PARTY: System.out.println("Loading Particle Effects...."); parent.assMan.queueAddParticleEffects(); break; case SOUND: System.out.println("Loading Sounds...."); parent.assMan.queueAddSounds(); break; case MUSIC: System.out.println("Loading fonts...."); parent.assMan.queueAddMusic(); break; case 5: System.out.println("Finished"); break; } if (currentLoadingStage >5){ countDown -= delta; currentLoadingStage = 5; if(countDown < 0){ parent.changeScreen(Box2DTutorial.MENU); } } } stage.act(); stage.draw(); } |
Here we have added an if statement to check if the current loading stage is less than or equal to 5. We then find the actor that relates to this stage and set it to visible. Let’s break down this code a bit so we can understand what’s happening.
First, we get all the cells of the loadingTable with “loadingTable.getCells()” which is basically all the boxes in our table, one for each actor we added. Next, we get a single cell with “.get((currentLoadingStage-1)*2)” which is the current loading stage -1 (minus 1 because we increased the loading stage just before this check) and multiplied by 2 because we have 10 parts of a loading bar and only 5 stages. Then we get the actor in that cell and set them to visible with “getActor().setVisible(true);“. So every time the loadingStage increases 2 new loadingBarParts will be shown. This isn’t an ideal solution to showing a progress bar as the loading will be shown in chunks. A better solution would use the value returned by the manager.update() method to show a bar at a certain percentage of the current loading, however, this way was used to give you a better understanding on scene2D and how all the actors within it can be accessed.
If you run this code now you will probably notice the animation and the dash are not overlapped. This is because I updated the dash image to remove the white space that was making the dash have a large empty portion at the top of the image which was making it harder to align. To fix this you will need to use the following image:
![]()
Here are a couple more images we will be adding as well.![]()

Now you have the images add them to your packed texture like you did previously in your loading pack. If you run your game now you will see that dash and the animation line up.
We are now going to add the background image and the copyright image to the loading screen.
Adding a background
In your game, you may not like the fact the loading screen is on a black background and may want to add a background of your own. So let’s go over how to do that now. with your background image added to your packed loading textures update the loadAssets method to load the 2 new textures:
|
1 2 |
background = atlas.findRegion("flamebackground"); copyright = atlas.findRegion("copyright"); |
As the table is set to fill parent already we can set this table’s background image and it will fill the screen like we want so let’s use that to disp[lay our background image:
|
1 |
table.setBackground(new TiledDrawable(background)); |
and update our table to show the copyright images too:
|
1 2 3 4 5 |
table.add(titleImage).align(Align.center).pad(10, 0, 0, 0).colspan(10); table.row(); // move to next row table.add(loadingTable).width(400); table.row(); table.add(copyrightImage).align(Align.center).pad(200, 0, 0, 0).colspan(10); |
Now we have it all added we should be able to run the game and end up with the following loading screen.
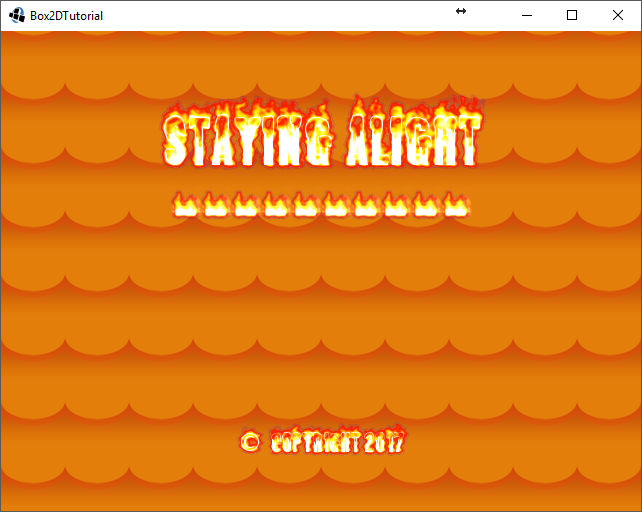
Yay, loading screen is complete for now but our menu screen is all blue and our loading screen is all orange and red. This isn’t very good so let’s update our skin so it matches the colour scheme a bit more. This is actually a pretty simple. All we need to do is adjust the hue of our skin from a blue colour to red/orange. I will be using photoshop to do this but you can use whatever program you want or you could just download the updated skin image below and replace your current image in the android/assets/skin folder:

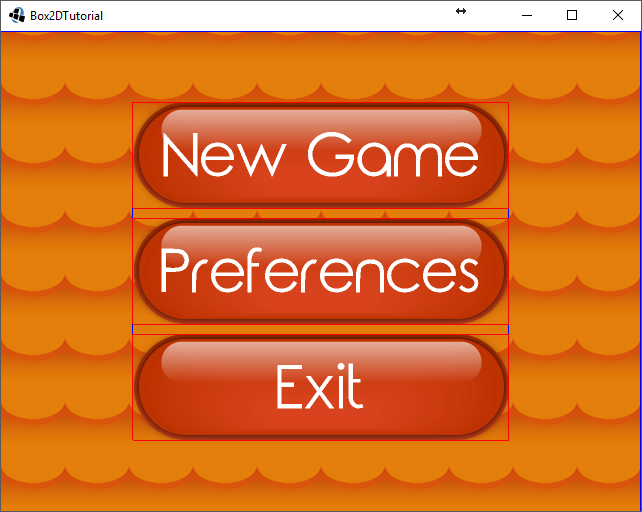
Our loading screen is done and our menu screen now has matching colours let’s add the background image from our loading screen to our menu screen so they match. Simply add the background loading code to our menu screen the same as we did in the loading screen:
|
1 2 3 |
skin = parent.assMan.manager.get("skin/glassy-ui.json"); atlas = parent.assMan.manager.get("images/loading.atlas"); background = atlas.findRegion("flamebackground"); |
and set the background image to the table like we did in the loading screen:
|
1 |
table.setBackground(new TiledDrawable(background)); |
You should now get a menu screen the same as below:
That’s it for part 9, as usual, you can download the full project from stormyvids. In part 10 of this tutorial, we will replace the model code we have currently with some more game oriented code and go over controlling our player.
| ← Loading Screen | — Contents — | Entities and Ashley ECS → |
This is my first comment on this tutorial series and I want to say thank you! The tutorial series has helped me understand a lot of the nuts and bolts of getting a libGDX app up and running.
I have some issues however. The start of the series says that it the intended audience is for non Java programmers, but from early on in the series I found problems in the code examples given that required moderate Java experience. As the series progresses, the problems get worse to the point where one of the examples suggests the “switch” Java keyword should be written with a capital ‘S’. It’s as if the examples have not been followed and compiled before it was posted.
The post I am replying to here is the one that I am finding the most difficult to bugfix and I’m at the stage of abandoning the game as defined in the tutorial and just using this blog as a reference.
I know you don’t know me personally and this may come across as harsh. This is not my intention. I think what you have done is great and is so close to the intention stated in the introduction. I am genuinely impressed and appreciative of your work.
I would be happy to help with suggested edits to improve the entire series if you like. I have worked professionally in documentation.
Again, sorry to sound negative, but it had so much promise, even to the point of being a potentially publishable book/eboook.
Hi, thanks for your comment. I appreciate any constructive feedback as this site is intended to help people get into programming with libgdx and it can’t do that if it has mistakes in. Any issues found can be reported in the comments and I will do my best to fix them. I have looked through the code examples on this page and from this and previous sources and was unable to find any switch statements with a capital S. If you find any issues with the source code in future please comment with the class name and line or method it is contained in and I will replace the source. For errors in the blogs just quote the text in a comment and I will replace it. I am willing to replace any writing on this blog if it can be worded better to help people understand the concepts they are trying to portray.
Best Regards
John Day
I think he refers to part 6 section “Adding our flags.”
In the KeyboardController class:
“@Override
public boolean keyDown(int keycode) {
Switch (keycode) // switch code base on the variable keycode
{
case Keys.LEFT: // if keycode is the same as Keys.LEFT a.k.a 21
left = true; // do this
return true; // we have reacted to a keypress so stop checking for more”
…
Hi there, thanks for the tutorial, I have followed it and working good so far up to the previous lesson. But now I am having a problem with this code:
currentFrame = flameAnimation.getKeyFrame(stateTime, true);
When I add it as is, it gives me red squigglies, so I have to cast it to (Texture) like so:
currentFrame = (Texture) flameAnimation.getKeyFrame(stateTime, true);
But when I run it, I get a ClassCastException: com.badlogic.gdx.graphics.g2d.TextureAtlas$AtlasRegion cannot be cast to com.badlogic.gdx.graphics.Texture
It wasn’t specified what class is currentFrame but you used it inside batch.draw, so I assumed it should be Texture, but I am getting this error. Please help? Thanks!
Okay, never mind, I fixed it.
I changed it to (TextureRegion) instead of (Texture).
Found a little mistake I think:
“table.add(copyrightImage).align(Align.center).pad(200, 0, 0, 0).colspan(10);”
Since there is no “copyrightImage” variable initialized anywhere I changed it to:
“table.add(new Image(copyright)).align(Align.center).pad(200, 0, 0, 0).colspan(10);”