
Full LibGDX Game Tutorial – Input Controller
Welcome to part 6 of our Full LibGDX Game Tutorial. This part will focus on the input controller which will allow us to take input from the user and control objects in game. If you haven’t seen the earlier parts of this tutorial I advise you to start at Full LibGDX Game Tutorial – Project setup as this tutorial continues from these earlier parts. For those of you who have come from part 5, you can continue on.
What is an input controller?
An input controller allows the game to take input from the user such as W,A,S,D keystrokes and then allows us the programmer to control how our game reacts. We can use input controllers to check for keystrokes, mouse locations, mouse button presses etc. We can also use the input controller to query a gamepad but there is already an extension for accessing controllers which makes supporting controllers a lot simpler.
Adding our controller class.
We are going to create the controller class and it will be full of flags for each key, e.g the left arrow key will have a flag, the right arrow key will have a flag etc. This means we can just query our controller’s left or right flag to see if the user wants to go left or right. It also means if we add other control methods say for a gamepad or for a phone’s accelerometer(phone tilt) we can just have them set a left or right flag as well and our game code stays the same. For now, we will just set up controls using the keyboard.
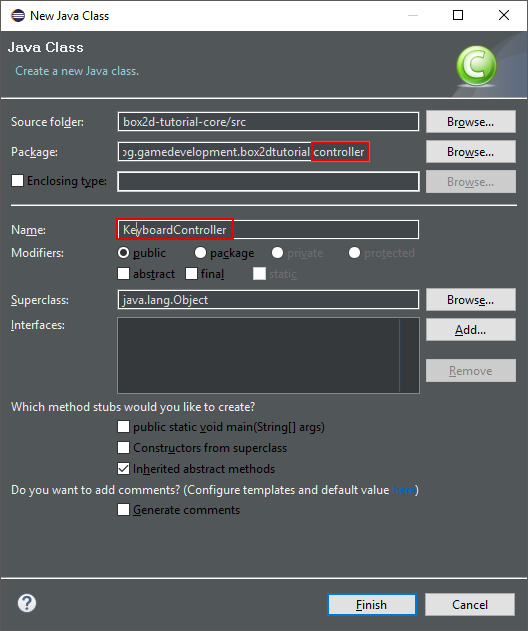
Let’s start by making a class in a new package called controller.
What are all these methods for?
Now we have our class in the new controller package, we want to implement the InputProcessor and add the unimplemented methods. You will end up with some code similar to this.
|
1 2 3 4 5 6 7 8 9 10 11 12 13 14 15 16 17 18 19 20 21 22 23 24 25 26 27 28 29 30 31 32 33 34 35 36 37 38 39 |
package blog.gamedevelopment.box2dtutorial.controller; import com.badlogic.gdx.InputProcessor; public class KeyboardController implements InputProcessor { @Override public boolean keyDown(int keycode) { return false; } @Override public boolean keyUp(int keycode) { return false; } @Override public boolean keyTyped(char character) { return false; } @Override public boolean touchDown(int screenX, int screenY, int pointer, int button) { return false; } @Override public boolean touchUp(int screenX, int screenY, int pointer, int button) { return false; } @Override public boolean touchDragged(int screenX, int screenY, int pointer) { return false; } @Override public boolean mouseMoved(int screenX, int screenY) { return false; } @Override public boolean scrolled(int amount) { return false; } } |
Here you can several methods that have been added for us. These methods are:
- keyDown
- This is activated once when a key on the keyboard is pressed down.
- keyUp
- This as activated once when the key that was pressed down is released.
- keyTyped
- This is activated everytime the keyboard sends a character. Unlike KeyUp and KeyDown this will be called many times while the key is down.
- touchDown
- Called when a mouse button or finger(on phone) is pressed down.
- touchUp
- Called when a finger or mouse button is released.
- touchDragged
- Called each time the finger or mouse moves while in the down state.
- mouseMoved
- Called when the mouse moves whether a button is pressed or not.
- scrolled
- Called when a mouse scroll wheel is moved.
Adding our flags.
The first things we well check for are the left, right, up and down arrows. So let’s add the flags for these:
|
1 |
public boolean left,right,up,down; |
Here you can see we have added the left, right, up and down all on the same line. This is the same as doing:
|
1 2 3 4 |
public boolean left; public boolean right; public boolean up; public boolean down; |
Now we have our flags we have to set them to true when those keys are pressed. To do that we’re going to use a switch statement. You’ve seen this before in our orchestrator class to change screens. A switch statement is used to run code based on the variable passed.
|
1 2 3 4 5 6 7 8 9 10 11 12 13 14 15 16 17 18 19 |
@Override public boolean keyDown(int keycode) { Switch (keycode) // switch code base on the variable keycode { case Keys.LEFT: // if keycode is the same as Keys.LEFT a.k.a 21 left = true; // do this return true; // we have reacted to a keypress so stop checking for more case Keys.RIGHT: // if keycode is the same as Keys.LEFT a.k.a 22 right = true; // do this return true; // we have reacted to a keypress so stop checking for more case Keys.UP: // if keycode is the same as Keys.LEFT a.k.a 19 up = true; // do this return true; // we have reacted to a keypress so stop checking for more case Keys.DOWN: // if keycode is the same as Keys.LEFT a.k.a 20 down = true; // do this return true; // we have reacted to a keypress so stop checking for more } return false; // no keys pressed that we care about so return false } |
Replace your keyDown method with the code above. This will check for the direction arrow keys and return true if a key that we check for was pressed. There is a problem with this code and that is that it only checks for one key at a time. So if a player is pressing up and left, only left will be processed. This is a cool mechanic because it allows you to control how a character is allowed to move. For example, a maze game that only allows left, right, up or down movement could use this code, but for a game like the one we’re making, we want to allow diagonal movement. This is done by adding a flag to say at least one key has been pressed and then checking if the flag has changed after all keys have been checked.
Update your keyDown code again to match the following:
|
1 2 3 4 5 6 7 8 9 10 11 12 13 14 15 16 17 18 19 20 21 22 23 |
@Override public boolean keyDown(int keycode) { boolean keyProcessed = false; switch (keycode) // switch code base on the variable keycode { case Keys.LEFT: // if keycode is the same as Keys.LEFT a.k.a 21 left = true; // do this keyProcessed = true;// we have reacted to a keypress break; case Keys.RIGHT: // if keycode is the same as Keys.LEFT a.k.a 22 right = true; // do this keyProcessed = true;// we have reacted to a keypress break; case Keys.UP: // if keycode is the same as Keys.LEFT a.k.a 19 up = true; // do this keyProcessed = true;// we have reacted to a keypress break; case Keys.DOWN: // if keycode is the same as Keys.LEFT a.k.a 20 down = true; // do this keyProcessed = true;// we have reacted to a keypress } return keyProcessed; // return our peyProcessed flag } |
So what have we updated and why did we do it? Well, we added the keyProccesed flag which is false by default. This is then switched to true if any key is pressed. It is then returned at the end. So if a key is pressed the keyProcessed will be true and will return true. However, if no key is pressed keyProcessed is false by default and will return false. We also added a “break;” to the top 3 switch code blocks. This is because a switch statement will go to the first code block that is true and then execute all the code blocks below it. So if there was no “break;” in any of the code blocks and the left key was pressed every block underneath would also be run meaning our controller would think left, right, up and down were all being pressed.
So now our flags are set to true when a key is pressed down but they are never set to false when the key goes back up. We’re going to have to do this again in our keyUp method except this time we set the flag to false.
|
1 2 3 4 5 6 7 8 9 10 11 12 13 14 15 16 17 18 19 20 21 22 23 |
@Override public boolean keyUp(int keycode) { boolean keyProcessed = false; switch (keycode) // switch code base on the variable keycode { case Keys.LEFT: // if keycode is the same as Keys.LEFT a.k.a 21 left = false; // do this keyProcessed = true; // we have reacted to a keypress break; case Keys.RIGHT: // if keycode is the same as Keys.LEFT a.k.a 22 right = false; // do this keyProcessed = true; // we have reacted to a keypress break; case Keys.UP: // if keycode is the same as Keys.LEFT a.k.a 19 up = false; // do this keyProcessed = true; // we have reacted to a keypress break; case Keys.DOWN: // if keycode is the same as Keys.LEFT a.k.a 20 down = false; // do this keyProcessed = true; // we have reacted to a keypress } return keyProcessed; // return our peyProcessed flag } |
Setting the controller as the input processor.
We now have a controller that will have our 4 flags for the arrow keys. Now all we have to do is add it to our mainScreen so it can react to the input and the allow our model to access the controller. In your main screen update the following methods:
|
1 2 3 4 5 6 7 8 9 10 11 12 13 |
public MainScreen(Box2DTutorial box2dTutorial) { parent = box2dTutorial; cam = new OrthographicCamera(32,24); controller = new KeyboardController(); model = new B2dModel(controller); debugRenderer = new Box2DDebugRenderer(true,true,true,true,true,true); } @Override public void show() { Gdx.input.setInputProcessor(controller); } |
Here we added a new KeyboardController which is then passed to the model and we added “Gdx.input.setInputProcessor(controller);” to set our controller as the class which processes inputs. So now the main screen is now sending all the inputs it receives to our controller and our model now has a reference to our controller. We just need to update our model to take the controller as an argument and then we can query our controller and make it move items on our game. So let’s update our model:
|
1 2 3 4 5 6 7 8 9 10 11 12 13 14 15 |
public class B2dModel { public World world; private Body bodyd; private Body bodys; private Body bodyk; private KeyboardController controller; public boolean isSwimming = false; private Body player; public B2dModel(KeyboardController cont){ controller = cont; world = new World(new Vector2(0,-10f), true); world.setContactListener(new B2dContactListener(this)); // .... rest of model class |
Here we have updated our model to have a KeyboardController field and set it in our constructor. Now we can access our controller in our model, so let’s make our player who is currently swimming if you’ve been following along with this tutorial do something.
Applying the controls to our character.
Update your logic method to match the following:
|
1 2 3 4 5 6 7 8 9 10 11 12 13 14 15 16 17 18 19 |
// our game logic here public void logicStep(float delta){ if(controller.left){ player.applyForceToCenter(-10, 0,true); }else if(controller.right){ player.applyForceToCenter(10, 0,true); }else if(controller.up){ player.applyForceToCenter(0, 10,true); }else if(controller.down){ player.applyForceToCenter(0, -10,true); } if(isSwimming){ player.applyForceToCenter(0, 40, true); } world.step(delta , 3, 3); } |
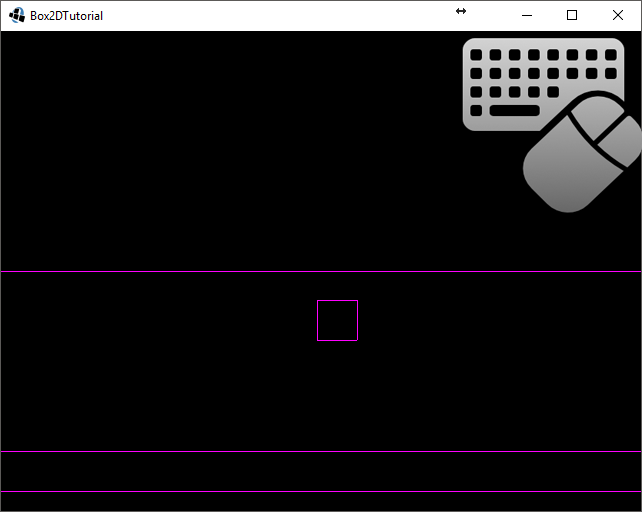
You should now have an application that allows you to control the player square with the arrow keys like this video:
[embedyt] http://www.youtube.com/watch?v=GjRIffVvnu0[/embedyt]
So now we can control our player with the keyboard, how can we use the mouse? Well, yet again we’re going to use flags. We will have flags for each button 1(left),2(right) and 3(middle). We will also have a Vector2 which will store our mouse location. Add these fields to our controller and add the necessary imports as usual:
|
1 2 3 |
public boolean isMouse1Down, isMouse2Down,isMouse3Down; public boolean isDragged; public Vector2 mouseLocation; |
Update all the mouse methods to match the following:
|
1 2 3 4 5 6 7 8 9 10 11 12 13 14 15 16 17 18 19 20 21 22 23 24 25 26 27 28 29 30 31 32 33 34 35 36 37 38 39 40 41 42 43 44 |
@Override public boolean touchDown(int screenX, int screenY, int pointer, int button) { if(button == 0){ isMouse1Down = true; }else if(button == 1){ isMouse2Down = true; }else if(button == 2){ isMouse3Down = true; } mouseLocation.x = screenX; mouseLocation.y = screenY; return false; } @Override public boolean touchUp(int screenX, int screenY, int pointer, int button) { isDragged = false; //System.out.println(button); if(button == 0){ isMouse1Down = false; }else if(button == 1){ isMouse2Down = false; }else if(button == 2){ isMouse3Down = false; } mouseLocation.x = screenX; mouseLocation.y = screenY; return false; } @Override public boolean touchDragged(int screenX, int screenY, int pointer) { isDragged = true; mouseLocation.x = screenX; mouseLocation.y = screenY; return false; } @Override public boolean mouseMoved(int screenX, int screenY) { mouseLocation.x = screenX; mouseLocation.y = screenY; return false; } |
Now we can query the mouse like we query our keyboard keys in our model. Something to note about the mouse position from a controller and the position in the Box2D world is that they are not a direct relation. So your mouse location that you get from the controller is the location it is on the screen and not the location it is pointing to in the world. This is important because when our character moves through the world we will have to adjust the position we get from the controller to match the world. Luckily this is already taken care of in LibGDX using the OrthographicCamera class.
We went over the OrthographicCamera class back in part 3 of this tutorial which told us how the camera shows a part of our world. We can use this to convert our mouse location from a screen position to a world’s position using the unproject method. In order to use the camera in our model, our model will have to have a reference to the camera. So let’s add the camera to our model’s constructor adding imports as needed:
|
1 2 3 4 5 6 7 |
public B2dModel(KeyboardController cont, OrthographicCamera cam){ camera = cam; controller = cont; world = new World(new Vector2(0,-10f), true); world.setContactListener(new B2dContactListener(this)); createFloor(); // .. more code |
Update your mainScreen constructor to pass the camera to our model like below:
|
1 2 3 4 5 6 7 |
public MainScreen(Box2DTutorial box2dTutorial) { parent = box2dTutorial; cam = new OrthographicCamera(32,24); controller = new KeyboardController(); model = new B2dModel(controller,cam); debugRenderer = new Box2DDebugRenderer(true,true,true,true,true,true); } |
As we might want to check if a click hits any body and not just our player we will add a method that takes a body and the mouse location and returns true if they intersect.
|
1 2 3 4 5 6 7 8 9 10 11 12 13 14 15 16 |
/** * Checks if point is in first fixture * Does not check all fixtures.....yet * * @param body the Box2D body to check * @param mouseLocation the point on the screen * @return true if click is inside body */ public boolean pointIntersectsBody(Body body, Vector2 mouseLocation){ Vector3 mousePos = new Vector3(mouseLocation,0); //convert mouseLocation to 3D position camera.unproject(mousePos); // convert from screen potition to world position if(body.getFixtureList().first().testPoint(mousePos.x, mousePos.y)){ return true; } return false; } |
Here we take the body we want to check and the mouse location. We then convert it to a 3D Vector as the unproject method requires a 3D Vector. We then unproject the position and use an if statement to check if the point the mouse clicked is in the first fixture of the body. This isn’t ideal as it only checks the first fixture so bodies with multiple fixtures may not get caught. Now we have our method for checking we can use it in our logic method to output some text when the mouse clicks the player using the following code:
|
1 2 3 4 |
// check if mouse1 is down (player click) then if true check if point intersects if(controller.isMouse1Down && pointIntersectsBody(player,controller.mouseLocation)){ System.out.println("Player was clicked"); } |
Now we are able to create a world, add objects and players, control our players with the keyboard or mouse clicks. We still need a lot of things before our game starts to take shape such as loading assets, rendering the world and players, player and enemy entities, enemy AI and pathfinding to name a few.
In part 7 we will go into using the asset manager to load our assets such as images and sounds.
| ← Box2d Contact Listener | — Contents — | Rendering And Asset Manager → |
mouseLocation.x = screenX;
mouseLocation.y = screenY;
is giving a null pointer exception. mouseLocation was never initialized, I suggest replacing it with
mouseLocation = new Vector2(screenX, screenY);
for all of them
So you create new vector each mouse click.
I think will be better to initialize mouseLocation like this
“public Vector2 mouseLocation = new Vector2();”
Avoid creating a new vector every time location is changed. What I did was create a member variable like so:
public final Vector2 mousePos = new Vector();
And just change the vector when needed:
mousePos.set(screenX, screenY);
How do I use the input controller to drag a game sprite?
Let’s break this down into 3 tasks.
1. Check for click inside the sprite:
Let’s say you have a sprite called plImage, then in the game loop you check if the mouseLocation is inside the plImage bounds and the mouse1Down is true. This shows that the player has clicked inside the plImage.
2. Check for drag:
We know the player clicked the image so now we check if the isDragged is true and if it is, move the plImage to mouseLocation.
This will move the image with the mouse while isDragged is true which it will be until the mouse button is released.
3. Check for release:
Once isDragged is false we know the player let go of the mouse button and the image can stop following the mouseLocation.
I’ve worked my way through the tutorial so far, and would like to contribute my code for parts 1-6. However, my code for part 6 does not work as planned. At first using the mouse crashed the app in android. Using a hint from Jay I can use the mouse without crashing the app, but it doesn’t actually do anything when using the mouse. I’ve opened a github account, and will gladly commit my code there for you, but, pretty please, consider helping me figure out what’s wrong in my part-six code?
I haven’t tested the code with android at all :/
If you link me to your code somewhere I will have a look and see if I can figure out what is going wrong.
For some reason my player object does not “float” in the water but rather keeps jumping up and then back into the water. I think this is due to forceY catapulting him into the air every time he sinks into the water. Also the controls don’t work for me as they do in the video. I put a logger command in every if bracket and once I press left for instance it never stops hitting left so my console is filled with “MOVING LEFT” phrases.
Upon further inspection I’ve found out that the problem was that I haven’t updated they keyUp function and the result was that when the user pressed a key down the character would go left but since i haven’t specified what happens when the user releases the key it would just keep going left.
As for the water part of my question, I think the problem is more fundamental. If the character spawns in the water i.e. if the user is on the water box when the game loads he will be able to swim. If you lower the box a bit and the user falls in the water he will constantly keep getting pushed up in the air. Which only keeps getting worse if you give the water box more force Y.
A very good lesson, but I don’t understand how to add handling of clicks on the sensor so that you can move the object
This tutorial is awesome, I’ve had small hiccups here and there. Most were due to the placement of variables, which turns out is a very important concept.
I keep getting a NullPointerException when trying to apply any type of force to the place character. Anyone know how to fix this?
I keep getting a NullPointerException when trying to apply any type of force to the player character. Anyone know how to fix this?
The two switch statements in the beginning are functionally identical. with the break, you stop checking anything as well and returning at the end.