
Full LibGDX Game Tutorial – Loading Screen
Welcome to part 8 of our Full LibGDX Game Tutorial. This part will focus on the using the texture packer to pack all your images into an atlas and creating a loading screen. If you haven’t seen the earlier parts of this tutorial I advise you to start at Full LibGDX Game Tutorial – Project setup as this tutorial continues from these earlier parts. For those of you who have come from part 7, you can continue on.
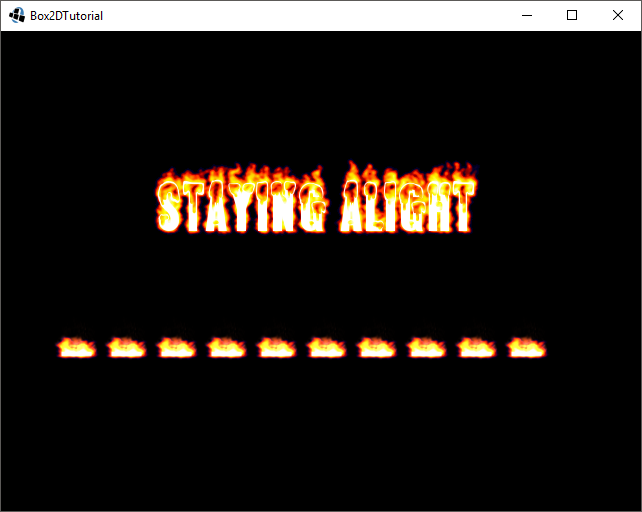
This is what we hope to achieve by the end of part 8. Note the loading bar loads really fast as we’re not loading many sounds, images or music yet.
[embedyt] http://www.youtube.com/watch?v=VxRODvLh1ME[/embedyt]
Texture Packer
The first thing we’re going to go over is the texture packer and how to use it to pack all your textures. For a quick guide on the texture pack and the settings I use you can visit the texture packer guide. We are going to divide our images into two sets. One for the game and one for the loading screen. This means we can quickly load the few images for our loading screen then use those images in our loading screen to show the progress of the loading for the game images.
The first thing you want to do is create this folder structure:
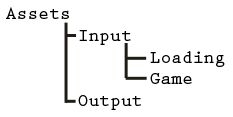
This will keep your loading images and game images separate as your loading images will be updated a lot less than your game images and you need your loading images separate so they load fast. Now you have this folder structure add all your current game images to the game folder. You can download the folder structure with images from here. If you haven’t already got the texture packer you can get it from www.aurelienribon.com and once downloaded open it up.
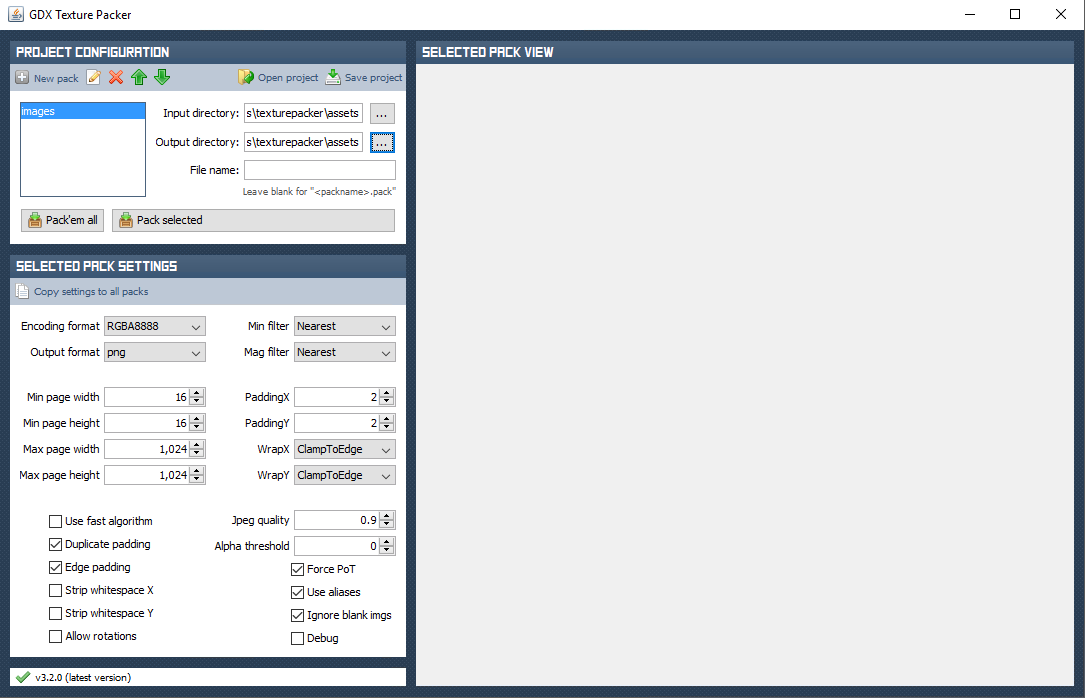
Press the … button and navigate to the input/loading folder and click open to set the input folder. Now do the same for the output directory and select the output folder. Next copy the settings from the image above. Since we will be adding images later and we will want to have all these settings again we should save these settings. This is done with the save project button on the top. So select “save project” and save the file as game.project in the output folder. Now anytime you need to add images to your atlas you can put the images in the input/game folder and load the game.project file and all your settings will be populated and all you will have to do is click Pack’em all to create the new files. Do the same for your loading images so you will have 2 projects and Pack’em all for both.
Now copy the game.atlas and game.png files and place them in your android assets/images folder. Now add the loading.atlas, loading.png and loading2.png to your assets/images folder and we’re ready to update our AssetManager to load these files.
|
1 2 3 4 5 6 7 8 9 10 11 12 |
// Textures public final String gameImages = "images/game.atlas"; public final String loadingImages = "images/loading.atlas"; public void queueAddImages(){ manager.load(gameImages, TextureAtlas.class); } // a small set of images used by the loading screen public void queueAddLoadingImages(){ manager.load(loadingImages, TextureAtlas.class); } |
Here we have replaced the old loading of images in our asset manager with the new versions that use the TextureAtlas class instead of the old texture class.
Loading Screen
Now we need to update our loading screen to load these images. Put the following code into your show method of the loading screen to load them when the screen is first shown.
|
1 2 3 4 5 6 7 8 9 10 11 12 |
// load loading images and wait until finished parent.assMan.queueAddLoadingImages(); parent.assMan.manager.finishLoading(); // get images used to display loading progress atlas = parent.assMan.manager.get("images/loading.atlas"); title = atlas.findRegion("staying-alight-logo"); dash = atlas.findRegion("loading-dash"); // initiate queueing of images but don't start loading parent.assMan.queueAddImages(); System.out.println("Loading images...."); |
Now we need a SpriteBatch to draw our images to the loading screen so add this to the constructor:
|
1 2 |
sb = new SpriteBatch(); sb.setBlendFunction(GL20.GL_SRC_ALPHA, GL20.GL_ONE); |
Here we also set the blend function replaced the default blend function which overwrites previous images with a new blend function which adds the two images together. Before we can start drawing images to the screen we need some code to differentiate between the stages of loading. Update your render method in the loading screen to the following:
|
1 2 3 4 5 6 7 8 9 10 11 12 13 14 15 16 17 18 19 20 21 22 23 24 25 26 27 28 29 30 31 32 33 34 35 36 37 38 39 40 41 42 43 44 |
@Override public void render(float delta) { Gdx.gl.glClearColor(0,0,0,1); // clear the screen Gdx.gl.glBlendFunc(GL20.GL_SRC_ALPHA, GL20.GL_ONE_MINUS_SRC_ALPHA); Gdx.gl.glClear(GL20.GL_COLOR_BUFFER_BIT); // start SpriteBatch and draw the logo sb.begin(); sb.draw(title, 135, 250); sb.end(); // check if the asset manager has finished loading if (parent.assMan.manager.update()) { // Load some, will return true if done loading currentLoadingStage+= 1; switch(currentLoadingStage){ case FONT: System.out.println("Loading fonts...."); parent.assMan.queueAddFonts(); // first load done, now start fonts break; case PARTY: System.out.println("Loading Particle Effects...."); parent.assMan.queueAddParticleEffects(); // fonts are done now do party effects break; case SOUND: System.out.println("Loading Sounds...."); parent.assMan.queueAddSounds(); break; case MUSIC: System.out.println("Loading fonts...."); parent.assMan.queueAddMusic(); break; case 5: System.out.println("Finished"); // all done break; } if (currentLoadingStage >5){ countDown -= delta; // timer to stay on loading screen for short preiod once done loading currentLoadingStage = 5; // cap loading stage to 5 as will use later to display progress bar anbd more than 5 would go off the screen if(countDown < 0){ // countdown is complete parent.changeScreen(Box2DTutorial.MENU); /// go to menu screen } } } } |
This code will need the queue methods added to the assetManager but can be left empty for now as there are no fonts or particle effects to load yet. e.g:
|
1 2 3 4 5 |
public void queueAddFonts(){ } public void queueAddParticleEffects(){ } |
We will also need the following fields added to our loading screen to make it work:
|
1 2 3 4 5 6 7 8 9 10 |
public final int IMAGE = 0; // loading images public final int FONT = 1; // loading fonts public final int PARTY = 2; // loading particle effects public final int SOUND = 3; // loading sounds public final int MUSIC = 4; // loading music private int currentLoadingStage = 0; // timer for exiting loading screen public float countDown = 5f; // 5 seconds of waiting before menu screen |
We can move on to displaying a cool animation bar for our loading progress. If you’ve looked at the images we packed you will have noticed a folder called flames that has 16 images. This is a flame animation we will use to overlay over our flame dash image to display the loading progress. First, we add the code to load the animation:
|
1 2 3 4 5 6 7 8 9 10 |
// get images used to display loading progress atlas = parent.assMan.manager.get("images/loading.atlas"); title = atlas.findRegion("staying-alight-logo"); dash = atlas.findRegion("loading-dash"); flameAnimation = new Animation(0.07f, atlas.findRegions("flames/flames"), PlayMode.LOOP); //new // initiate queueing of images but don't start loading parent.assMan.queueAddImages(); System.out.println("Loading images...."); |
We have just created a new animation of our flames. The first parameter is the duration of the frame, the second is the frame images and the third is the play mode. Now we have our animation we want to draw a dash and the animation over it for each stage that we complete of our loading stages. For that, we need a new method:
|
1 2 3 4 5 6 |
private void drawLoadingBar(int stage, TextureRegion currentFrame){ for(int i = 0; i < stage;i++){ sb.draw(currentFrame, 50 + (i * 50), 150, 50, 50); sb.draw(dash, 35 + (i * 50), 140, 80, 80); } } |
This method takes the stage value and the current frame value. The stage value is the current stage the of the loading process we are in. The second one is the current frame of the animation. As an animation is made up of a lot of individual images we need to tell it which one should be displayed. Then we loop through the drawing process for each stage and use the i variable to increase the horizontal position by 50 per stage. This should give use a line of dashes and animations like the video at the start of this tutorial. Now, all we need to do is get the current frame and run our method. This is done by adding the stateTime field in our show method:
|
1 |
stateTime = 0f; |
and updating our render method:
|
1 2 3 4 5 6 7 8 |
stateTime += delta; // Accumulate elapsed animation time // new // Get current frame of animation for the current stateTime TextureRegion currentFrame = flameAnimation.getKeyFrame(stateTime, true); //new sb.begin(); drawLoadingBar(currentLoadingStage * 2, currentFrame); // new sb.draw(title, 135, 250); sb.end(); |
So now when you open the game you should get the same loading screen as the video above which then goes to the menu screen. You will notice now that when you start the game it crashes with an error regarding the missing texture for the player. If you don’t receive this error it is due to you having the old player png images still in the folder. Those should be deleted now as we are moving into using packed images, so delete those if you are getting the error.
We will now update our application screen to use the asset manager to get the images. In your MainScreen class update your constructor to the following:
|
1 2 3 4 5 6 7 8 9 10 11 12 13 |
public MainScreen(Box2DTutorial box2dTutorial) { parent = box2dTutorial; cam = new OrthographicCamera(32,24); controller = new KeyboardController(); model = new B2dModel(controller,cam,parent.assMan); debugRenderer = new Box2DDebugRenderer(true,true,true,true,true,true); sb = new SpriteBatch(); sb.setProjectionMatrix(cam.combined); atlas = parent.assMan.manager.get("images/game.atlas"); // new playerTex = atlas.findRegion("player"); // updated } |
You will also need to change the playerTex from a Texture to an AtlasRegion and you’re done. All images are loaded from the asset manager, all sounds and music are too.
In the next part, we will improve our loading screen by using scene2D to display things a little nicer with labels. For now though here’s a zip of the current project.
| ← Rendering And Asset Manager | — Contents — | Scene2D → |
Hi,
how did you make your .atlas Files with Texture Packer? I just get the .png’s and a .pack file 🙁
The old texture packer that I used would create files with .atlas suffix. You can change them from .pack to .atlas with no problem as the data is the same, it’s just a filename suffix.
Thanks! 🙂
I got an Error with
TextureRegion currentFrame = (TextureRegion) flameAnimation.getKeyFrame(stateTime,true);
I had to add the cast to TextureRegion but still got a “Arithmetic Exception: / by zero” that was because the flameAnimation wasnt loaded correctly. I used the updated texturepacker (https://github.com/crashinvaders/gdx-texture-packer-gui/releases) which seems to differ from the one used here. I had to set “Use indices” in the Packer and then in the code i changed it to:
flameAnimation = new Animation(0.07f, atlas.findRegions(“flames”), Animation.PlayMode.LOOP);
since findRegion (without the “s”) only loaded 1 Frame and not the entire animation.
Hi,
I’m following this tutorial, and I like it very much.
Unfortunately the resources are no longer hosted at https://stormyvids.is-sweet.co.uk/download.php?id=$1$jbN3SEQd$TAARaJXfzq6N/bDMeLHAQ1
Could you provide me with an alternative download location?
Kind regards,
Johan
Hi, I found a copy of the files from the same dat as this post. I believe it to be the right one and can be downloaded from https://www.gamedevelopment.blog/wp-content/uploads/2020/01/flgt.zip
Thank you! Sorry for the double questions, the site responded weirdly, so I thought the spamfilter didn’t allow the comments 😛
Hi,
I’m following your tutorial and I like it very much. Unfortunately the resources are no longer available at stormyvids. Could you provide an alternative download location?
JohannisK
Hi,
Stormyvids is no longer resolving, but I would like to continue this tutorial, could you provide an alternative download location for the resources?
JohannisK
Im getting an exception when trying to load the the game.atlas:
Exception in thread “LWJGL Application” com.badlogic.gdx.utils.GdxRuntimeException: com.badlogic.gdx.utils.GdxRuntimeException: Couldn’t load dependencies of asset: images/game.atlas
Do you have any idea why this might be? Google couldn’t help me
It looks like it can only find some of the files and not all of them. There should be an atlas file and some image files in the images folder.
public void queueAddImages(){
manager.load(gameImages, TextureAtlas.class); //not Texture.class
}
public void queueAddLoadingImages(){
manager.load(loadingImages, TextureAtlas.class); //not Texture.class
}
frigging awesome