
Full Unity 2D Game Tutorial 2019 – Simple Enemy AI
In this section of the tutorial we will go over creating an enemy and giving it simple AI to follow the player. We will also give the enemy some colliders so it can detect collisions with other objects.
Full Unity 2D Game Tutorial 2019- Creating an Enemy Object
As shown in previous sections of this tutorial, we need to create an EnemyObject with a Sprite. Again we give the EnemySprite the Knob image except this time we apply a color change. Well we can’t have all our object plain white. Set the color for your enemy sprite to whatever you like and let the people who will pay your game know that this guy is not friendly.
Now the sprite is set we will go to our EnemyObject and give it 3 new components, a RigidBody2D because we’re going to use physics again, and 2 CircleCollider2D components. Remember to set the gravity to zero and Interpolate to interpolate.
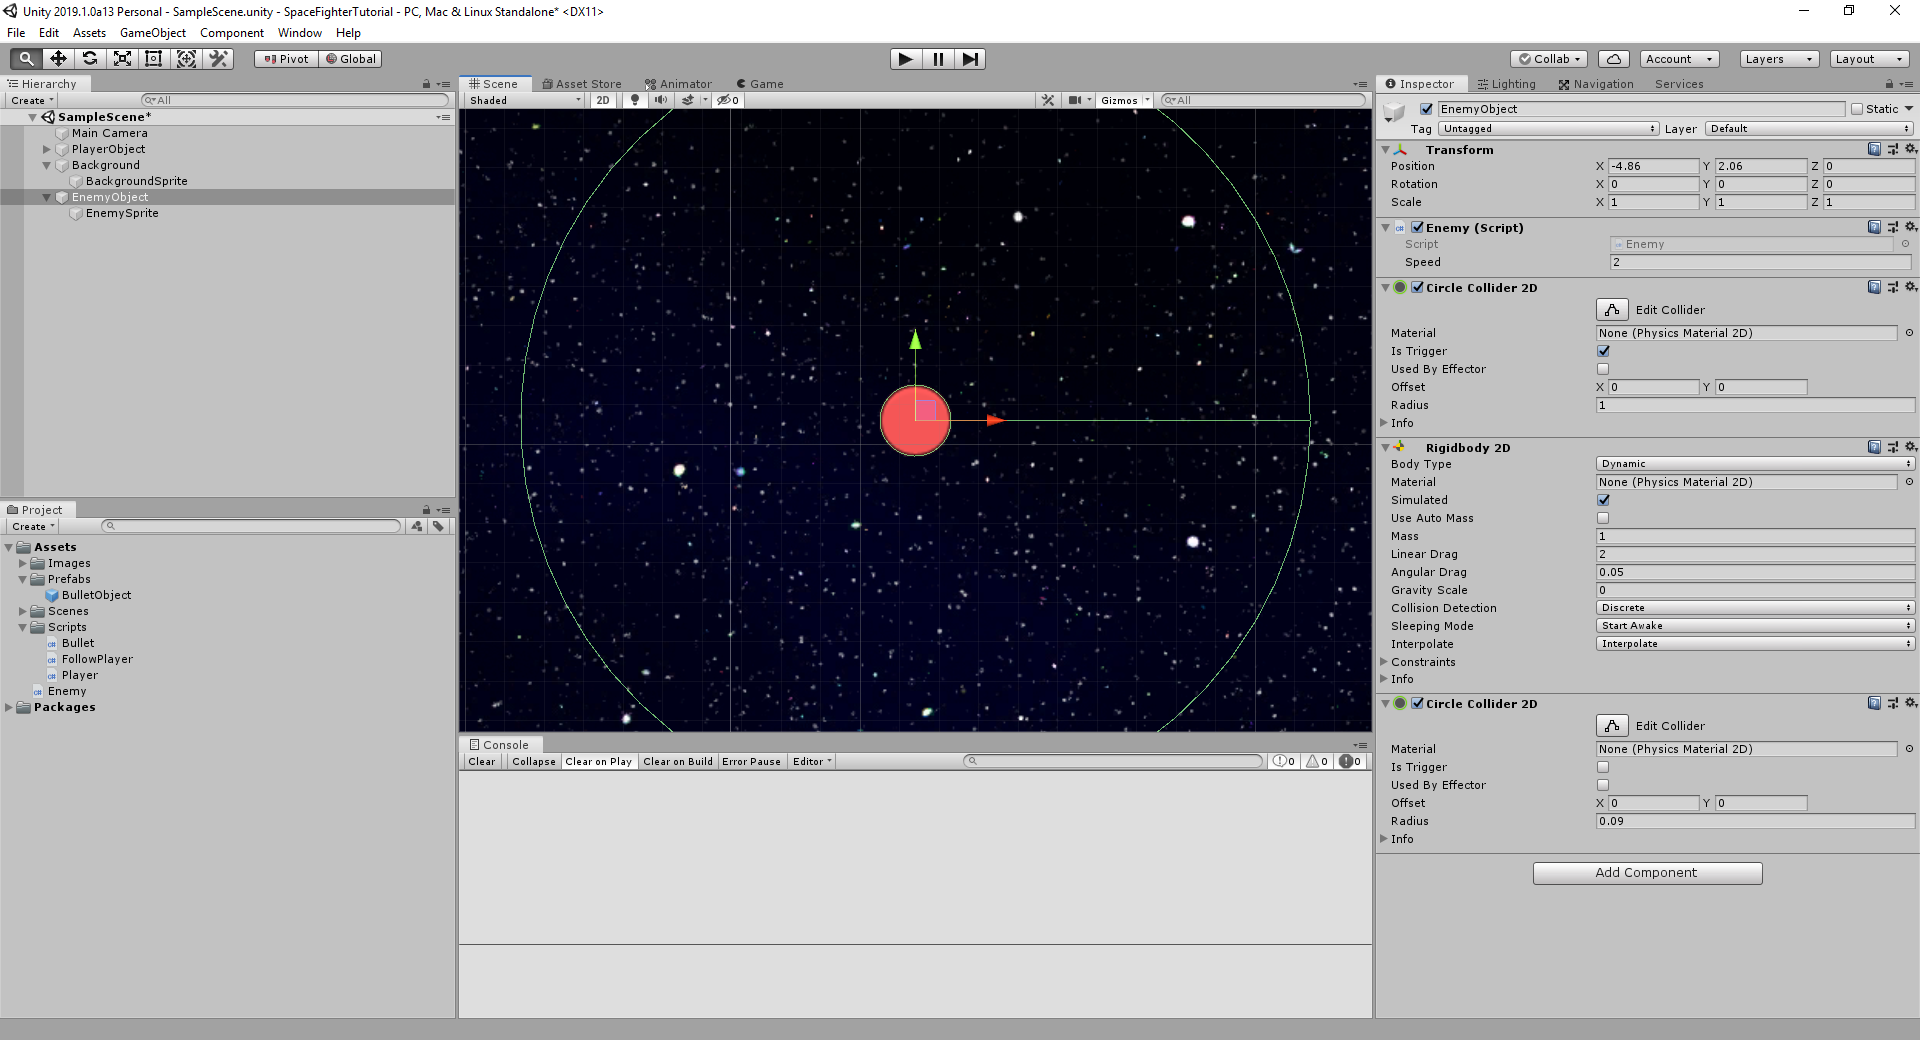
Full Unity 2D Game Tutorial 2019- Colliders
Colliders are how we define the area that an object uses. We use them to check whether an object has collided with another. We can also use them to trigger events. The reason we have added 2 colliders to our enemy is so we can use one to represent the physical space the enemy takes up and the second to trigger event based on what object enter the colliders space.
In the image above you can see that one collider has been set to a radius of 1 and has the is Trigger checkbox checked. This is the collider which will trigger the enemy to follow the target. Increase the radius to something like 4 (it was shrunk to 1 to show both colliders clearly). Our second Collider is set at 0.09 and roughly matches the size of our sprite. This is our physical collider and it will stop other object with colliders going through it. No one likes enemies that can phase through walls or other players (Hax!).
Since we want the enemy to collide with the player we need to add a CircleCollider2D on our player as well. This will be identical to the 0.09 radius collider we added to our enemy.
Full Unity 2D Game Tutorial 2019- Enemy Code
Now its time to create a new script for our enemy. Firstly lets think what our enemy needs to know. It needs to know if there is a target to follow, If there is a target who/where is it, oh and our speed. Sometimes it helps to work out what we need in pseudo code(What the code does in plain English without having to have the actual syntax). So lets flesh it out!
The enemy needs to:
|
1 2 3 4 5 |
Check if I have a target If I have, do a follow If not, do a nothing If a target comes in view, say I have a target if not, do nothing |
O.K. so that’s pretty basic but it can help when coming to a task that has a lot of different things to do and even just doing the pseudo code can allow you to think of a solution for a particular task. Create a new Script called Enemy and add this code:
|
1 2 3 4 5 6 7 8 9 10 11 12 13 14 15 16 17 18 19 20 21 22 23 24 25 26 27 28 29 30 31 32 33 34 35 36 37 38 39 40 41 42 43 44 45 46 47 |
public class Enemy : MonoBehaviour { public float speed = 2f; // Follow speed [HideInInspector] public bool hasTarget = false; // do I have a target to move towards [HideInInspector] public GameObject target; // the target i want to get closer to private Rigidbody2D rb; void Awake() { rb = gameObject.GetComponent<Rigidbody2D>(); } private void Update() { if (hasTarget) { //get distance between me and my target float distance = Vector3.Distance(transform.position, target.transform.position); // am I further than 2 units away if (distance > 2) { // I am over 2 units away follow(target.transform); // do a follow } } } // if anything starts to collide with me I will run this method private void OnTriggerEnter2D(Collider2D collision) { if (collision.name.Equals("PlayerObject")) { // is the other object the player target = collision.gameObject; // it is so set him as my target hasTarget = true; // I have a target } } // if something is no longer coliiding with me I will run this code private void OnTriggerExit2D(Collider2D collision) { if (collision.name.Equals("PlayerObject")) { target = null; hasTarget = false; } } private void follow(Transform target) { // add force to my rigid body to make me move rb.AddForce((target.transform.position - transform.position).normalized * speed); } |
Code Notes:
[HideInInspector] is used to hide this value from the unity Inspector.
Vector3.Distance takes two Vector3s and gives us the distance in a float value
OnTriggerEnter2D(Collider2D collision) This is a built in function that will be run each time something enters a collider on our object that has is Trigger set to true.
OnTriggerExit2D(Collider2D collision) Same as above except it is called when an object leaves
.normalized this converts Vector3 values from a high range into a set size where neither x, y, or z are greater than 1 or less than -1.
As usual put the script in our scripts folder and add it to our EnemyObject. Press play and watch our enemy try to get close when we come in range.

That’s it for this short tutorial section, as usual the finished code is on Github here.
I’m enjoying this tutorial a lot. I like how at the start we have explicit detail and as we progress you indicate things that need to be done but with less detail. Makes me apply what I’ve learned previously.
In the interest of improving your content, I made these minor changes in my code:
In this line I added a comma:
target = collision.gameObject; // it is, so set him as my target
In this line, corrected spelling of coliiding:
// if something is no longer colliding with me I will run this code
Also, somewhere among these “chapters” of this tutorial, a brief mention that copying code from a web page and pasting that code into an editor may create inconsistent line endings and what to do about it.
In my case, using Visual Studio 2019 Version 16.3.6, a minor change has been made in this regard and it took me a couple of minutes to figure out how to do this. Previous versions of Visual Studio had File -> Advanced Save Options. Now one must do a File -> Save [filename] As…
In the save dialog box, click the drop-down arrow on the save button and choose “Save with encoding…”, select Yes to replace the file. In the next Advanced Save Options dialog-box select the Line endings needed for the OS (Windows CR LF) in my case.
Thank you for this tutorial, I’m excited to complete it!
Huh. My enemy doesen’t follows me, I even used your github code, and it fixed nothing. What could be possibly wrong?
I had similar, but found I hadn’t ticked the “Is Trigger” attribute on the large of the 2d colliders for the enemy object, so it was never triggering the follow condition.
did you ever figure this out? I’m having the same problem and “is triggered” is checked off for the larger one
Same here, getting fed up of tutorials that don’t work. Earlier in this the bullet fires from the bullet – once the original bullet disappears it doesn’t work anymore, but now this.
After searching around the problem seems to be that you need to have to have a collider on the PlayerObject as well.
For the next one:
try to comment the if-case in Enemy-Script:
private void OnTriggerEnter2D(Collider2D collision) {
// if (collision.name.Equals(“PlayerObject”)) { // is the other object the player
target = collision.gameObject; // it is so set him as my target
hasTarget = true; // I have a target
//}
}
It seems the if-case does not work out with .Equals(“..”) so you never get a “true”
Also try to add a “Circle Collider2D” to the PlayerObject
I also made the variable “target” in the Enemy-Script visible in the Inspector by removing “[HideInInspector]” from it. Then I could assign “PlayerObject” to it by using the Inspector.
Then everything worked quite well.
good!