
Full Unity 2D Game Tutorial 2019 – Scriptable Objects
In this section of the tutorial we will dive into Scriptable Objects. Scriptable objects are a way to contain data in asset files that can then be used by your game objects. As an example we could have a car Scriptable object. This could than be used to store all data about a car; speed, gears, image, icon, name and description. We could then use our Scriptable car class to make a mini with 6 gears and a mini with 2 gears and red paint. For more information check out the manual here.
Full Unity 2D Game Tutorial 2019 – Creating our Scriptable Weapons
We will be using scriptable objects to define our weapons. This will make it easier for us to create and swap weapons for our player. We will start by coding out Scriptable object class.
|
1 2 3 4 5 6 7 8 9 10 11 12 13 14 15 16 17 18 19 20 21 |
using System.Collections; using System.Collections.Generic; using UnityEngine; /* * Here we add CreateAssetMenu to allow us to create new Weapons from the menu * fileName is the initial name of the file when created * menuName is the name used in the menu */ [CreateAssetMenu(fileName = "New Weapon", menuName = "Weapon")] public class ScObWeapon : ScriptableObject { public GameObject bulletPrefab; // Stores out Bullet Prefab public string weaponName; // weapon name e.g plasma cannon public string weaponDescription;// weapon description e.g "Fires plasma ball" public int magazineCapacity; // amount of bullets per magazine e.g. 5 public float reloadSpeed; // time to reload e.g 2.5f (2.5 seconds) public float fireRate; // bullets shot per second 1f (1 per second) public float damage; // damage per bullet (100) } |
Code Notes:
We no longer use the MonoBehaviour, instead we use ScriptableObject
The rest of the fields are just the data that each weapon will have.
That’s it, we’ve created out scriptable object class. We can now go into unity and create some weapons. Right click in the project window and go to create. You will see out new scriptable object Weapon.
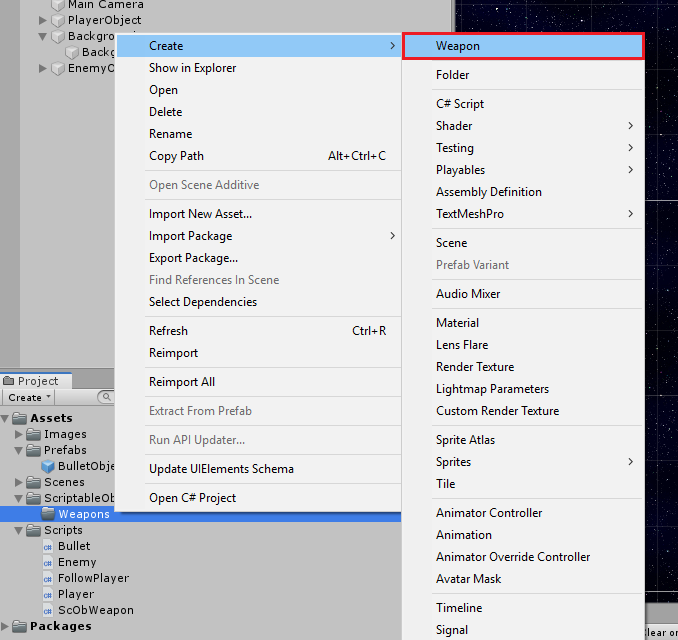
We can now click Weapon to create a new asset. Remember to keep things neat by placing scripts in the scripts folder and creating a new set of folders for our new scriptable assets.
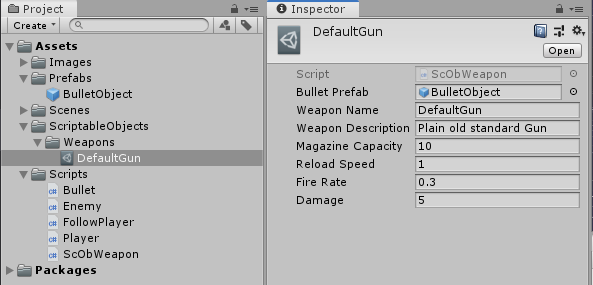
I have named my weapon DefaultGun because it will be the default gun for our player and Enemies. Add some settings to your weapon in the inspector and we will proceed to add some code in our player to use these new weapons.
Full Unity 2D Game Tutorial 2019 – Player Code
Since we are now storing the bullet prefab inside our weapon we can remove this old variable in our player. We will then add some code to fire the bullet when we click the mouse and fire towards the current mouse pointer.
|
1 2 3 4 5 6 7 8 9 10 11 12 13 14 15 16 17 18 19 20 21 22 23 24 25 26 27 28 29 |
public class Player : MonoBehaviour { public float moveSpeed = 5f; public float hitPoints = 100f; private Rigidbody2D rb; public ScObWeapon currentWeapon; //public GameObject bulletPrefab; // the prefab of our bullet // Start is called before the first frame update void Start() { rb = gameObject.GetComponent<Rigidbody2D>(); if(rb == null) { Debug.LogError("Player::Start cant find RigidBody2D </sadface>"); } } // Update is called once per frame void Update(){ if (Input.GetMouseButton(0)) { Vector3 pointMouseVector = Camera.main.ScreenToWorldPoint(Input.mousePosition); pointMouseVector.z = 0; // set z to 0, this is 2D GameObject go = Instantiate(currentWeapon.bulletPrefab, gameObject.transform.position, Quaternion.identity); Bullet bullet = go.GetComponent<Bullet>(); Vector3 targetVector = pointMouseVector - gameObject.transform.position; bullet.targetVector = targetVector; } } |
Code Notes:
Input.GetMouseDown(0) this will let us know if the user is pressing the left mouse button.
Camera.main.ScreenToWorldPoint converts the position we give it to a position in our world because the screen and world have a different coordinates system.
targetVector is the place we aim at – our position to get the direction we want to bullet to travel.

One final change before we can test the player shooting is to change the bullet prefab. Open the prefab and set the speed to 25, the mass to 0.2 and linear drag to 0.1. This should let our bullets travel faster. Press play and you should have something similar to this:
Full Unity 2D Game Tutorial 2019 – Using Weapon Stats
We have started to use our scriptable object however we are only using the bulletprefab in it at the moment. Let’s update our player some more to allow us to use the other fields.
|
1 2 3 4 5 6 7 8 9 10 11 12 13 14 15 16 17 18 19 20 21 22 23 24 25 26 27 28 29 30 31 32 33 34 35 36 37 38 39 40 41 42 43 44 45 46 47 48 49 50 51 52 53 54 55 56 57 58 59 60 61 62 63 64 65 66 67 68 69 70 71 72 73 74 75 76 77 78 79 80 81 82 |
using System.Collections; using System.Collections.Generic; using UnityEngine; public class Player : MonoBehaviour { public float moveSpeed = 5f; public float hitPoints = 100f; private Rigidbody2D rb; public ScObWeapon currentWeapon; private float lastFired = 0f; // last shot time private float reloadTimer = 0f; // time until reload finsihes private int magazine; // current bullet count private bool reloading = false; // is reloading //public GameObject bulletPrefab; // the prefab of our bullet // Start is called before the first frame update void Start() { rb = gameObject.GetComponent<Rigidbody2D>(); if(rb == null) { Debug.LogError("Player::Start cant find RigidBody2D </sadface>"); } reloadTimer = currentWeapon.reloadSpeed; magazine = currentWeapon.magazineCapacity; } // Update is called once per frame void Update(){ if (Input.GetMouseButton(0)) { fire(); // do us a firing! } lastFired -= Time.deltaTime; // reduce last fired Timer if (reloading) { // check if were reloading reloadTimer -= Time.deltaTime; // lower reload timer if (reloadTimer <= 0) { // have we reloaded long enough reloading = false; // reset reload magazine = currentWeapon.magazineCapacity;// refill our pew pew machine } } } // this is called at a fixed interval for use with physics objects like the RigidBody2D void FixedUpdate() { // check if user has pressed some input keys if (Input.GetAxisRaw("Horizontal") != 0 || Input.GetAxisRaw("Vertical") != 0) { // convert user input into world movement float horizontalMovement = Input.GetAxisRaw("Horizontal") * moveSpeed; float verticalMovement = Input.GetAxisRaw("Vertical") * moveSpeed ; //assign world movements to a Veoctor2 Vector2 directionOfMovement = new Vector2(horizontalMovement, verticalMovement); // apply movement to player's transform rb.AddForce(directionOfMovement); } } private void startReload() { reloading = true; reloadTimer = currentWeapon.reloadSpeed; } public void fire() { if (lastFired <= 0f && !reloading) { // make sure we dont shoot while reloading or too often if (magazine == 1) { // this is our last bullet startReload(); // start reloading } Vector3 pointMouseVector = Camera.main.ScreenToWorldPoint(Input.mousePosition); pointMouseVector.z = 0; // set z to 0, this is 2D GameObject go = Instantiate(currentWeapon.bulletPrefab, gameObject.transform.position, Quaternion.identity); Bullet bullet = go.GetComponent<Bullet>(); Vector3 targetVector = pointMouseVector - gameObject.transform.position; bullet.targetVector = targetVector; lastFired = currentWeapon.fireRate; // we just fired, add a delay with lastFired timer magazine -= 1; // bye bye bullet } } } |
What have we changed in this code… well we moved the fire code from the update method to its own method for clarity. We have also added a startReload method because we might want to trigger a reload sound in the future. We have added 2 new variable for timing the reload and the shots, 1 for magazine to store how many bullets we have left and a bool to keep track of our reload state.
That’s it for this part of the tutorial. Why don’t you try making some different weapons yourself. The finished source code is hosted on github here.
Previous Part Simple Enemy Ai – Next Part User Interface and TextMeshPro
Hallo 🙂