
Full Unity 2D Game Tutorial 2019 – Interfaces and Enemy Shooting
In this section of the tutorial we will implement the enemy shooting capability and we will use Interfaces to allow us to add the ability to give and take away health to an object. We will also look into changing the collision matrix to allow us to limit which colliders should interact with each other.
Full Unity 2D Game Tutorial 2019 – Enemy Shooting
First let’s allow our enemy to shoot by using the code we already created for the player.
|
1 2 3 4 5 6 7 8 9 10 11 12 13 14 15 16 17 18 19 20 21 22 23 24 25 26 27 28 29 30 31 32 33 34 35 36 37 38 39 40 41 42 43 44 45 46 47 48 49 50 51 52 53 54 55 56 57 58 59 60 61 62 63 64 65 66 67 68 69 70 71 72 73 74 75 76 77 78 79 80 81 82 83 84 85 86 87 88 89 90 91 92 93 94 95 96 97 98 99 100 101 102 103 104 105 106 107 108 |
using System.Collections; using System.Collections.Generic; using UnityEngine; public class Enemy : MonoBehaviour { public float speed = 2f; // Follow speed [HideInInspector] public bool hasTarget = false; // do I have a target to move towards [HideInInspector] public GameObject target; // the target i want to get closer to public float hitpoints = 100f; private bool isDead = false; private Rigidbody2D rb; public ScObWeapon currentWeapon; private float lastFired = 0f; // last shot time private float reloadTimer = 0f; // time til reload finsihes private int magazine; // current bullet count private bool reloading = true; // is reloading void Awake() { rb = gameObject.GetComponent<Rigidbody2D>(); } private void Update() { if (hasTarget) { //get distance between me and my target float distance = Vector3.Distance(transform.position, target.transform.position); // am I further than 2 units away if (distance > 2) { // I am over 2 units away follow(target.transform); // do a follow } shoot(); } if (isDead) { // I am dead, destroy me Destroy(gameObject); } } // allow our enemy to shoot private void shoot() { // same as player (ideally we would have this in its own class(like entityWeapon) but for now // we will just add it here and give it a TODO // TODO move into own class as this is shared between player and enemy lastFired -= Time.deltaTime; if (reloading) { reloadTimer -= Time.deltaTime; if (reloadTimer <= 0) { reloading = false; magazine = currentWeapon.magazineCapacity; } } else { if (lastFired <= 0f && !reloading) { if (magazine == 1) { startReload(); } Vector3 direction = (target.transform.position - transform.position).normalized; GameObject bulletObject = Instantiate(currentWeapon.bulletPrefab, (transform.position + (direction * 0.6f)), Quaternion.identity); Bullet bullet = bulletObject.GetComponent<Bullet>(); bullet.targetVector = direction.normalized; bulletObject.transform.position = transform.position; lastFired = currentWeapon.fireRate; magazine -= 1; } } } private void startReload() { reloading = true; reloadTimer = currentWeapon.reloadSpeed; } // if anything starts to collide with me I will run this method private void OnTriggerEnter2D(Collider2D collision) { if (collision.name.Equals("PlayerObject")) { // is the other object the player target = collision.gameObject; // it is so set him as my target hasTarget = true; // I have a target } } // if something is no longer coliiding with me I will run this code private void OnTriggerExit2D(Collider2D collision) { if (collision.name.Equals("PlayerObject")) { target = null; hasTarget = false; } } private void follow(Transform target) { // add force to my rigid body to make me move rb.AddForce((target.transform.position - transform.position).normalized * speed); } } |
Code Notes:
Nothing really new here, just using the same code as the player with some small adjustments.
We have copied the code from our player here and changed it so we use the target position instead of the mouse click position to direct the bullet. Since we have duplicated this code in the player and enemy we should really extract it from the player and enemy and put it in its own class which the player and enemy can share but for now lets just leave it and add a TODO.
You can test the game out now and remember to set the weapon for the enemy in the Unity editor.
Yay! the enemy shoots when the player gets close enough, but nothing happens when the bullets hit each other. One of the reasons for this is that the bullets don’t even have colliders on them. They are just images floating across the screen. To make them physical object we need to update our bullet prefab to have a collider. Make sure to set it to be a trigger as we will use the onTriggerEnter method to trigger getting hit.
 That’s one issue sorted. Another issue is we don’t have any code in place to take care of taking damage. We will create an Interface which we can place on any object we want to take damage.
Full Unity 2D Game Tutorial 2019 – Interfaces
An interface is a bit of code that says what methods should be added to a class in order to interface with other classes. Our Interface will be called IEntityHealth and will say what methods an object needs to have to be able to change its health. The code is pretty simple but the concept is a bit harder to grasp. We first start by making the Interface. In the project window add a new C# script and name it IEntityHealth (we tend to have all interfaces start with a capital I so we can identify them easily). Now add this simple code:
|
1 2 3 4 5 6 7 8 9 10 11 12 |
using System.Collections; using System.Collections.Generic; using UnityEngine; public interface IEntityHealth { // a method for taking damage void ITakeDamage(float damage); // a method for gaining health void IGainHealth(float healthAmount); } |
Code Notes:
We removed the class and monobehaviour because we will not be a game object or a class, we are an Interface.
Next we define the 2 methods we want our classes to have and what values they will take.
We have created the Interface but we don’t have a class that uses an interface yet. We will be adding them to both our player and enemy.
Enemy Code:
|
1 2 3 4 5 6 7 8 9 10 11 12 13 14 15 16 17 18 19 20 21 22 23 |
using System.Collections; using System.Collections.Generic; using UnityEngine; public class Enemy : MonoBehaviour, IEntityHealth { public float hitpoints = 100f; private bool isDead = false; //... old code public void IGainHealth(float health) { // do nothing yet } public void ITakeDamage(float damage) { hitpoints -= damage; if (hitpoints <= 0) { isDead = true; } } } |
Player Code:
|
1 2 3 4 5 6 7 8 9 10 11 12 13 14 15 16 17 18 19 20 21 22 23 24 |
using System.Collections; using System.Collections.Generic; using UnityEngine; public class Player : MonoBehaviour, IEntityHealth { public float hitpoints = 100f; // renamed this from hitPoints private bool isDead = false; //..old code stays same public void IGainHealth(float health) { // do nothing yet } public void ITakeDamage(float damage) { hitpoints -= damage; if (hitpoints <= 0) { isDead = true; Debug.Log("Our Player died, do nothing for now"); } } } |
Now that our player and enemy have the new interface methods we just need to call them when the bullets hit them. Again we will implement some code for this, this time inside the bullets script. Simply add this method inside the Bullet script.
|
1 2 3 4 5 6 7 8 |
private void OnTriggerEnter2D(Collider2D collision) { IEntityHealth itd = collision.GetComponent<IEntityHealth>(); if (itd != null) { itd.ITakeDamage(damage); lifetime = 0f; // I did my part. Join the mobile infantry today! } } |
Now if you test out the game it looks like nothing happens. and our enemy and player die for no reason. This is because the player bullets hit the player and the enemy bullets hit the enemy. They are killing themselves 🙁
Full Unity 2D Game Tutorial 2019 – Collision Matrix
We don’t want our player and enemy to kill themselves. We often don’t want certain things to interact with one another, like the player and the players bullets or one enemy’s bullets hitting another enemy. This is where the collision matrix comes in to play. To use a collision matrix we must create some layers where we can separate objects. Click an object in the hierarchy view and click the layer drop down and finally click Add Layer… to start adding some layers.
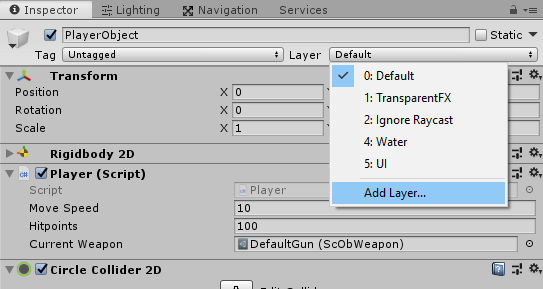
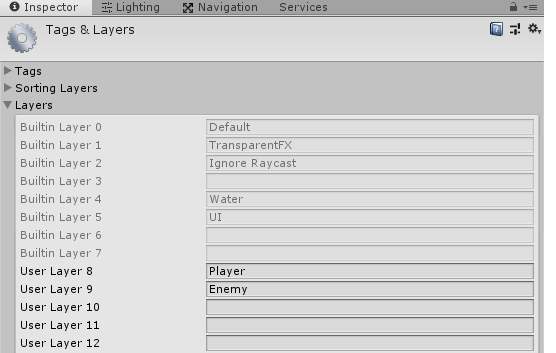
Add 2 new layers by typing text in the text boxes presented to you. We will have one for player and on for the enemies. Here my layer 8 is the player, we will need to remember this later as we will use this value to set what layer our bullets will be added to.
Now we need to update our player and enemy scripts so they set the layer for the bullets. All we have to do is after we create our bullet set its layer to the layer we want it on. This is the code for the player:
|
1 2 3 4 5 6 7 8 9 |
Vector3 pointMouseVector = Camera.main.ScreenToWorldPoint(Input.mousePosition); pointMouseVector.z = 0; // set z to 0, this is 2D GameObject go = Instantiate(currentWeapon.bulletPrefab, gameObject.transform.position, Quaternion.identity); Bullet bullet = go.GetComponent<Bullet>(); go.layer = 8; // set out bullet to the player layer Vector3 targetVector = pointMouseVector - gameObject.transform.position; bullet.targetVector = targetVector; lastFired = currentWeapon.fireRate; // we just fired, add a delay with lastFired timer magazine -= 1; // bye bye bullet |
Simple right, now do the same for the enemy. We should also change the layer of our player and enemy to their respective layers. And if requested change the layer of all children.
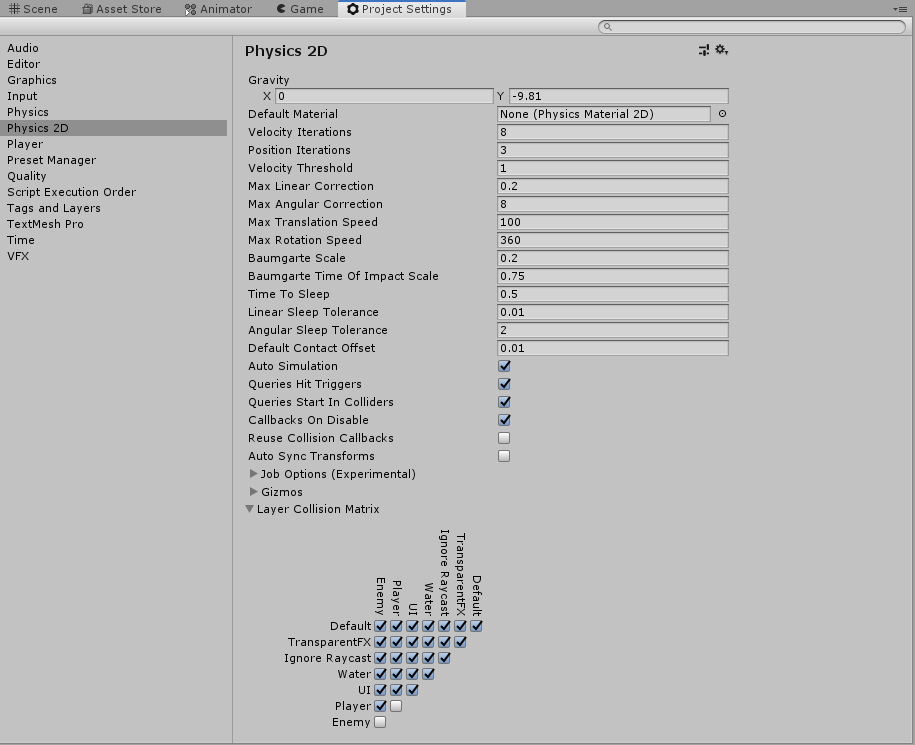
 Now if we run our game.. nothing has changed. That’s because we haven’t changed the matrix yet. We need to update it so it knows which layers will interact with each other. To do that we start by opening the project settings window. We can open it by going to the Edit > Project settings then selecting Physics 2D and the matrix is displayed at the bottom.

Update the matrix so players don’t interact with other player objects and enemies don’t interact with other enemies like the image below.
 Now if we run our game we will see that the player and enemy can now shoot without hitting themselves. We still have an issue though, our player bullets are hitting our enemy from far away. This is cause by the trigger we have used in the enemy to spot the player. Its our LineOfSight trigger and this can be easily fixed by moving the trigger from being directly on the enemyObject to a child.
All we need to do is create an empty inside the EnemyObject and name it LineOfSight. Then add a CircleCollider2D and set it to a radius of 5. Then delete the CircleCollider2D component on our enemy that represents the Line of sight.
 With all this done you should end up with something similar to this

As usual the complete source can be found on Github here.
Bullets don’t destroy themselves. Nothing takes damage. The empty object still triggers the collider. I give up.
Maybe you forgot to set the “isTrigger” checkbox on the bulletPrefab’s collider? That was what did it for me!