
Full Unity 2D Game Tutorial 2019 – User Interface and TextMeshPro
In this section of the tutorial we will add a user interface for the player using the Canvas and TextMeshPro. The User interface will allow the player to see how many bullets they have left in the magazine and notify them when they are reloading. In the future we will add to the user interface to show a minimap, current health and to show them what music is currently player. We will also use some of the techniques picked up here to make a main menu.
Full Unity 2D Game Tutorial 2019 – UI and Canvas
The first step in creating a UI is to add a new UI element. We will add a TextMeshPro – Text object. This will display our bullets remaining. So click and add a TextMeshPro – Text object now.
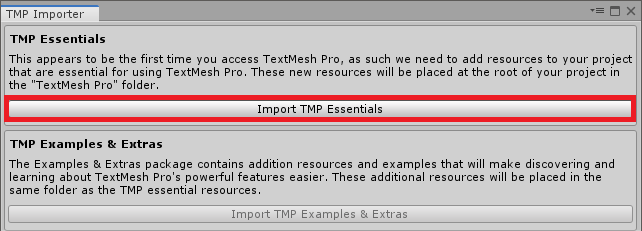
 If you are prompted with an import window like the one shown below. Select the Import TMP Essentials to import all the required files by TextMeshPro.
 Once that’s done you will notice that you have been given your TextMeshPro Text and it is in a Canvas object. The Canvas is required for all UI items supplied by Unity. It is the object that holds all our UI and decides how to render it for the player. We don’t need to change any settings as it will work out of the box and allow us to use UI elements.

Double click the Canvas in the hierarchy view to zoom out and get the whole UI visible in our scene view. You will see that the text is in the centre of the screen. This is not where we want it so we will move it to the top right of the screen by selecting it in the hierarchy view and clicking the anchor presets button(the box icon). We can the use the shift+alt click and select the top right box from the centre 9 boxes shown in the image below.
Each UI element has an anchor(where it is attached to the canvas), pivot (the point that it rotates around) and a position. By using shift+alt+click we can set all 3 to the top right corner. The anchor allows us to position an element relative to that point. If we anchored it to the left of the screen and the screen size was increased the UI element wouldn’t move and would stay x amount of pixels from the left part of the screen.

Full Unity 2D Game Tutorial 2019 – TextMeshPro Text
The TextMeshPro text element has some options which we will change to get the desired effect. The first of those is the Text. Here we will simple add 10 capital O’s. These will represent or bullets for now. Next we will set the Font style to Bold , the font size to 20 the colour to #E0346A or whatever you want your capital O bullets to look like. Since this element is anchored to the right we will set the Alignment to right aligned and the vertical alignment to centre.

Now we add another TextMeshPro element for reloading. Repeat the process we did for the bullets element except this time we will drag the box down using the small white boxes to position it under the bullets display. Change a few of the TextMeshPro options to get a text element you like for the reloading message. Remember to rename all your objects so we know what they are and what they’re for. Now, we will proceed to the coding part.
Full Unity 2D Game Tutorial 2019 – Coding The UI
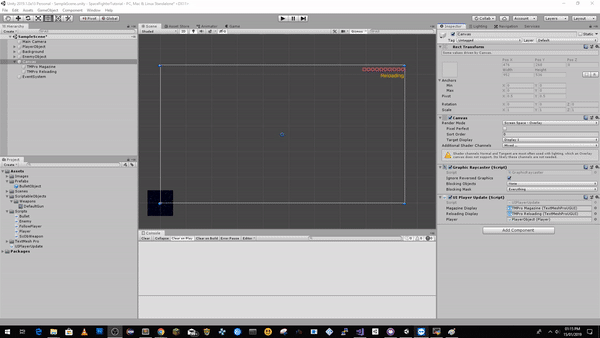
You should now have the both TextMeshPro elements on your canvas and should look similar to the image shown above. We will have several UI elements later on so we want to be able to update them all from a single place. The Canvas is ideal for this as all of our elements are on it. We will create our script on the Canvas component. Name it something like UIPlayerUpdate since we will be updating all the player details on the UI.
|
1 2 3 4 5 6 7 8 9 10 11 12 13 14 15 16 17 18 19 20 21 22 23 24 25 26 27 28 29 30 31 32 33 34 35 36 37 |
using System.Collections; using System.Collections.Generic; using UnityEngine; using TMPro; // <- this is required each time we use a TextMeshPro element public class UIPlayerUpdate : MonoBehaviour { public TextMeshProUGUI magazineDisplay; public TextMeshProUGUI reloadingDisplay; public Player player; void Update(){ updateMagazine(); updateReloading(); } // I personally don't like this. It is called each frame to update the display yet // the player may not shoot for a long time. A better solution would be to only call this after // the player has fired, reloaded or changed weapon. lets mark this with a TODO //TODO maybe replace this with event driven call private void updateMagazine() { string displayText = ""; for (int i = 0; i < player.getMagazine(); i++) { displayText = displayText + "O"; } magazineDisplay.text = displayText; } private void updateReloading() { if (player.isReloading()) { reloadingDisplay.enabled = true; } else { reloadingDisplay.enabled = false; } } } |
Code Notes:
Added using TMPro because we are using TextMeshPro elements and all their code is in this namespace.
Used a TODO to mark something we want to return to later and hopefully improve.
We have added a couple of simple methods that are called in the update method to update our UI elements. We call the player’s isReloading() and getMagazine() methods to get this data. These do not exist in the player yet so let’s make them now.
|
1 2 3 4 5 6 7 8 |
// allows public access to amount of bullets left public float getMagazine() { return magazine; } public bool isReloading() { return reloading; } |
Remember to add the Player and TextMeshPro texts to the script we have added on the Canvas.

We can now play the game inside Unity and we should see the displays now change when our player shoots and reloads.
That’s it for this section of the tutorial, as usual the finished source is available on Github here.