

Over the past couple of years libgdx, eclipse and android have went through many changes. These changes have made a lot of the tutorials online out of date so a new tutorial detailing the steps required to generate a new project was needed. So before we begin I’d like to note what versions I will be using in this tutorial to make it easier for you to follow along.
Software Downloads
The first thing we need is the LibGDX Project Generator
This can be downloaded from the libGDX website.


Next we need to get Eclipse Version 2018-12 from https://www.eclipse.org/ide/
and finally we get Android Studio 3.2.1 from https://developer.android.com/studio/
Project Generator
Now that you have the same versions taht are used in this tutorial you can follow along.
The first thing we will do is run the project generator. This can be done by double clicking the .jar file or right clicking and opening with java.
 This should bring up a screen with all the inputs for setting up your project.

Project Generator Options
- Project Name
- The name of your project. This is usually written out all in lowercase with minus separators. E.g. skull-crushers
- Package
- This is the package for your game. Typically this is your domain in reverse with your game name. E.g. blog.gamedevelopment.skullcrushers
- Game Class
- This is the name of the main class for your game in Camel case. E.g. SkullCrushers
- Destination
- The location your project will be placed on your storage media. E.g. c:\projects\skullcrushers
- Android SDK
- This is the location of your installed Android SDK. This will be installed with the Android Studio IDE and will be in the C:\Users\{username}\AppData\Local\Android\Sdk
- Sub Projects
- This is where you select which platforms you want projects for. The options are:
- Desktop: For projects that run on a typical desktop environment such as windows or *nix.
- Android: For Android devices such as phones and tablets.
- IOS: For Apple IPhones, IPads using MobiDevelop’s RoboVM fork
- IOS-moe: Again for IPhones and Ipads using Intel’s Multi-OS Engine backend.
- HTML: For browser applications.
- This is where you select which platforms you want projects for. The options are:
- Extensions
- These are extensions you can add to your application. The current extensions are:
- Bullet: A 3D Collision Detection and Rigid Body Dynamics Library for use with 3D games.
- Freetype: An Extension to allow use of Freetype fonts.
- Tools: A collection of tools such as:
- Texture packer: packs images into larger files to increase performance.
- Hiero: for creating Bitmap fonts.
- 2D and 3D Particle Editor: To create 2D or 3D particle Effects.
- Controllers: An Extension to add support for wired peripheral controllers such as the xbox controller.
- Box2D: An Extension which allows you to add 2D physics to your game.
- Box2DLights: An extension to use with Box2D to create lighting effects using ray-casting.
- Ashley: A Component Entity Engine. More can be found out about this on www.gamedev.net
- AI: This extension adds support for AI based Movement, Path finding and decision making.
- These are extensions you can add to your application. The current extensions are:
- Third Party Extensions
- These are extensions added by third parties that can be used in LibGDX.
- Advanced Options:
- Maven Mirror URL: used to replace the default Maven Repository
- IDEA and Eclipse: used to select the project types that are created. IDEA for Intellij IDE and Eclipse for Eclipse IDE.
- Offline Mode: Used to disable the dependency download in your projects.
Some notes about libgdx and eclipse. Android is no longer supported by libGDX on the eclipse IDE due to the discontinuation of the standalone android SDK as well as other things. This means if you are making an android project you are better off using android studio.
Now the project generator is running and you have been told what all the settings are for enter your application details and select the target platforms and extensions you plan to use. Once done, click the generate button and you will be presented with some progress text like below
|
1 2 3 4 5 6 7 8 9 10 11 12 13 14 15 16 17 18 19 20 21 22 23 24 25 26 27 28 29 30 31 32 33 34 35 36 37 38 39 40 41 42 43 44 45 46 47 48 49 50 51 52 53 54 55 56 57 58 59 60 61 62 63 64 65 66 67 68 69 70 71 72 73 74 75 76 77 78 79 80 81 82 83 84 85 86 87 88 89 90 91 92 93 94 95 96 97 98 99 100 101 102 103 104 105 106 107 108 109 110 111 112 |
Generating app in C:\Users\darkd\Desktop\libgdx-2019-project setup\skullcrushers Executing 'C:\Users\darkd\Desktop\libgdx-2019-project setup\skullcrushers/gradlew.bat clean --no-daemon' Downloading https://services.gradle.org/distributions/gradle-4.6-bin.zip Unzipping C:\Users\darkd\.gradle\wrapper\dists\gradle-4.6-bin\4jp4stjndanmxuerzfseyb6wo\gradle-4.6-bin.zip to C:\Users\darkd\.gradle\wrapper\dists\gradle-4.6-bin\4jp4stjndanmxuerzfseyb6wo To honour the JVM settings for this build a new JVM will be forked. Please consider using the daemon: https://docs.gradle.org/4.6/userguide/gradle_daemon.html. Daemon will be stopped at the end of the build stopping after processing Download https://repo.maven.apache.org/maven2/com/mobidevelop/robovm/robovm-gradle-plugin/2.3.5/robovm-gradle-plugin-2.3.5.pom Download https://repo.maven.apache.org/maven2/org/wisepersist/gwt-gradle-plugin/1.0.6/gwt-gradle-plugin-1.0.6.pom Download https://dl.google.com/dl/android/maven2/com/android/tools/build/gradle/3.2.0/gradle-3.2.0.pom Download https://repo.maven.apache.org/maven2/org/jetbrains/kotlin/kotlin-stdlib-jre8/1.2.0/kotlin-stdlib-jre8-1.2.0.pom Download https://dl.google.com/dl/android/maven2/androidx/databinding/databinding-compiler-common/3.2.0/databinding-compiler-common-3.2.0.pom Download https://dl.google.com/dl/android/maven2/com/android/tools/analytics-library/shared/26.2.0/shared-26.2.0.pom Download https://dl.google.com/dl/android/maven2/com/android/tools/analytics-library/crash/26.2.0/crash-26.2.0.pom Download https://dl.google.com/dl/android/maven2/com/android/tools/build/gradle-api/3.2.0/gradle-api-3.2.0.pom Download https://dl.google.com/dl/android/maven2/com/android/tools/build/builder/3.2.0/builder-3.2.0.pom Download https://dl.google.com/dl/android/maven2/com/android/tools/lint/lint-gradle-api/26.2.0/lint-gradle-api-26.2.0.pom Download https://repo.maven.apache.org/maven2/com/mobidevelop/robovm/robovm-debugger/2.3.5/robovm-debugger-2.3.5.pom Download https://repo.maven.apache.org/maven2/com/mobidevelop/robovm/robovm-dist-compiler/2.3.5/robovm-dist-compiler-2.3.5.pom Download https://repo.maven.apache.org/maven2/com/mobidevelop/robovm/robovm-dist-parent/2.3.5/robovm-dist-parent-2.3.5.pom Download https://repo.maven.apache.org/maven2/com/mobidevelop/robovm/robovm-parent/2.3.5/robovm-parent-2.3.5.pom Download https://dl.google.com/dl/android/maven2/com/android/tools/analytics-library/tracker/26.2.0/tracker-26.2.0.pom Download https://dl.google.com/dl/android/maven2/com/android/tools/sdk-common/26.2.0/sdk-common-26.2.0.pom Download https://dl.google.com/dl/android/maven2/com/android/tools/common/26.2.0/common-26.2.0.pom Download https://dl.google.com/dl/android/maven2/com/android/tools/sdklib/26.2.0/sdklib-26.2.0.pom Download https://dl.google.com/dl/android/maven2/com/android/tools/build/builder-test-api/3.2.0/builder-test-api-3.2.0.pom Download https://dl.google.com/dl/android/maven2/com/android/tools/build/builder-model/3.2.0/builder-model-3.2.0.pom Download https://dl.google.com/dl/android/maven2/com/android/tools/build/manifest-merger/26.2.0/manifest-merger-26.2.0.pom Download https://dl.google.com/dl/android/maven2/com/android/tools/ddms/ddmlib/26.2.0/ddmlib-26.2.0.pom Download https://dl.google.com/dl/android/maven2/com/android/tools/build/apksig/3.2.0/apksig-3.2.0.pom Download https://dl.google.com/dl/android/maven2/com/android/tools/build/apkzlib/3.2.0/apkzlib-3.2.0.pom Download https://dl.google.com/dl/android/maven2/com/android/tools/analytics-library/protos/26.2.0/protos-26.2.0.pom Download https://dl.google.com/dl/android/maven2/com/android/tools/annotations/26.2.0/annotations-26.2.0.pom Download https://dl.google.com/dl/android/maven2/androidx/databinding/databinding-common/3.2.0/databinding-common-3.2.0.pom Download https://dl.google.com/dl/android/maven2/com/android/databinding/baseLibrary/3.2.0/baseLibrary-3.2.0.pom Download https://repo.maven.apache.org/maven2/org/jetbrains/kotlin/kotlin-stdlib/1.2.0/kotlin-stdlib-1.2.0.pom Download https://repo.maven.apache.org/maven2/org/jetbrains/kotlin/kotlin-stdlib-jre7/1.2.0/kotlin-stdlib-jre7-1.2.0.pom Download https://repo.maven.apache.org/maven2/com/mobidevelop/robovm/robovm-compiler/2.3.5/robovm-compiler-2.3.5.pom Download https://repo.maven.apache.org/maven2/com/mobidevelop/robovm/robovm-compiler-parent/2.3.5/robovm-compiler-parent-2.3.5.pom Download https://dl.google.com/dl/android/maven2/com/android/tools/layoutlib/layoutlib-api/26.2.0/layoutlib-api-26.2.0.pom Download https://dl.google.com/dl/android/maven2/com/android/tools/repository/26.2.0/repository-26.2.0.pom Download https://dl.google.com/dl/android/maven2/com/android/tools/dvlib/26.2.0/dvlib-26.2.0.pom Download https://repo.maven.apache.org/maven2/com/mobidevelop/robovm/robovm-llvm/2.3.5/robovm-llvm-2.3.5.pom Download https://repo.maven.apache.org/maven2/org/apache/commons/commons-exec/1.0.1/commons-exec-1.0.1.pom Download https://repo.maven.apache.org/maven2/org/simpleframework/simple-xml/2.7/simple-xml-2.7.pom Download https://repo.maven.apache.org/maven2/com/mobidevelop/robovm/robovm-libimobiledevice/2.3.5/robovm-libimobiledevice-2.3.5.pom Download https://repo.maven.apache.org/maven2/com/mobidevelop/robovm/robovm-soot/2.5.0-5/robovm-soot-2.5.0-5.pom Download https://repo.maven.apache.org/maven2/com/googlecode/plist/dd-plist/1.16/dd-plist-1.16.pom Download https://repo.maven.apache.org/maven2/org/ow2/asm/asm-debug-all/5.0.3/asm-debug-all-5.0.3.pom Download https://repo.maven.apache.org/maven2/org/jetbrains/kotlin/kotlin-stdlib/1.2.20/kotlin-stdlib-1.2.20.pom Download https://repo.maven.apache.org/maven2/com/googlecode/json-simple/json-simple/1.1.1/json-simple-1.1.1.pom Download https://repo.maven.apache.org/maven2/junit/junit/4.10/junit-4.10.pom Download https://repo.maven.apache.org/maven2/org/hamcrest/hamcrest-core/1.1/hamcrest-core-1.1.pom Download https://repo.maven.apache.org/maven2/org/hamcrest/hamcrest-parent/1.1/hamcrest-parent-1.1.pom Download https://repo.maven.apache.org/maven2/org/wisepersist/gwt-gradle-plugin/1.0.6/gwt-gradle-plugin-1.0.6.jar Download https://dl.google.com/dl/android/maven2/com/android/tools/analytics-library/crash/26.2.0/crash-26.2.0.jar Download https://dl.google.com/dl/android/maven2/com/android/tools/analytics-library/tracker/26.2.0/tracker-26.2.0.jar Download https://repo.maven.apache.org/maven2/com/mobidevelop/robovm/robovm-gradle-plugin/2.3.5/robovm-gradle-plugin-2.3.5.jar Download https://dl.google.com/dl/android/maven2/com/android/tools/analytics-library/shared/26.2.0/shared-26.2.0.jar Download https://dl.google.com/dl/android/maven2/com/android/tools/lint/lint-gradle-api/26.2.0/lint-gradle-api-26.2.0.jar Download https://dl.google.com/dl/android/maven2/com/android/tools/build/manifest-merger/26.2.0/manifest-merger-26.2.0.jar Download https://dl.google.com/dl/android/maven2/androidx/databinding/databinding-compiler-common/3.2.0/databinding-compiler-common-3.2.0.jar Download https://dl.google.com/dl/android/maven2/com/android/tools/build/builder/3.2.0/builder-3.2.0.jar Download https://dl.google.com/dl/android/maven2/com/android/tools/build/gradle/3.2.0/gradle-3.2.0.jar Download https://dl.google.com/dl/android/maven2/com/android/tools/ddms/ddmlib/26.2.0/ddmlib-26.2.0.jar Download https://dl.google.com/dl/android/maven2/com/android/tools/sdk-common/26.2.0/sdk-common-26.2.0.jar Download https://dl.google.com/dl/android/maven2/com/android/tools/sdklib/26.2.0/sdklib-26.2.0.jar Download https://dl.google.com/dl/android/maven2/com/android/tools/build/builder-test-api/3.2.0/builder-test-api-3.2.0.jar Download https://dl.google.com/dl/android/maven2/com/android/tools/layoutlib/layoutlib-api/26.2.0/layoutlib-api-26.2.0.jar Download https://dl.google.com/dl/android/maven2/com/android/tools/dvlib/26.2.0/dvlib-26.2.0.jar Download https://dl.google.com/dl/android/maven2/com/android/tools/repository/26.2.0/repository-26.2.0.jar Download https://dl.google.com/dl/android/maven2/com/android/tools/common/26.2.0/common-26.2.0.jar Download https://repo.maven.apache.org/maven2/org/jetbrains/kotlin/kotlin-stdlib-jre8/1.2.0/kotlin-stdlib-jre8-1.2.0.jar Download https://repo.maven.apache.org/maven2/com/mobidevelop/robovm/robovm-dist-compiler/2.3.5/robovm-dist-compiler-2.3.5.jar Download https://repo.maven.apache.org/maven2/com/mobidevelop/robovm/robovm-debugger/2.3.5/robovm-debugger-2.3.5.jar Download https://dl.google.com/dl/android/maven2/com/android/tools/build/builder-model/3.2.0/builder-model-3.2.0.jar Download https://dl.google.com/dl/android/maven2/com/android/tools/analytics-library/protos/26.2.0/protos-26.2.0.jar Download https://dl.google.com/dl/android/maven2/com/android/tools/build/apkzlib/3.2.0/apkzlib-3.2.0.jar Download https://dl.google.com/dl/android/maven2/com/android/tools/build/apksig/3.2.0/apksig-3.2.0.jar Download https://repo.maven.apache.org/maven2/com/mobidevelop/robovm/robovm-compiler/2.3.5/robovm-compiler-2.3.5.jar Download https://repo.maven.apache.org/maven2/com/googlecode/json-simple/json-simple/1.1.1/json-simple-1.1.1.jar Download https://dl.google.com/dl/android/maven2/com/android/tools/annotations/26.2.0/annotations-26.2.0.jar Download https://dl.google.com/dl/android/maven2/com/android/databinding/baseLibrary/3.2.0/baseLibrary-3.2.0.jar Download https://dl.google.com/dl/android/maven2/androidx/databinding/databinding-common/3.2.0/databinding-common-3.2.0.jar Download https://repo.maven.apache.org/maven2/org/jetbrains/kotlin/kotlin-stdlib-jre7/1.2.0/kotlin-stdlib-jre7-1.2.0.jar Download https://repo.maven.apache.org/maven2/org/jetbrains/kotlin/kotlin-stdlib/1.2.20/kotlin-stdlib-1.2.20.jar Download https://repo.maven.apache.org/maven2/org/apache/commons/commons-exec/1.0.1/commons-exec-1.0.1.jar Download https://repo.maven.apache.org/maven2/com/mobidevelop/robovm/robovm-libimobiledevice/2.3.5/robovm-libimobiledevice-2.3.5.jar Download https://repo.maven.apache.org/maven2/com/googlecode/plist/dd-plist/1.16/dd-plist-1.16.jar Download https://repo.maven.apache.org/maven2/org/ow2/asm/asm-debug-all/5.0.3/asm-debug-all-5.0.3.jar Download https://repo.maven.apache.org/maven2/org/simpleframework/simple-xml/2.7/simple-xml-2.7.jar Download https://repo.maven.apache.org/maven2/com/mobidevelop/robovm/robovm-llvm/2.3.5/robovm-llvm-2.3.5.jar Download https://repo.maven.apache.org/maven2/com/mobidevelop/robovm/robovm-soot/2.5.0-5/robovm-soot-2.5.0-5.jar Download https://repo.maven.apache.org/maven2/junit/junit/4.10/junit-4.10.jar Download https://repo.maven.apache.org/maven2/org/hamcrest/hamcrest-core/1.1/hamcrest-core-1.1.jar Download https://dl.google.com/dl/android/maven2/com/android/tools/build/gradle-api/3.2.0/gradle-api-3.2.0.jar WARNING: Configuration 'compile' is obsolete and has been replaced with 'implementation' and 'api'. It will be removed at the end of 2018. For more information see: http://d.android.com/r/tools/update-dependency-configurations.html :android:clean UP-TO-DATE :core:clean UP-TO-DATE :desktop:clean UP-TO-DATE :html:clean UP-TO-DATE :ios:clean UP-TO-DATE Deprecated Gradle features were used in this build, making it incompatible with Gradle 5.0. See https://docs.gradle.org/4.6/userguide/command_line_interface.html#sec:command_line_warnings BUILD SUCCESSFUL in 1m 15s 5 actionable tasks: 5 up-to-date Done! To import in Eclipse: File -> Import -> Gradle -> Gradle Project To import to Intellij IDEA: File -> Open -> build.gradle To import to NetBeans: File -> Open Project... |
Once the Build Successful message is shown you can start to import the project into your preferred IDE.
Eclipse
In order to import the gradle project into your eclipse IDE go to File > import

Then select Gradle > Existing Gradle Project

Browse for the top level folder (This will be the same as the text you entered in the Name section of the project generator) and click finish to import the projects.
Now the project should be in your eclipse workspace and available for code editing. Projects like the HTML and android may still have issues as they may require additional steps e.g. installing and setting up GWT.
Android Studio
Android studio is by far the easiest IDE to add a libGDX project to as you simple need to open an existing Android Studio Project.
 Navigate to the top level folder of your application (This will be the same as the text you entered in the Name section of the project generator)
Click OK and the project will be imported. One isse that may appear when importing is a popup message asking to upgrade Gradle. In my opinion this is not required and may in fact cause issues with your project setup. 
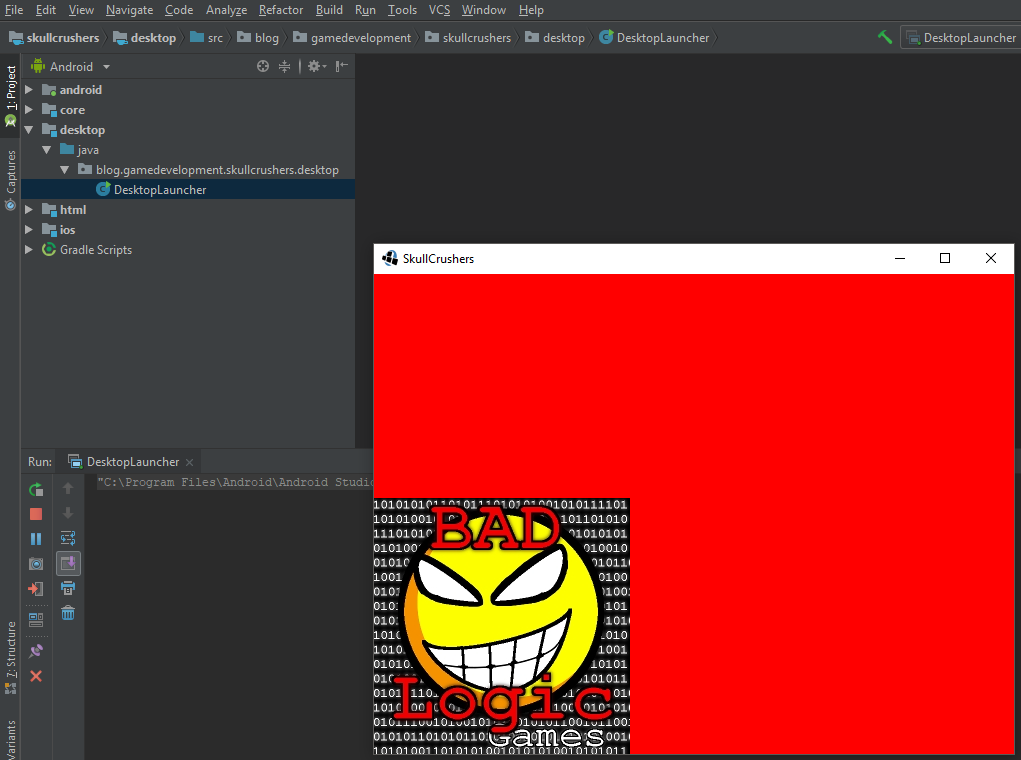
Once done you should end up with a screen like the image above and you can start to edit the code within the project.
Android Studio Running Desktop Configuration
If you try to run the desktop configuration in android studio you will most likely be prompted with an error saying that the badlogic.jpg file cannot be found. This is due to Android studio not setting the working directory for the desktop version to the Android asset folder. If you’re like me and prefer to test on the desktop first then you will need to follow these steps to set the working directory to the android assets folder before testing.
Step 1
 Try to run the desktop version if you haven’t already tried. This creates a configuration for the desktop mode that can then be edited to set the working directory.
Step 2
 Select Run from the top menu and scroll to edit configurations…
Step 3
 Select the Desktop Launcher configuration and hit the […] button next to the working directory input box and navigate to the android > assets folder
Last Step
Select OK and then you should be able to run the Desktop launcher.