
What is a texture filter?
A texture filter is an openGL process for taking pixel information from a texture for rendering. There will be 2 filters defined for each texture. One filter for rendering the texture bigger than it is and one for rendering smaller than it is. The default texture filter for a texture is nearest-nearest, which means that when a texture is rendered larger or smaller than it is, each pixel of the rendered image will take the pixel closest to the point being rendered.
The example below shows what happens to an 8 pixel image when it is rendered smaller with the nearest filter.
 In the image, you can see that 4 of the colours from the top image(original texture) have disappeared in the bottom texture(rendered output) because OpenGL has taken a single pixels colour information and that pixel was the one nearest the point being drawn. This process of choosing what colour is rendered from the texture is whats known as the texture filter.

Above you can see what happens to the pixels when we enlarge an image with the texture filter set to nearest. When we double the size it looks good because the proportions match the original image. However, when we only increase the image by a small amount our perfectly preportioned rainbow now has more red, green and pink compared to other pixels.
Why should I care?
Using the wrong texture filter will not only make your application look worse but could also severely increase processing time. As an example, I have used a picture of my old car which is 4032px by 3024px and is being squished into a 378px by 672px screen. As you can see there is quite a difference. The image on the left uses a MipMapLinerNearest filter for the minFilter and on the right is a standard Nearest minFilter.
 The important thing to notice between these 2 images is that using the MipMapLinerNearest filter makes lines still appear smoothe but loses detail in the finer areas such as the road or grass. Whereas the nearest filter keeps the detail of the grass and road but makes the lines appear jagged.
MinFilter and MagFilter.
What is the difference between the minFilter and magFilter? This is simply when a texture is being rendered larger, OpenGl will use the filter set in magFilter (Magnification Filter) and when the texture is being rendered smaller, it will use the minFilter(minification Filter). So why do we have 2 texture filter parameters? Well, let’s take a pixel art game as an example. Pixel art is all about hard lines between different colours, there is no blurring between the colours which is what you want. Well for that you need the nearest filter on both the minFilter and magFilter and using as the linear filter would lead to blurring between colours as seen in the car image above on the left. Now, let’s look at a game with high definition images. This game will probably need the nearest filter on the magFilter to preserve the details and the linear filter on the minFilter so the lines are preserved when the image is shrunk.
The Nearest Texture Filter.
As used in the examples above, the nearest texture filter uses the pixel from the texture which is closest to the point being rendered. As an example, if we had a 2px by 2px texture which was black on the left and white on the right and we rendered it as 3px by 3px the middle pixels would have to be populated by either the white or the black pixel of the texture. The colour will most likely be white as the values 0.0 to 0.499 fall on the left and 0.5-1.0 fall on the right and the point in the very centre of the pixel would be 0.5 which is the pixel on the right(white).

The Linear Texture Filter.
We’ve spoken about the nearest filter a lot but we haven’t talked about the linear filter at all. So what is the linear filter and how is it different from the nearest filter. Well, the nearest filter uses a single pixel but the linear filter uses the four nearest pixels and combines them to create a new pixel.
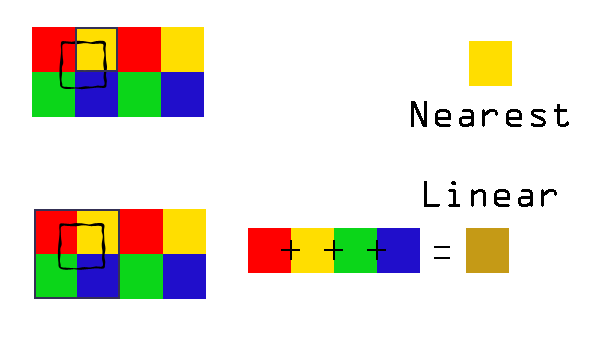
The image above shows how the nearest filter picks the yellow pixel because it’s closest to the centre of the black square. In the linear example below it, you can see that the four colours red, yellow, green and blue are combined to create a browny orange. This texture filter is good when shrinking a texture because it more accurately represents what happens in real life when looking at objects far away.
Mipmaps
Mipmaps are images which contain the original image + a half-sized version of the original image and a half sized version of that image and so on until it is 1 pixel on either its height or width. This allows OpenGL to choose the image best suited for rendering on the screen size of the device and then applying the texture filtering techniques to pick the pixel for rendering.

The above image is an example of a mipmapped file. As you can see the largest image on the left is the original image. All the images on the right are progressively smaller images of the original image.
MipMap Texture Filters.
In LibGDX there are 4 mipmap texture filters which can be used. They all require the texture to be loaded with the mipmap flag set to true to generate the mipmaps for the texture. The texture filters are named like this GL_[filter]_MIPMAP_[mipmap-filter]. So for a filter that uses the linear method to pick the pixels and a nearest method to pick the right mipmap image you would use GL_LINEAR_MIPMAP_NEAREST.

GL_NEAREST_MIPMAP_NEAREST (MipMapNearestNearest)is the least performance intensive and will choose the mipmap image that is the closest size to the rendered image and then use the nearest pixel of that mipmap image to render.
GL_LINEAR_MIPMAP_NEAREST(MipmapLinearNearest) is slightly more costly than the previous method and this will choose the mipmap image closest in size to the rendered image and then use the linear process to pick a pixel colour.
GL_NEAREST_MIPMAP_LINEAR(MipmapNearestLinear) is even more costly than the previous method. This time two mipmap images will be selected which are closest to the rendered image size and then the nearest pixel on each image will be combined to create the pixel for rendering.
GL_LINEAR_MIPMAP_LINEAR(MipmapLinearLinear) is the most costly performance wise as it takes the two closest mipmap images and then takes 4 pixels from each and combines them all to create the pixel for rendering.
Conclusion
In terms of speed, your best bet is to use the Nearest Nearest Texture filter as this requires the least amount of processing power when minifying or magnifying your texture, however, this does leave you with jagged edges, which on anything other than a pixel art style game can look rather bad. After the NearestNearest filter, the best filter for a mix between performance and aesthetics would be the MipmapLinearNearest(GL_LINEAR_MIPMAP_NEAREST) which chooses the closest mipmap image and applies linear filtering to create a pixel colour to render.
I hope this guide helps you understand what texture filtering is and how it works so you can create much faster and better looking applications.
For a more in-depth look at texture filtering, you can look into Texture Filtering or Sampler Object Filtering on Wikipedia. Another good read on how the mipmap filters were updated in libgdx can be found here.