The LibGDX Project Generator
If your creating a project in LibGDX then your probably making a game. This guide will be aimed at those people making games, however, most of this guide can be applied to other projects using libgdx. To make this as simple as possible we will be using the LibGDX project generator which is available from https://bitly.com/1i3C7i3 and will set up all your projects for all platforms. The project generator will allow you to create each platforms respective projects and it will also allow you to choose which extensions are included. Extensions are optional extras which can add useful tools or frameworks adding extra functionality to your game. Box2d for example is an extension which allows you to create games that have gravity and physics.
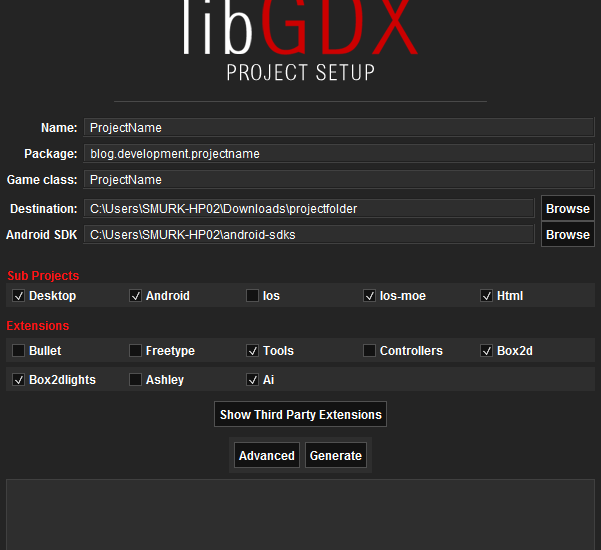
Once you have downloaded the project generator you can open it to reveal a form to add all your project specific information, such as game name, SDK location, project platforms and optional extensions.
Project Generator Options
- Project Name
- The name of your project. This is usually written out all in lowercase with minus separators. E.g. skull-crushers
- Package
- This is the package for your game. Typically this is your domain in reverse with your game name. E.g. blog.gamedevelopment.skullcrushers
- Game Class
- This is the name of the main class for your game in Camel case. E.g. SkullCrushers
- Destination
- The location your project will be placed on your storage media. E.g. c:\projects\skullcrushers
- Android SDK
- This is the location of your installed Android SDK. Usual Android SDK location for windows is c:\Users\<username>\AppData\Local\Android\sdk. If you open the Android Sdk manager the path will be displayed on the status bar.

- This is the location of your installed Android SDK. Usual Android SDK location for windows is c:\Users\<username>\AppData\Local\Android\sdk. If you open the Android Sdk manager the path will be displayed on the status bar.
- Sub Projects
- This is where you select which platforms you want projects for. The options are:
- Desktop: For projects that run on a typical desktop environment such as windows or *nix.
- Android: For Android devices such as phones and tablets.
- IOS: For Apple IPhones, IPads using MobiDevelop’s RoboVM fork
- IOS-moe: Again for IPhones and Ipads using Intel’s Multi-OS Engine backend.
- HTML: For browser applications.
- This is where you select which platforms you want projects for. The options are:
- Extensions
- These are extensions you can add to your application. The current extensions are:
- Bullet: A 3D Collision Detection and Rigid Body Dynamics Library for use with 3D games.
- Freetype: An Extension to allow use of Freetype fonts.
- Tools: A collection of tools such as:
- Texture packer: packs images into larger files to increase performance.
- Hiero: for creating Bitmap fonts.
- 2D and 3D Particle Editor: To create 2D or 3D particle Effects.
- Controllers: An Extension to add support for wired peripheral controllers such as the xbox controller.
- Box2D: An Extension which allows you to add 2D physics to your game.
- Box2DLights: An extension to use with Box2D to create lighting effects using ray-casting.
- Ashley: A Component Entity Engine. More can be found out about this on www.gamedev.net
- AI: This extension adds support for AI based Movement, Path finding and decision making.
- These are extensions you can add to your application. The current extensions are:
- Third Party Extensions
- These are extensions added by third parties that can be used in LibGDX.
- Advanced Options:
- Maven Mirror URL: used to replace the default Maven Repository
- IDEA and Eclipse: used to select the project types that are created. IDEA for Intellij IDE and Eclipse for Eclipse IDE.
- Offline Mode: Used to disable the dependency download in your projects.
LibGDX Project Generator – Creating a project
Once you have entered all your project specifics you can click the Generate button to generate your project files. You may get a couple of error messages as soon as you click the generate button like this:
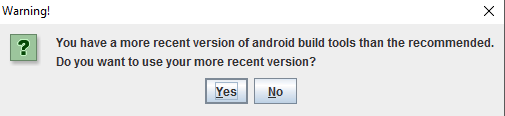
Click Yes for both to use the more recent versions. Once done you should see a build successful notification in the project generator console similar to the image below.

This shows that the project structure has been completed and is ready to be imported into Eclipse. You can now close the project generator and open your eclipse IDE.
Once eclipse is open proceed to file > import and select Gradle > Gradle project and click next. You will then be shown the Gradle import project window. From here browse to your project location, this is the location you specified in the destination field of the LibGDX project Generator. I used C:\Users\darkd\workspace\skullcrushers. Click build model to show the possible projects and select all projects. You will then see a window similar to the one below.
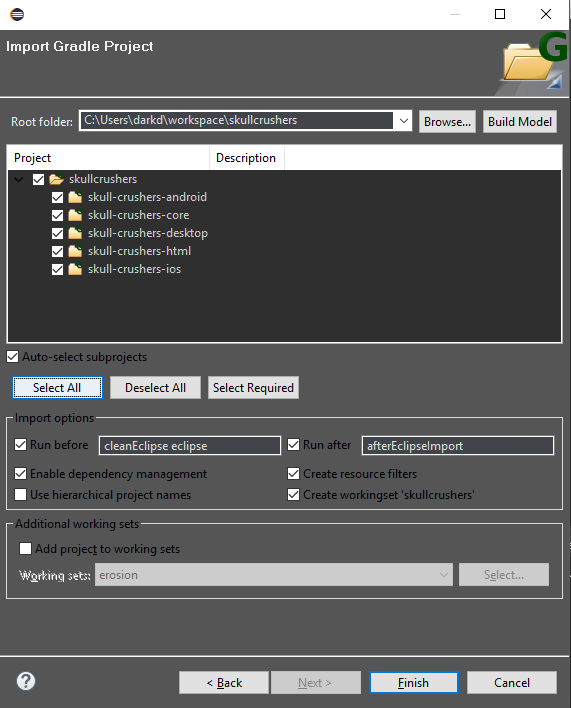
Click Finish to import the project. Eclipse will then attempt to import your project and build it with Gradle. The console will output the outcome of this and should look similar to the image below:

If you selected yes to the “use the more recent versions” error message you will see an “unable to resolve target android-xx” error on your android project. This is expected and can be fixed by updating the project to use the correct android target.

Right click the android project and select properties. Now select the android tab and select the android target available to you. For me I was able to select Android 6.0 version 23, now click “OK” and all your projects should be error free.
LibGDX Project Generator – Verifying the project works.
With an installed project you can now test them be running them in eclipse. In order to run them you need to specify all the run configurations. We will test both the Desktop version and the android version.
Desktop
To test the desktop version right click the project and select run as and then select Java Application. You will then be prompted with a list of classes, you need to select the DesktopLauncher class as shown in the image below:

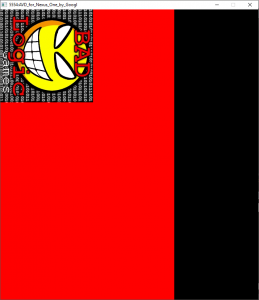
Click OK and your project should run and display a window with the BadLogic image which is the default application and shows that the project is working. Other classes such as Hiero, ImagePacker and ParticleEditor are launchers for their respective tools and will open those for use.
Android
Right click the android project and select run as > android application. If you have a default virtual android device set up already it will start the virtual device and display the Bad Logic logo. If you haven’t created a virtual device yet you can view this Stack overflow question which shows how to create one.
Example output for the Android Virtual Device: