

Full LibGDX Game Tutorial – General Improvements
Welcome to part 15 of our Full LibGDX Game Tutorial. This part will focus on general improvements to the game like adding textures, better level generation etc. If you haven’t seen the earlier parts of this tutorial I advise you to start at Full LibGDX Game Tutorial – Project setup as this tutorial continues from these earlier parts. For those of you who have come from part 14, you can continue on.
In this part, we will be replacing our old simplex noise generation code with the OpenSimplexNoise. We will also be changing the code in the levelFactory to be more readable and reusable. Finally, we will update the end screen to show the user their score with a button to go back to the main menu. Later we will be adding the ability to post the high score on a leaderboard.
General Improvements – Open Simplex Noise
The OpenSimplexNoise is available from github.com. This is similar to the one we have already, however, the output values are more consistent than the one we are using at the moment and this will make it easier for us to use in our game.
Add the OpenSimplexNoise to your simplexnoise package so we can use it in our game. Once done, update your levelFactory to match this code:
|
1 2 3 4 5 6 7 8 9 10 11 12 13 14 15 16 17 18 19 20 21 22 23 24 25 26 27 28 29 30 31 32 33 34 35 36 37 38 39 40 41 42 43 44 45 46 47 48 49 50 51 52 53 54 55 56 |
public LevelFactory(PooledEngine en, TextureAtlas atlas){ engine = en; this.atlas = atlas; floorTex = DFUtils.makeTextureRegion(40*RenderingSystem.PPM, 0.5f*RenderingSystem.PPM, "111111FF"); enemyTex = DFUtils.makeTextureRegion(1*RenderingSystem.PPM,1*RenderingSystem.PPM, "331111FF"); bulletTex = DFUtils.makeTextureRegion(10,10,"444444FF"); platformTex = DFUtils.makeTextureRegion(2*RenderingSystem.PPM, 0.1f*RenderingSystem.PPM, "221122FF"); world = new World(new Vector2(0,-10f), true); world.setContactListener(new B2dContactListener()); bodyFactory = BodyFactory.getInstance(world); // create a new SimplexNoise (size,roughness,seed) //sim = new SimplexNoise(1024, 1f, MathUtils.random(3)); openSim = new OpenSimplexNoise(MathUtils.random(2000l)); //simRough = new SimplexNoise(512, 1, MathUtils.random(3)); } /** Creates a pair of platforms per level up to yLevel * @param ylevel */ public void generateLevel(int ylevel){ while(ylevel > currentLevel){ int range = 15; for(int i = 1; i < 5; i ++){ generateSingleColumn(genNForL(i * 1,currentLevel) ,genNForL(i * 100,currentLevel) ,genNForL(i * 200,currentLevel) ,genNForL(i * 300,currentLevel) ,range,i * 10); } currentLevel++; } } // generate noise for level private float genNForL(int level, int height){ return (float)openSim.eval(height, level); } private void generateSingleColumn(float n1, float n2,float n3,float n4, int range, int offset){ if(n1 > -0.8f){ createPlatform(n2 * range + offset ,currentLevel * 2); if(n3 > 0.3f){ // add bouncy platform createBouncyPlatform(n2 * range + offset,currentLevel * 2); } if(n4 > 0.2f){ // add an enemy createEnemy(enemyTex,n2 * range + offset,currentLevel * 2 + 1); } } } |
Here we added a new method called genNforL that takes the level(the height of the player) and the height (the layer of noise). This will generate the noise value for the level we provide. This is purely for readability in our generateLevel method. If you look at the generateLevel method you will now see we replaced all the noise generation with a for loop which calls the generateSingleColumn method. This method will generate a single column of platforms based on the noise values passed in. This allows us to reuse this code by changing the offset so another column can be created next to our previous column.
Now when you run the game the world should look similar to this:

This should be a lot easier for our player to traverse allowing them to get higher and reduce the possibility of impossible sections.
General Improvements – Springs to Teleporters
All the extra platforms mean that the springs we created are pretty much useless most of the time as a platform is likely to be over it. In order to fix this, we will change the spring from shooting a player up to teleporting a player up higher. This is done in the playerController:
|
1 2 3 4 5 6 7 |
// make player teleport higher if(player.onSpring){ //b2body.body.applyLinearImpulse(0, 175f, b2body.body.getWorldCenter().x,b2body.body.getWorldCenter().y, true); // old b2body.body.setTransform(b2body.body.getPosition().x, b2body.body.getPosition().y+ 10, b2body.body.getAngle()); // new //state.set(StateComponent.STATE_JUMPING); //old removed player.onSpring = false; } |
Now when you land on a Spring you are teleported 10 units higher. Now we have a better level generation process let’s update the player and bullets so they have animations.
General Improvements – Bullet Animation
We will need to add 2 new sprite animation sheets to our project. For the purpose of this tutorial, I will use 2 different methods to load the animation. One will be a series of images that we will turn into an animation and the other will be a sprite sheet that we will convert to an animation using an extra function added to the DFUtils class. Let’s start by adding the new function to our DFUtils class:
|
1 2 3 4 5 6 7 8 9 10 11 12 13 14 15 16 |
public static TextureRegion[] spriteSheetToFrames(TextureRegion region, int FRAME_COLS, int FRAME_ROWS){ // split texture region TextureRegion[][] tmp = region.split(region.getRegionWidth() / FRAME_COLS, region.getRegionHeight() / FRAME_ROWS); // compact 2d array to 1d array TextureRegion[] frames = new TextureRegion[FRAME_COLS * FRAME_ROWS]; int index = 0; for (int i = 0; i < FRAME_ROWS; i++) { for (int j = 0; j < FRAME_COLS; j++) { frames[index++] = tmp[i][j]; } } return frames; } |
This function takes a texture region which contains all of our animation frames then splits them into a 2d array. An animation only takes a 1d array so we have to compact the 2d array into a single array which is then returned. In order for an entity to be animated, it requires the AnimationComponent and StateComponent. The StateComponent is used to choose which animation to play This allows us to have a different animation for jumping, moving, falling, shooting etc. We will do the Bullets first which don’t have any states other than the normal state but the state component is still required. Update your LevelFactory’s createBullet method to match this:
|
1 2 3 4 5 6 7 8 9 10 11 12 13 14 15 16 17 18 19 20 21 22 23 24 25 26 27 28 29 30 31 32 33 34 35 36 37 38 |
public Entity createBullet(float x, float y, float xVel, float yVel){ System.out.println("Making bullet"+x+":"+y+":"+xVel+":"+yVel); Entity entity = engine.createEntity(); B2dBodyComponent b2dbody = engine.createComponent(B2dBodyComponent.class); TransformComponent position = engine.createComponent(TransformComponent.class); TextureComponent texture = engine.createComponent(TextureComponent.class); AnimationComponent animCom = engine.createComponent(AnimationComponent.class); StateComponent stateCom = engine.createComponent(StateComponent.class); TypeComponent type = engine.createComponent(TypeComponent.class); CollisionComponent colComp = engine.createComponent(CollisionComponent.class); BulletComponent bul = engine.createComponent(BulletComponent.class); b2dbody.body = bodyFactory.makeCirclePolyBody(x,y,0.5f, BodyFactory.STONE, BodyType.DynamicBody,true); b2dbody.body.setBullet(true); // increase physics computation to limit body travelling through other objects bodyFactory.makeAllFixturesSensors(b2dbody.body); // make bullets sensors so they don't move player position.position.set(x,y,0); texture.region = bulletTex; Animation anim = new Animation(0.05f,DFUtils.spriteSheetToFrames(atlas.findRegion("FlameSpriteAnimation"), 7, 1)); anim.setPlayMode(Animation.PlayMode.LOOP); animCom.animations.put(0, anim); type.type = TypeComponent.BULLET; b2dbody.body.setUserData(entity); bul.xVel = xVel; bul.yVel = yVel; entity.add(bul); entity.add(colComp); entity.add(b2dbody); entity.add(position); entity.add(texture); entity.add(animCom); entity.add(stateCom); entity.add(type); engine.addEntity(entity); return entity; } |
In order to use the animation, you will need to add the sprite sheet images to your assets. You can download the sprite sheet from opengameart.org and add it yourself with the texture packer or you can download the already packed game.png(the image below) and game.atlas(the text below)

|
1 2 3 4 5 6 7 8 9 10 11 12 13 14 15 16 17 18 19 20 21 22 23 24 25 26 27 28 29 30 31 32 33 34 35 36 37 38 39 40 41 42 43 44 45 46 47 48 49 50 51 52 53 54 55 56 57 58 59 60 61 62 63 64 65 66 67 68 69 70 71 72 73 74 |
game.png format: RGBA8888 filter: MipMapLinearLinear,MipMapLinearLinear repeat: none FlameSpriteAnimation rotate: false xy: 1, 101 size: 168, 24 orig: 168, 24 offset: 0, 0 index: -1 flame_a rotate: false xy: 1, 35 size: 64, 64 orig: 64, 64 offset: 0, 0 index: 1 flame_a rotate: false xy: 67, 35 size: 64, 64 orig: 64, 64 offset: 0, 0 index: 2 flame_a rotate: false xy: 133, 35 size: 64, 64 orig: 64, 64 offset: 0, 0 index: 3 flame_a rotate: false xy: 199, 61 size: 64, 64 orig: 64, 64 offset: 0, 0 index: 4 flame_a rotate: false xy: 265, 61 size: 64, 64 orig: 64, 64 offset: 0, 0 index: 5 flame_a rotate: false xy: 331, 61 size: 64, 64 orig: 64, 64 offset: 0, 0 index: 6 enemy rotate: false xy: 1, 1 size: 32, 32 orig: 32, 32 offset: 0, 0 index: -1 platform rotate: false xy: 199, 43 size: 48, 16 orig: 48, 16 offset: 0, 0 index: -1 player rotate: false xy: 397, 93 size: 32, 32 orig: 32, 32 offset: 0, 0 index: -1 |
In the code, we have added atlas.findRegion(“FlameSpriteAnimation”) to get the animation from the atlas. We then pass it to the DFUtils function we created earlier to split the texture into single frames which are used to create a new animation. The animation is set to loop and added to the AnimationCompnent under state 0. state 0 is the normal state and the only state a bullet has. Now when we fire a bullet the bullet will be an animated flame.
General Improvements – Player Animation
Now to add an animation for the player. Still, in our LevelFactory we need to update our createPlayer method to this:
|
1 2 3 4 5 6 7 8 9 10 11 12 13 14 15 16 17 18 19 20 21 22 23 24 25 26 27 28 29 30 31 32 33 34 35 36 37 38 39 40 41 42 |
public Entity createPlayer(TextureRegion tex, OrthographicCamera cam){ Entity entity = engine.createEntity(); B2dBodyComponent b2dbody = engine.createComponent(B2dBodyComponent.class); TransformComponent position = engine.createComponent(TransformComponent.class); TextureComponent texture = engine.createComponent(TextureComponent.class); AnimationComponent animCom = engine.createComponent(AnimationComponent.class); PlayerComponent player = engine.createComponent(PlayerComponent.class); CollisionComponent colComp = engine.createComponent(CollisionComponent.class); TypeComponent type = engine.createComponent(TypeComponent.class); StateComponent stateCom = engine.createComponent(StateComponent.class); player.cam = cam; b2dbody.body = bodyFactory.makeCirclePolyBody(10,1,1, BodyFactory.STONE, BodyType.DynamicBody,true); // set object position (x,y,z) z used to define draw order 0 first drawn Animation anim = new Animation(0.1f,atlas.findRegions("flame_a")); //anim.setPlayMode(Animation.PlayMode.LOOP); animCom.animations.put(StateComponent.STATE_NORMAL, anim); animCom.animations.put(StateComponent.STATE_MOVING, anim); animCom.animations.put(StateComponent.STATE_JUMPING, anim); animCom.animations.put(StateComponent.STATE_FALLING, anim); animCom.animations.put(StateComponent.STATE_HIT, anim); position.position.set(10,1,0); texture.region = tex; type.type = TypeComponent.PLAYER; stateCom.set(StateComponent.STATE_NORMAL); b2dbody.body.setUserData(entity); entity.add(b2dbody); entity.add(position); entity.add(texture); entity.add(animCom); entity.add(player); entity.add(colComp); entity.add(type); entity.add(stateCom); engine.addEntity(entity); return entity; } |
The animation frames used here are from powstudios.com and are single images which have been resized to match our player size. The images were added in our texture atlas as single images with a number suffix in the name to identify the order the images should be used. This makes adding animations easier as we can load the images as a single array of texture regions straight from the atlas with atlas.findRegions(“flame_a”). The file names were flame_a_000x.png where x is the frame number. Since out player has different states we have to add an animation for each state. Later we will have a different animation for each state, but for now, a single animation will suffice.
After testing the player animation you will notice that the animation stops when doing certain actions like jumping. This is due to the way we change the player state. Currently, we are changing the state each frame which resets the animation. In order to fix this, we need to update our PlayerControlSystem to only change the state if it is not already in that state. Update you PlayerControlSystem to:
|
1 2 3 4 5 6 7 8 9 10 11 12 13 14 15 16 17 18 19 20 21 22 23 24 25 26 27 28 29 30 31 32 33 34 35 36 37 38 39 40 41 42 43 44 45 46 47 48 49 50 51 52 53 54 55 56 57 58 59 60 61 62 63 64 65 66 67 68 69 70 71 72 73 74 75 76 77 78 79 80 81 82 83 84 85 86 87 88 89 90 91 |
@Override protected void processEntity(Entity entity, float deltaTime) { B2dBodyComponent b2body = bodm.get(entity); StateComponent state = sm.get(entity); PlayerComponent player = pm.get(entity); System.out.println(state.get()); player.cam.position.y = b2body.body.getPosition().y; if(b2body.body.getLinearVelocity().y > 0 && state.get() != StateComponent.STATE_FALLING){ // NEW state.set(StateComponent.STATE_FALLING); } if(b2body.body.getLinearVelocity().y == 0){ if(state.get() == StateComponent.STATE_FALLING){ state.set(StateComponent.STATE_NORMAL); } if(b2body.body.getLinearVelocity().x != 0 && state.get() != StateComponent.STATE_MOVING){ // NEW state.set(StateComponent.STATE_MOVING); } } if(b2body.body.getLinearVelocity().y < 0 && state.get() == StateComponent.STATE_FALLING){ // player is actually falling. check if they are on platform if(player.onPlatform){ //overwrite old y value with 0 t stop falling but keep x vel b2body.body.setLinearVelocity(b2body.body.getLinearVelocity().x, 0f); } } // make player teleport higher if(player.onSpring){ //b2body.body.applyLinearImpulse(0, 175f, b2body.body.getWorldCenter().x,b2body.body.getWorldCenter().y, true); b2body.body.setTransform(b2body.body.getPosition().x, b2body.body.getPosition().y+ 10, b2body.body.getAngle()); //state.set(StateComponent.STATE_JUMPING); player.onSpring = false; } if(controller.left){ b2body.body.setLinearVelocity(MathUtils.lerp(b2body.body.getLinearVelocity().x, -7f, 0.2f),b2body.body.getLinearVelocity().y); } if(controller.right){ b2body.body.setLinearVelocity(MathUtils.lerp(b2body.body.getLinearVelocity().x, 7f, 0.2f),b2body.body.getLinearVelocity().y); } if(!controller.left && ! controller.right){ b2body.body.setLinearVelocity(MathUtils.lerp(b2body.body.getLinearVelocity().x, 0, 0.1f),b2body.body.getLinearVelocity().y); } if(controller.up && (state.get() == StateComponent.STATE_NORMAL || state.get() == StateComponent.STATE_MOVING)){ b2body.body.applyLinearImpulse(0, 12f * b2body.body.getMass() , b2body.body.getWorldCenter().x,b2body.body.getWorldCenter().y, true); state.set(StateComponent.STATE_JUMPING); player.onPlatform = false; player.onSpring = false; } if(controller.down){ b2body.body.applyLinearImpulse(0, -5f, b2body.body.getWorldCenter().x,b2body.body.getWorldCenter().y, true); } if(player.timeSinceLastShot > 0){ player.timeSinceLastShot -= deltaTime; } if(controller.isMouse1Down){ // if mouse button is pressed //System.out.println(player.timeSinceLastShot+" ls:sd "+player.shootDelay); // user wants to fire if(player.timeSinceLastShot <=0){ // check the player hasn't just shot //player can shoot so do player shoot Vector3 mousePos = new Vector3(controller.mouseLocation.x,controller.mouseLocation.y,0); // get mouse position player.cam.unproject(mousePos); // convert position from screen to box2d world position float speed = 10f; // set the speed of the bullet float shooterX = b2body.body.getPosition().x; // get player location float shooterY = b2body.body.getPosition().y; // get player location float velx = mousePos.x - shooterX; // get distance from shooter to target on x plain float vely = mousePos.y - shooterY; // get distance from shooter to target on y plain float length = (float) Math.sqrt(velx * velx + vely * vely); // get distance to target direct if (length != 0) { velx = velx / length; // get required x velocity to aim at target vely = vely / length; // get required y velocity to aim at target } // create a bullet lvlFactory.createBullet(shooterX, shooterY, velx*speed, vely*speed); //reset timeSinceLastShot player.timeSinceLastShot = player.shootDelay; } } } |
In a couple of places we have added && state.get() != StateComponent.[some state] to check if the state is not in the state we want to change to. This fixes the problem of the animation resetting.
In the code above we also changed the jump mechanic. We changed the value used to add upward force to our player with b2body.body.applyLinearImpulse(0, 12f * b2body.body.getMass() , b2body.body.getWorldCenter().x,b2body.body.getWorldCenter().y, true); In order for this to work properly we need to update the BodyFactory and set a new density for our STONE setting. Set the stone density to 1f.
|
1 2 3 4 5 |
case STONE: fixtureDef.density = 1f; fixtureDef.friction = 0.5f; fixtureDef.restitution = 0f; break; |
Now our player should jump normally again.
General Improvements – Entity Textures
If you noticed a green flat object in our game.png file earlier you may already know that we are going to add images to our platforms..and you’d be right we are. All it is is a simple change to the LevelFactory and our platforms will have images.
![]()
If you haven’t added the platform image in your atlas yet, use the image above to add it. Then you can update your LevelFactory:
|
1 2 3 4 5 |
//replace this //platformTex = DFUtils.makeTextureRegion(2*RenderingSystem.PPM, 0.1f*RenderingSystem.PPM, "221122FF"); //with this platformTex = atlas.findRegion("platform"); |
So we have added a couple of animations and a texture for our platform but we’re still using the debug renderer. Later, we will want to turn this off completely but for now, we just want to see what the game looks like without it on. Let’s add a flag for the debug renderer that we can adjust in the code to turn the debug renderer on and off. Update your PhysicsDebugSystem:
|
1 2 3 4 5 6 7 8 9 10 11 12 13 14 15 16 17 18 19 20 21 22 23 24 25 26 27 28 29 30 31 32 33 34 35 36 37 |
package blog.gamedevelopment.box2dtutorial.entity.systems; import com.badlogic.ashley.core.Entity; import com.badlogic.ashley.core.Family; import com.badlogic.ashley.systems.IteratingSystem; import com.badlogic.gdx.graphics.OrthographicCamera; import com.badlogic.gdx.physics.box2d.Box2DDebugRenderer; import com.badlogic.gdx.physics.box2d.World; public class PhysicsDebugSystem extends IteratingSystem { private Box2DDebugRenderer debugRenderer; private World world; private OrthographicCamera camera; private boolean debug = false; // turn off with false on with true @SuppressWarnings("unchecked") public PhysicsDebugSystem(World world, OrthographicCamera camera){ super(Family.all().get()); debugRenderer = new Box2DDebugRenderer(); this.world = world; this.camera = camera; } @Override public void update(float deltaTime) { super.update(deltaTime); if (debug) debugRenderer.render(world, camera.combined); } @Override protected void processEntity(Entity entity, float deltaTime) { } } |
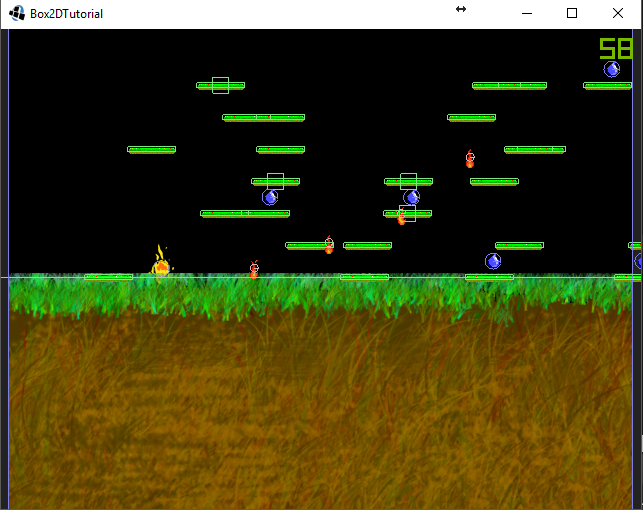
Now, when you run the game you won’t see the debug renderer and will only see the animations and textures we have added. Which should look something similar to this:

The enemies are hard to see due to the colour I chose the use, but that doesn’t matter because we’re going to give them a new texture. What texture is that? well it this awesome super texture created by me:
![]()
That masterpiece needs to be added to your assets via that texture packer. As we did before for the platform texture we change a single line of code in the LevelFactory:
|
1 2 3 4 5 |
// Change this //enemyTex = DFUtils.makeTextureRegion(1*RenderingSystem.PPM,1*RenderingSystem.PPM, "331111FF"); // to this enemyTex = atlas.findRegion("waterdrop"); |
And voila:
General Improvements – Water Floor
To make this a bit more aesthetically pleasing we need to add some items for the teleporter/springs, however, I want to use a particle system for those so that will be done in the next part of the tutorial. To make the game a bit more fun and playable we will limit the distance the water can be from the player which will increase the urgency of the player moving upwards. To do that we will check the water position and if it is too far move it up. So let’s edit the WaterFloorSystem:
|
1 2 3 4 |
// make sure water doesn't get too far behind if(bod.getPosition().y < currentyLevel - 50){ bod.setTransform(bod.getPosition().x, currentyLevel - 50, bod.getAngle()); } |
Since the water is now going to follow us we will want to be able to top see it. We will also want to see the floor when we start so we don’t look like we’re floating when we start the game. So let’s add the floor texture and the water texture:


Add these 2 images to your texture atlas, or make your own and add them to your atlas. Then update you LevelFactory class and update this code:
|
1 2 |
floorTex = atlas.findRegion("reallybadlydrawndirt"); waterTex = atlas.findRegion("water"); |
You should now have something similar to this video:
[embedyt] https://www.youtube.com/watch?v=lFwPgxEBCAE[/embedyt]
General Improvements – End Game Screen
The final step of this tutorial is to add an end game screen that shows the player their score and has a button to go back to the main menu. Currently, we just move to the endgame screen then move back to the menu so we already have the code for these actions. All we need to do now is to add the button and make the button trigger the screen change. The first thing we need to is to add a last Score variable to our Box2DTutorial class so that we can pass it to our endScreen to display. Simply add this code to the Box2DTutorial after the other variables:
|
1 |
public int lastScore = 0; |
Now we need to set this value when the player dies. We already check for the player death in the MainScreen so let’s update it to not only check for death but also update score in the Box2DTutorial class.
|
1 2 3 4 5 6 7 |
//check if the player is dead. if so show end screen PlayerComponent pc = (player.getComponent(PlayerComponent.class)); if(pc.isDead){ DFUtils.log("YOU DIED : back to menu you go!"); parent.lastScore = (int) pc.cam.position.y; parent.changeScreen(Box2DTutorial.ENDGAME); } |
Finally, we need to update the EndScreen:
|
1 2 3 4 5 6 7 8 9 10 11 12 13 14 15 16 17 18 19 20 21 22 23 24 25 26 27 28 29 30 31 32 33 34 35 36 37 38 39 40 41 42 43 44 45 46 47 48 49 50 51 52 53 54 55 56 57 58 59 60 61 62 63 64 65 66 67 68 69 70 71 72 73 74 75 76 77 78 79 80 81 82 83 84 85 86 87 88 89 90 91 92 93 94 95 96 97 98 99 100 101 102 103 104 105 106 107 108 109 110 111 112 113 114 115 116 117 |
package blog.gamedevelopment.box2dtutorial.views; import blog.gamedevelopment.box2dtutorial.Box2DTutorial; import blog.gamedevelopment.box2dtutorial.DFUtils; import com.badlogic.gdx.Gdx; import com.badlogic.gdx.Screen; import com.badlogic.gdx.graphics.GL20; import com.badlogic.gdx.graphics.g2d.TextureAtlas; import com.badlogic.gdx.graphics.g2d.TextureAtlas.AtlasRegion; import com.badlogic.gdx.scenes.scene2d.Actor; import com.badlogic.gdx.scenes.scene2d.Stage; import com.badlogic.gdx.scenes.scene2d.ui.Label; import com.badlogic.gdx.scenes.scene2d.ui.Skin; import com.badlogic.gdx.scenes.scene2d.ui.Table; import com.badlogic.gdx.scenes.scene2d.ui.TextButton; import com.badlogic.gdx.scenes.scene2d.utils.ChangeListener; import com.badlogic.gdx.scenes.scene2d.utils.TiledDrawable; import com.badlogic.gdx.utils.Align; import com.badlogic.gdx.utils.viewport.ScreenViewport; public class EndScreen implements Screen { private Box2DTutorial parent; private Skin skin; private Stage stage; private TextureAtlas atlas; private AtlasRegion background; public EndScreen(Box2DTutorial box2dTutorial){ parent = box2dTutorial; } @Override public void show() { // get skin skin = parent.assMan.manager.get("skin/glassy-ui.json"); atlas = parent.assMan.manager.get("images/loading.atlas"); background = atlas.findRegion("flamebackground"); // create button to go back to manu TextButton menuButton = new TextButton("Back", skin, "small"); // create button listener menuButton.addListener(new ChangeListener() { @Override public void changed(ChangeEvent event, Actor actor) { DFUtils.log("To the MENU"); parent.changeScreen(Box2DTutorial.MENU); } }); // create stage and set it as input processor stage = new Stage(new ScreenViewport()); Gdx.input.setInputProcessor(stage); // create table to layout iutems we will add Table table = new Table(); table.setFillParent(true); table.setDebug(true); table.setBackground(new TiledDrawable(background)); //create a Labels showing the score and some credits Label labelScore = new Label("You score was "+parent.lastScore+" Meters", skin); Label labelCredits = new Label("Credits:", skin); Label labelCredits1 = new Label("Game Design by", skin); Label labelCredits2 = new Label("gamedevelopment.blog", skin); Label labelCredits3 = new Label("Art Design by", skin); Label labelCredits4 = new Label("Random stuff off the internet", skin); // add items to table table.add(labelScore).colspan(2); table.row().padTop(10); table.add(labelCredits).colspan(2); table.row().padTop(10); table.add(labelCredits1).uniformX().align(Align.left); table.add(labelCredits2).uniformX().align(Align.left); table.row().padTop(10); table.add(labelCredits3).uniformX().align(Align.left); table.add(labelCredits4).uniformX().align(Align.left); table.row().padTop(50); table.add(menuButton).colspan(2); //add table to stage stage.addActor(table); } @Override public void render(float delta) { // clear the screen ready for next set of images to be drawn Gdx.gl.glClearColor(0f, 0f, 0f, 1); Gdx.gl.glClear(GL20.GL_COLOR_BUFFER_BIT); stage.act(); stage.draw(); } @Override public void resize(int width, int height) { // change the stage's viewport when teh screen size is changed stage.getViewport().update(width, height, true); } @Override public void pause() {} @Override public void resume() {} @Override public void hide() {} @Override public void dispose() {} } |
All of the code above has been seen before when we created the MainMenu so no explanation should be necessary. You should now have a game that starts with a loading screen, goes to the main menu where the player can update preferences, quit and play the game. The player can now play the game and when they die are prompted with the end game screen which shows their score and returns to the menu.
We now have a full game, granted it’s missing a few things like music, sounds, pretty effects, challenging play and finesse but these can be added later and people can start playing the game. This is where the fun starts, we can start thinking about what other things we want in our game, do we want to add new enemies or some traps like falling rocks or hidden panels that shoot arrows. Do we add an AI character that we have to race or do we add new bonus items like power-ups that make us shoot faster or give our player different weapons to use against the enemies? Since we used the Ashley framework we can simply add new items with a few components and a new system easily whenever we want.
Over the next few tutorials, we will aim to add some particle effects to cover the pretty effects need and maybe move into AI for the enemies to make the game more challenging.
As usual here is a download of the complete project from stormyvids and a link to the next part Particle Effects – part 16
| ← Shooting | — Contents — | Particle Effects → |
Hi, could you put the source code (until now, part 15)?
I have a problem with animation, I see a black screen (if I set debug to true).
Also I do not see the score (I am using Android Studio 2.3.3, I to test the code for both the Desktop and Mobile version.
I’m using the latest version (libgdx-nightly-latest.zip – 15-Jul-2017 10:03)
I would compare the code, thanks for the work done so far.
Hey 5ono10,
I have added a link for downloading the full project.
I believe there have been some changes in LibGDX that requires you to define a type when creating an animation.
So
new Animation (0.1f,TextureRegImg)becomesnew Animation < TextureRegion > (0.1f,TextureRegImg)Thanks John.
Hey JOHN,
I’ve made the changes without results, I think the problem varies from the AnimationSystem class …
@Override
Protected void processEntity (entity entity, float deltaTime) {
…
if (ani.animations.containsKey (state.get ())) {
TextureComponent tex = tm.get (entity);
—> tex.region = ani.animations.get (state.get ()). GetKeyFrame (state.time, state.isLooping);
}
…
I tried to cast it but nothing changes –> tex.region = (TextureRegion) ani.animations.get(state.get()).getKeyFrame(state.time, state.isLooping);
Have you updated your AnimationComponent so that he animation types are set?
public class AnimationComponent implements Component, Poolable {
public IntMap<Animation<TextureRegion>> animations = new IntMap<Animation<TextureRegion>>();
@Override
public void reset() {
animations = new IntMap<Animation<TextureRegion>>();
}
}
Ok! Now works. 😉
However, the resolution that you have set is good only for the desktop version.
Anyway thank you for this tutorial.
That’s an incredible work, i am for 4 days following the tutorials and today i have think, if have been four days with copy-paste , how many time has been working this men to create these tutorials?.
Thank you very much.
(sorry for my english)
Hi Juanjo,
I write these tutorials myself in my spare time, which is why they’re still not finished. :p
I’m glad you like it and I hope you continue on learning and end up creating your own software/game in the future.
solo puedo disparar una sola ves